All information, illustrations and specifications in this manual are based on the latest information
available at the time of publication. We reserve the right to make changes at any time without notice.
17
2.0. Assembly
2.2. Unpacking and setting up the Terra Spike
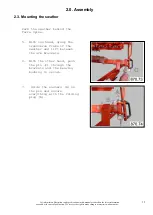
4.
The hex bolt
(D)
and the
intermediate piece
(E)
must
be removed on both sides of
the Terra Spike. These parts
have been installed only for
shipping.
5.
Raise the Terra Spike until
the pin
(F)
can be inserted
in the rear hole
(G)
in order
to secure the rear roller.
The pin
(F)
is secured with a
cotter pin
(H)
.
6.
Move the pointer
(J)
into
the uppermost position 200 on
the scale.
7.
To lower the front roller,
unlock the handle
(K)
. For
this purpose, turn the spring
bolt
(L)
outwards.
8.
Turn the handle
(K)
counterclockwise until the
front roller has reached the
0-position.
NOTE
All work is carried out on the
machine in this state.

