background image

5

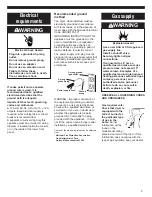
Electrical

requirements

Gas supply

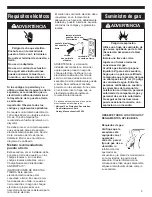
Electrical Shock Hazard

Plug into a grounded 3-prong
outlet.

Do not remove ground prong.

Do not use an adapter.

Do not use an extension cord.

Failure to follow these
instructions can result in death,
fire, or electrical shock.

WARNING

If codes permit and a separate
ground wire is used, it is
recommended that a qualified
electrician determine that the
ground path is adequate.

Important: Observe all governing
codes and ordinances.

A 120-volt, 60-Hz, AC-only, 15- or 20-
ampere fused electrical supply is
required. A time-delay fuse or circuit
breaker is recommended.

A separate circuit serving only this
appliance must be provided. A wiring
diagram is located inside the console
or on the inside of the lower front
panel.

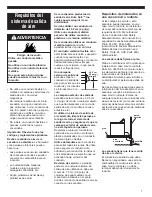
3-prong ground
type outlet

3-prong
ground plug

Power supply cord

Ground
prong

WARNING - Improper connection of
the equipment-grounding conductor
can result in a risk of electric shock.
Check with a qualified electrician or
serviceman if you are in doubt as to
whether the appliance is properly
grounded. Do not modify the plug
provided with the appliance - if it will
not fit the outlet, have a proper outlet
installed by a qualified electrician.

Copies of the standards listed may be obtained
from:

* National Fire Protection Association

One Batterymarch Park
Quincy, Massachusetts 02269

Explosion Hazard

Use a new AGA or CSA approved
gas supply line.

Install a shut-off valve.

Securely tighten all gas
connections.

If connected to LP, have a
qualified person make sure gas
pressure does not exceed 13"
water column. Examples of a
qualified person include licensed
heating personnel, authorized gas
company personnel, and
authorized service personnel.

Failure to do so can result in
death, explosion, or fire.

WARNING

OBSERVE ALL GOVERNING CODES
AND ORDINANCES.

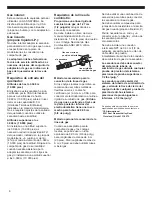
Gas requirements:

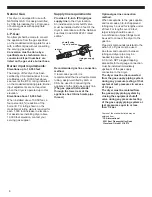
Check that dryer is
equipped with the
correct burner for
the particular type
of gas in the
home. 
Burner
information will be
found on the
model/serial rating
plate in door well of the dryer. If this
information does not agree with the
type of gas available, see your dealer.

Recommended ground
method 

The dryer, when installed, must be
electrically grounded in accordance
with local codes, or in the absence of
local codes with the National Electrical
Code, ANSI/NFPA 70*.

GROUNDING INSTRUCTIONS: This
appliance must be grounded. In the
event of malfunction or breakdown,
grounding will reduce the risk of
electric shock by providing a path of
least resistance for electric current.

The power supply cord plug must be
plugged into an appropriate outlet that
is properly installed and grounded in
accordance with all local codes and
ordinances.

Содержание 8535845

Страница 1: ...complete installation as instructed could void warranty Save Installation Instructions for local inspector s use Have questions about your dryer Call your dealer or local authorized service company When you call you will need the dryer model number and serial number Both numbers are on the model serial rating plate located in the door well behind the dryer door and on front of opening Record the n...

Страница 2: ...The location must provide Protection from weather and water Do not store or use dryer where it will be exposed to water and weather Room temperature above 45 F If room temperature is below 45 F automatic cycles may not shut off Level floor Maximum slope under entire dryer should not be more than 1 inch If slope is greater than 1 inch install Extended Dryer Feet Kit Part No 279810 Clothes may not t...

Страница 3: ...can use 3 8 approved tubing if codes and gas supplier permit Lengths over 20 feet should use larger tubing L P gas conversion Conversion must be made by a qualified technician A qualified service technician is someone experienced and trained in servicing gas equipment and familiar with necessary precautions See gas valve burner base for gas conversion kit part number Fire Hazard Use a heavy metal ...

Страница 4: ...talled The minimum unobstructed air openings are required Louvered doors with equivalent air openings are acceptable Installation clearances Use recommended clearance for easier installation Dryer dimensions Dimensions shown with feet extended 1 from bottom of dryer Most installations will require at least 5 clearance behind the dryer for the dryer vent Front view 48 sq in WARNING To reduce the ri...

Страница 5: ...may be obtained from National Fire Protection Association One Batterymarch Park Quincy Massachusetts 02269 Explosion Hazard Use a new AGA or CSA approved gas supply line Install a shut off valve Securely tighten all gas connections If connected to LP have a qualified person make sure gas pressure does not exceed 13 water column Examples of a qualified person include licensed heating personnel auth...

Страница 6: ...ied by AGA or CSA be used for connecting the appliance to the rigid gas supply line The gas pipe which extends through the lower rear of the appliance has 3 8 inch male pipe thread Copies of the standards listed may be obtained from CSA International 8501 East Pleasant Valley Road Cleveland Ohio 44131 5575 Optional gas line connection method When acceptable to the gas supplier and local codes 3 8 ...

Страница 7: ...cks or bushes etc If using an existing exhaust system clean lint from entire length of system and make sure exhaust hood is not plugged with lint Replace any vinyl or metallized plastic foil vent with rigid metal or flexible metal vent Use clamps to seal all joints Do Not use duct tape screws or other fastening devices that extend into the interior of the vent to secure vent Service check Back pre...

Страница 8: ... Determine vent length The maximum length of the exhaust system depends upon the type of vent rigid or flexible metal the number of elbows used 1 See the exhaust vent length chart that matches your type hood for the maximum vent lengths you can use Do not use vent runs longer than specified in exhaust vent length charts Exhaust systems longer than specified will accumulate lint creating a potentia...

Страница 9: ...rsing door swing skip ahead to Level and exhaust dryer steps Be careful not to scratch or chip paint Place a large towel or soft cloth A on top of dryer Open dryer door Remove bottom screws from cabinet side of hinges B Loosen do not remove top screws from cabinet side of hinges Lift door until top screws in cabinet are in large part of hinge slot Pull door forward off screws Set door handle side ...

Страница 10: ... with screw Insert door strike plug in original door strike hole and secure with screw Slowly close door and check that door strike aligns with door catch F If door does not close completely slide door catch left or right within slot until strike snaps into catch D Level dryer Dryer must be level to reduce noise and assure proper performance Slide dryer onto cardboard or hardboard before moving ac...

Страница 11: ... Extra long band clamp for dryer connection Swivel collar Beveled edges allow corner installations Telescoping sections Swivel collar wall connection Provides 2 1 2 clearance between dryer and wall Great for closet installations 0 18 18 29 or 29 50 periscopes include one male snap lock fitting one extra long draw band collar and one clamp 21 2 2 1 2 Periscopes For Offset Outlets Tight Installation...

Страница 12: ...g plate Shut off electrical supply to dryer Unplug power supply cord and tape it securely to dryer Disconnect bracket from wall and reinstall in new home Not used on all models Tape lint collector lid to cabinet Tape top to cabinet Shut off gas supply valve in the gas supply line Disconnect gas fittings from dryer and cap gas supply line Tape end of dryer gas pipe Tape door to front panel Turn lev...

Страница 13: ...la garantía Conserve las instrucciones de instalación para uso del inspector de instalaciones eléctricas de su localidad Tiene preguntas sobre su secadora Llame a su distribuidor o a la compañía de servicios autorizada de su localidad Cuando llame necesitará el número del modelo y el número de serie de la secadora Ambos números están en la placa de modelo serie la cual se encuentra en la cavidad d...

Страница 14: ...mperatura es inferior a los 7 C 45 F los ciclos automáticos podrían no detenerse Piso nivelado La inclinación máxima debajo de toda la secadora no debe ser mayor de 2 5 cm 1 pulgada Si la inclinación es mayor de 2 5 cm 1 pulgada instale el Conjunto de Extensión de Patas para Secadora Parte No 279810 Si la secadora no está nivelada la ropa podría no girar debidamente y los ciclos de detección autom...

Страница 15: ...es se pueden utilizar tubos de 0 95 cm 3 8 de pulg si lo permiten los códigos y la compañía de gas Para longitudes mayores de 6 1 m 20 pies se deben utilizar tubos más largos Conversión a gas licuado propano líquido L P La conversión la debe hacer un técnico calificado Un técnico de servicio calificado es una persona con experiencia y que ha recibido la debida capacitación en mantenimiento y repar...

Страница 16: ...talen al lado de la secadora Espacios para la instalación Utilice los espacios recomendados para facilitar la instalación Recomendados mínimos Parte Parte Parte posterior Costados superior delantera Empotrada 12 7 cm 0 cm 2 5 cm 0 cm 45 cm 38 1 cm 5 pulg 0 pulg 1 pulg 0 pulg 18 pulg 15 pulg Closet 12 7 cm 0 cm 2 5 cm 0 cm 45 cm 38 1 cm 2 5 cm 2 5 cm Armario 5 pulg 0 pulg 1 pulg 0 pulg 18 pulg 15 p...

Страница 17: ...TENCIA La conexión indebida del conductor a tierra del equipo puede producir riesgo de choque eléctrico Verifique con un electricista calificado o técnico de servicio si tiene dudas sobre si la secadora ha sido debidamente puesta a tierra No modifique el enchufe provisto con la secadora Si no calza en el tomacorriente haga que un electricista calificado instale un tomacorriente adecuado Se pueden ...

Страница 18: ...ódigo Nacional de Gas Combustible ANSI Z223 última edición llave de cierre en posición abierta a la secadora línea rígida de suministro de gas Método recomendado para la conexión de la línea de gas Si los códigos locales lo permiten se recomienda usar tubos metálicos flexibles nuevos con diseño certificado por la A G A o CSA para conectar el electrodoméstico a la línea rígida de suministro de gas ...

Страница 19: ... Si utiliza un sistema de salida de aire existente limpie las pelusas a lo largo de todo el sistema de salida de aire y asegúrese de que la campana exterior de salida de aire no esté tapada con pelusas Reemplace cualquier conducto de salida de aire de vinilo o de lámina plástica metalizada con un conducto de metal rígido o flexible Utilice abrazaderas para conductos para sellar todas las juntas No...

Страница 20: ...ea empotrada closet armario en la página 4 Determine la longitud del conducto La longitud máxima del sistema de salida de aire depende de el tipo de conducto utilizado metal rígido o flexible el número de codos utilizados 1 Vea la tabla de longitudes de conductos de salida de aire que corresponda a su tipo de campana para determinar las longitudes máximas de conductos que puede utilizar No utilice...

Страница 21: ...rario a las manecillas del reloj para asegurarse de que quitó todas las cintas Limpie el tambor con un paño húmedo para eliminar el polvo C Para invertir el sentido de la apertura de la puerta Disponible únicamente en los modelos de puerta vertical lateral superancha y puerta vertical lateral grande Si no está invirtiendo el sentido de la apertura de la puerta pase a las etapas de Nivelación y sal...

Страница 22: ...a de la puerta interior NO trate de separar los paneles con un cuchillo NO jale el sello de la puerta ni los pestillos plásticos de la puerta Gire y vuelva a fijar el panel de la puerta exterior al panel de la puerta interior de manera que la manija quede en el lado donde se quitaron las bisagras Tenga cuidado de mantener el espaciador de cartón centrado entre la puerta interior y la exterior Fije...

Страница 23: ...archa la secadora Después de cinco minutos abra la puerta de la secadora Debe sentir calor dentro de la secadora Si el quemador no se incendió y usted no siente calor dentro de la secadora apague la secadora durante 5 minutos Luego verifique que todos los controles estén en la posición de ON encendido que el botón de start puesta en marcha ha sido oprimido con firmeza que esté abierta la llave de ...

Страница 24: ... para conectar a la secadora Collar giratorio Bordes biselados permiten la instalación en los rincones Secciones de extensión Conexión en la pared con collar giratorio Proporciona un espacio de 64 mm 2 1 2 pulg entre la secadora y la pared Ideales para instalaciones en un closet armario Los periscopios de 0 45 7 cm 0 18 pulg 45 7 73 7 cm 18 29 pulg o 73 7 127 cm 29 50 pulg incluyen un accesorio ma...

Отзывы: