WFI E024 Скачать руководство пользователя страница 8

8

E SERIES INSTALLATION MANUAL

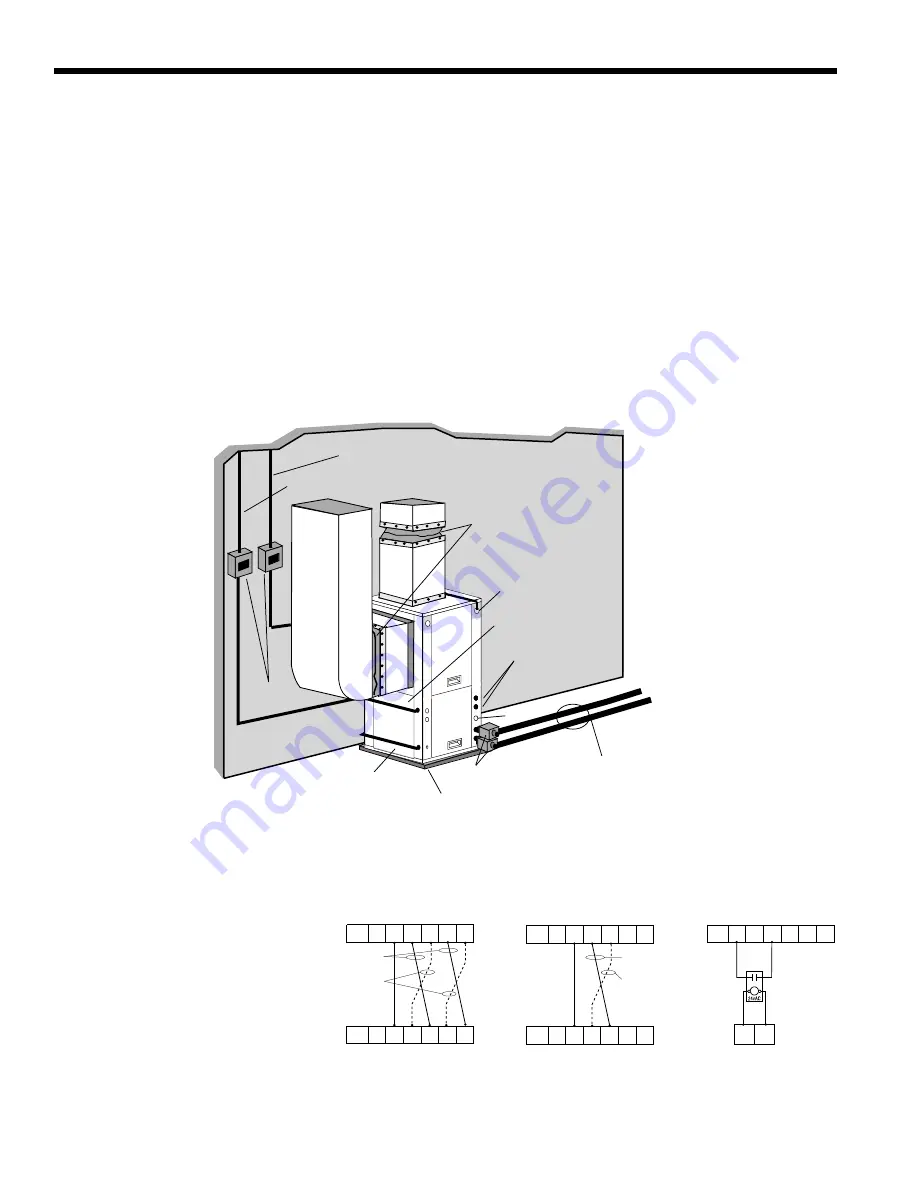
Figure 7: Closed Loop Ground Source Application 

Closed Loop Ground Source Systems

Note: 

For closed loop systems with antifreeze protection, set  SW2-2 to the “loop” position (see table on page 18).

Once piping is completed between the unit, pumps and the ground loop (see figure below), final purging and charging 

of the loop is required. A flush cart (or a 1.5 HP pump minimum) is needed to achieve adequate flow velocity in the loop 

to purge air and dirt particles from the loop itself. Antifreeze solution is used in most areas to prevent freezing. Flush the 

system adequately to remove as much air as possible then pressurize the loop to a static pressure of 40-50 PSI (summer) 

or 50-75 PSI (winter). This is normally adequate for good system operation. Loop static pressure will fluctuate with the sea-

sons. Pressures will be higher in the winter months than during the cooling season. This fluctuation is normal and should be 

considered when initially charging the system.

After pressurization, be sure to remove the plug in the end of the loop pump motor(s) (if applicable) to allow trapped air 

to be discharged and to ensure that the motor housing has been flooded. Ensure that the loop pumps provide adequate 

flow through the unit(s) by checking the pressure drop across the heat exchanger and comparing it to the unit capacity data 

in the specification catalog. Usually 2.5 to 3 GPM of flow per ton of cooling capacity is recommended in earth loop applica-

tions. 

Multiple Units on 

One Flow Center


When two units are connected to 

one loop pumping system, pump control is 

automatically achieved by connecting the 

SL terminals on connector P2 in both units 

with 2-wire thermostat wire. These terminals 

are polarity dependant (see Figure 8). The 

loop pump(s) may be powered from either 

unit, whichever is more convenient. If either 

unit calls, the loop pump(s) will automati-

cally start. The use of two units on one flow 

center is generally limited to a total of 20 

GPM capacity.

E Series to

Electromechanical Units

Shut

Down

C C

SL2

In

SL2

Out

SL1

In

SL1

Out

E Series Unit #1

To Electromechanical Unit

C

S

Shut

Down

C C

SL2

In

SL2

Out

Shut

Down

C C

SL1

In

SL1

Out

SL2

In

SL2

Out

SL1

In

SL1

Out

Single Speed

E Series Unit #1

With pump

wired to Unit 1

With pump

wired to

Unit 2

E Series to E Series

Microprocessor Units

E Series Unit #2

Single Speed

With pump

wired to Unit 1

With pump

wired to

Unit 2

Shut

Down

C C

SL2

In

SL2

Out

Shut

Down

C C

SL1

In

SL1

Out

SL2

In

SL2

Out

SL1

In

SL1

Out

Dual Capacity

E Series Unit #1

E Series Unit #2

Dual Capacity

E Series to E Series

Microprocessor Units

Figure 8:  Primary/Secondary Hook-up

Flexible Duct

Collar

Vibration Absorbing Pad

P/T Plugs

Drain

To Loop

or

Flow Center

Desuperheater

Connections

Auxiliary

Heater

Knockout

Low

Voltage to

Thermostat

Unit Supply

Auxiliary Heat

Supply

Insulated piping

or hose kit

Disconnects

(If Applicable)

Unit Power

Содержание E024

Страница 1: ...lation Information Water Piping Connections Desuperheater Connections Electrical Startup Procedures Troubleshooting Preventive Maintenance Geothermal Water Source Heat Pumps R 410A Refrigerant 2 thru 6 Ton E Series Installation Manual ...

Страница 2: ...h Factory Installed Pump Note FX10 available only on units with PSC blowers without desuperheaters Blower Options 0 PSC Blower 1 ECM Blower Standard on 036 048 060 072 2 Oversized ECM Blower 040 047 048 only Coax Options N Cupronickel Sound Kit A None 040 047 058 066 B Blanket Standard on 024 030 035 036 048 060 072 Optional on 040 047 058 066 Filter Options D 1 Pleated Disposable Non Standard Opt...

Страница 3: ...rtup 10 11 Electrical Connections 12 Electronic Thermostat Installation 13 Setting Fan Speed 13 Fan Performance Tables 14 15 Standard Microprocessor Control 16 18 Optional FX10 Microprocessor Control 19 Unit Startup 20 Description of Unit Operation 21 22 Operation Logic 22 Unit Operating Parameters 23 24 Pressure Drop Recommended Flow Rates 25 Troubleshooting 26 Preventive Maintenance 27 Replaceme...

Страница 4: ...l units should be mounted level on a vibration absorbing pad slightly larger than the base to provide isolation between the unit and the floor It is not necessary to anchor the unit to the floor see right Bottom flow units should be mounted level and sealed well to floor to prevent air leakage Bottom flow units require the supply air opening to be cut at least 1 2 inch larger than the unit s air outlet...

Страница 5: ...age internal parts Some residential applications require the installation of horizontal units on an attic floor In this case the unit should be set in a full size secondary drain pan on top of a vibration absorbing mesh The secondary drain pan prevents possible condensate overflow or water leakage damage to the ceiling The secondary drain pan is usually placed on a plywood base isolated from the cei...

Страница 6: ...ions on commercial units are fittings that accept a male pipe thread MPT Insert the connectors by hand then tighten the fitting with a wrench to provide a leakproof joint When con necting to an open loop groundwater system thread any copper MPT fitting into the connector and tighten in the same manner as described above All source water connections on residential units are swivel piping fittings see F...

Страница 7: ...occasional flushing Freeze Protection Set the freeze protection switch SW2 2 on the printed circuit board for applications using a closed loop antifreeze solu tion to LOOP On applications using an open loop ground water system or closed loop no antifreeze set this dip switch to WELL the factory default setting Refer to the Dip Switch Field Selection table on page 18 Condensate Drain On vertical uni...

Страница 8: ... in the specification catalog Usually 2 5 to 3 GPM of flow per ton of cooling capacity is recommended in earth loop applica tions Multiple Units on One Flow Center When two units are connected to one loop pumping system pump control is automatically achieved by connecting the SL terminals on connector P2 in both units with 2 wire thermostat wire These terminals are polarity dependant see Figure 8 Th...

Страница 9: ...r systems or systems that do not contain an antifreeze solution set SW2 Switch 2 to the WELL position Refer to the table on page 18 Slow opening closing solenoid valves type VM are recommended to elimi nate water hammer Solenoid Valve Flow Regulator Use two valves for dual capacity units Use one valve for single speed units Flexible Duct Collar Vibration Absorbing Pad P T Plugs Drain Desuperheater...

Страница 10: ...elief valve or hot water faucet Flush the tank by opening the cold water inlet valve to the water heater to free the tank of sediments Close when draining water is clear Disconnect the garden hose and remove the drain valve from the water heater Refer to Plumbing Installation and Desuperheater Startup on page 11 1 2 3 4 5 6 7 Note This configuration maximizes desuperheater capability Drain Valve In...

Страница 11: ...w the indicator plug on the motor end of the pump until all air is purged from the pump then tighten the plug Use vent couplings to bleed air from the lines 6 Carefully inspect all plumbing for water leaks and correct as required 7 Before restoring electrical supply to the water heater adjust the temperature setting on the tank On tanks with both upper and lower elements the lower element should b...

Страница 12: ...24 volt signals and not line voltage power The relay has both normally open and normally closed contacts and can operate with either the fan or the compressor Use DIP switch SW2 3 to cycle the relay with fan or compressor The relay contacts are available on terminals 2 and 3 of P3 208 Volt Operation All E Series 208 230 units are factory wired for 230 volt operation A switch located on the control...

Страница 13: ...ostat for proper control operation Setting Fan Speed ECM2 fan motors have a 12 speed selector dip switch on the logic board SW1 and are factory set for optimum performance To change speeds select the appropriate speeds on dip switch SW1 Consult the ECM2 fan performance table on page 14 for specific airflow and switch information PSC fan motors have 3 speeds To change speeds remove one of the blower ...

Страница 14: ... 0 50 650 750 850 L 950 1050 M 1150 1250 1325 H 1375 1475 E047 0 50 650 750 850 950 1050 L 1150 1250 M 1325 1375 1475 1550 H 1600 E040 w 1 HP 0 75 800 L 1000 M 1100 1300 H 1500 E047 w 1 HP 0 75 800 1000 L 1100 1300 M 1500 H 1600 1800 E058 0 75 750 900 1000 1200 L 1400 M 1600 1700 1850 H 2000 2200 2300 2400 E066 0 75 750 900 1000 1200 1400 L 1600 1700 M 1850 2000 2200 H 2300 2400 DUAL CAPACITY E036...

Страница 15: ...68 1536 1498 1469 1427 1388 1360 1293 1229 1128 Rated 1300 Med 1397 1374 1360 1344 1302 1298 1269 1237 1189 1162 1105 Min1040 CFM Low 1100 1092 1081 1066 1055 1040 E047 Max 1800 CFM High 1800 1760 1725 1690 1632 1584 1523 1474 1399 1308 1194 Rated 1500 Med 1571 1547 1518 1486 1456 1414 1388 1331 1281 1236 1168 1080 Min 1080 CFM Low 1183 1175 1162 1149 1136 1111 1085 E058 Max 2160 CFM High 2160 211...

Страница 16: ...age and a low suction temperature thermistor for freeze protection Upon a continuous 30 second measurement of the fault immediate for high pressure compressor operation is suspended the appropriate lockout LED begins flashing Refer to the Fault Retry section below Testing The E Series control allows service personnel to shorten most timing delays for faster diagnostics Refer to the Field Selection ...

Страница 17: ...ow Selection DIP Switches SW1 A 12 position DIP switch package on the E Series control allows the airflow levels to be set for low medium and high speed Refer to the ECM Blower Table on page 14 Only three of the DIP switches can be in the on position The first on switch the lowest position number determines the low speed fan setting The second on switch determines the medium speed fan setting and th...

Страница 18: ...nputs on the LED display Test Mode Normal Speed Operation SW 2 2 Freeze Protection Setting Allows field selection of freeze thermistor fault sensing tempera tures for well water 30 F or antifreeze protected 15 F earth loops Loop Water Freeze Protection 15 F Well Water Freeze Protection 30 F SW 2 3 Accessory Relay Allows field selection of the accessory relay to operate with the compressor or fan Acc...

Страница 19: ...start delay 0 120 seconds Short Cycle Protection The control allows a minimum compressor off time of 4 minutes and a minimum compressor run time of 2 minutes for short cycle protection Random Start A random start delay of 1 to 120 seconds is generated after each power up to prevent simultaneous startup of all units within a building after the release from an unoccupied cycle or power loss Emergenc...

Страница 20: ...to unit capacity data in specification catalog 6 Check the temperature of both the supply and discharge water see page 23 24 7 Check for an air temperature drop of 15 F to 25 F across the air coil depending on the fan speed and entering water temperature 8 Decrease the cooling set point several degrees and verify high speed blower operation 9 Adjust the cooling setpoint above the room temperature a...

Страница 21: ...lly every 2 minutes Cooling Operation In all cooling operations the reversing valve directly tracks the O input Thus anytime the O input is present the reversing valve will be energized Cool 1st Stage Y1 O The fan motor is started on low speed immediately the loop pump is energized 5 seconds after the Y1 input is re ceived and the compressor is energized 10 seconds after the Y1 input The fan is sw...

Страница 22: ...mit 100 RPM for 30 continuous seconds OPERATION LOGIC HEATING COOLING FAN ON SL1 IN ON SL2 IN ON STG1 STG2 STG3 EMERG STG1 STG2 SINGLE SPEED UNITS Compressor On On On Off On On ECM2 Normal Med High High High Med High Low ECM2 Dehumidify Med High High High 85 Med 85 High Low Rev Valve Off Off Off Off On On Loop Pump On On On Off On On On DHW Pump On Off Off Off On On Aux Heater Off Off Staged Stage...

Страница 23: ... 24 90 1 5 3 0 132 144 130 142 360 380 330 350 10 14 10 14 8 14 8 14 10 16 10 16 18 22 9 12 18 22 18 22 ENTERING WATER TEMP F WATER FLOW GPM TON HEATING NO DESUPERHEATER SUCTION PRESSURE PSIG DISCHARGE PRESSURE PSIG SUPER HEAT 024 058 SUBCOOLING WATER TEMP DROP F AIR TEMP RISE F DB 024 058 066 30 1 5 3 0 68 76 72 80 285 310 290 315 8 12 8 12 3 9 3 9 18 22 18 22 5 7 3 5 15 21 17 23 50 1 5 3 0 100 1...

Страница 24: ...8 12 8 12 2 10 2 10 6 8 4 6 18 22 20 24 70 1 5 3 0 156 166 160 170 325 350 330 355 8 12 8 12 4 12 4 12 7 9 5 7 26 30 28 32 SECOND STAGE OPERATION ENTERING WATER TEMP F WATER FLOW GPM TON COOLING NO DESUPERHEATER SUCTION PRESSURE PSIG DISCHARGE PRESSURE PSIG SUPER HEAT SUB COOLING WATER TEMP RISE F AIR TEMP DROP F DB 50 1 5 3 0 117 123 115 121 225 240 195 215 14 20 14 20 10 16 10 16 20 24 10 14 21 ...

Страница 25: ...4 0 3 7 9 0 1 7 1 6 1 6 1 5 1 5 5 0 E040 3 5 3 3 3 3 3 1 3 0 8 0 8 11 5 6 4 9 4 7 4 7 4 4 4 3 11 0 2 0 1 9 1 8 1 7 1 6 6 0 E047 3 7 3 5 3 3 3 3 3 0 9 0 9 12 6 7 5 9 5 6 5 3 5 2 4 8 12 0 E048 0 4 0 4 0 4 0 4 0 4 3 0 1 8 1 7 1 6 1 5 1 4 6 0 6 9 Lo cap 3 6 Lo cap 3 3 3 2 3 0 2 9 2 8 9 0 9 12 Hi cap 6 9 Hi cap 5 3 5 1 4 8 4 7 4 5 12 0 2 1 2 0 2 0 1 9 1 8 8 0 E058 3 1 2 9 2 8 2 7 2 6 11 0 11 14 8 9 5 5...

Страница 26: ... then be installed and super heat and subcooling numbers calculated If superheat and subcooling are outside recommended ranges an adjustment to the refrigerant charge may be necessary Note Refrigerant tests must be made with desuperheater turned OFF Verify that air and water flow rates are at proper levels before servicing the refrigerant circuit LED NORMAL DISPLAY MODE DIAGNOSTIC MODES CURRENT FAU...

Страница 27: ... when necessary Units should never be operated without a filter Condensate Drain In areas where airborne bacteria produce a slime in the drain pan it may be necessary to treat chemically to minimize the problem The condensate drain can pick up lint and dirt especially with dirty filters Inspect twice a year to avoid the possibility of overflow Blower Motors Blower motors are equipped with sealed ball...

Страница 28: ...oduct research and development and reserves the right to change design and specifications without notice 2004 WFI Product E Series Type Geothermal Water Source Heat Pumps Size 2 thru 6 Ton Document Type Installation Manual Part Number IM2502 Release Date 09 04 Supercedes IM1461 06 04 IM2500 07 04 ...

Отзывы: