background image

Installation and connection 

05.06.2015 

25 / 80 


Copyright 

 2013 by: WATERKOTTE GmbH. Subject to changes. 


6.2.10


Removing the housing 

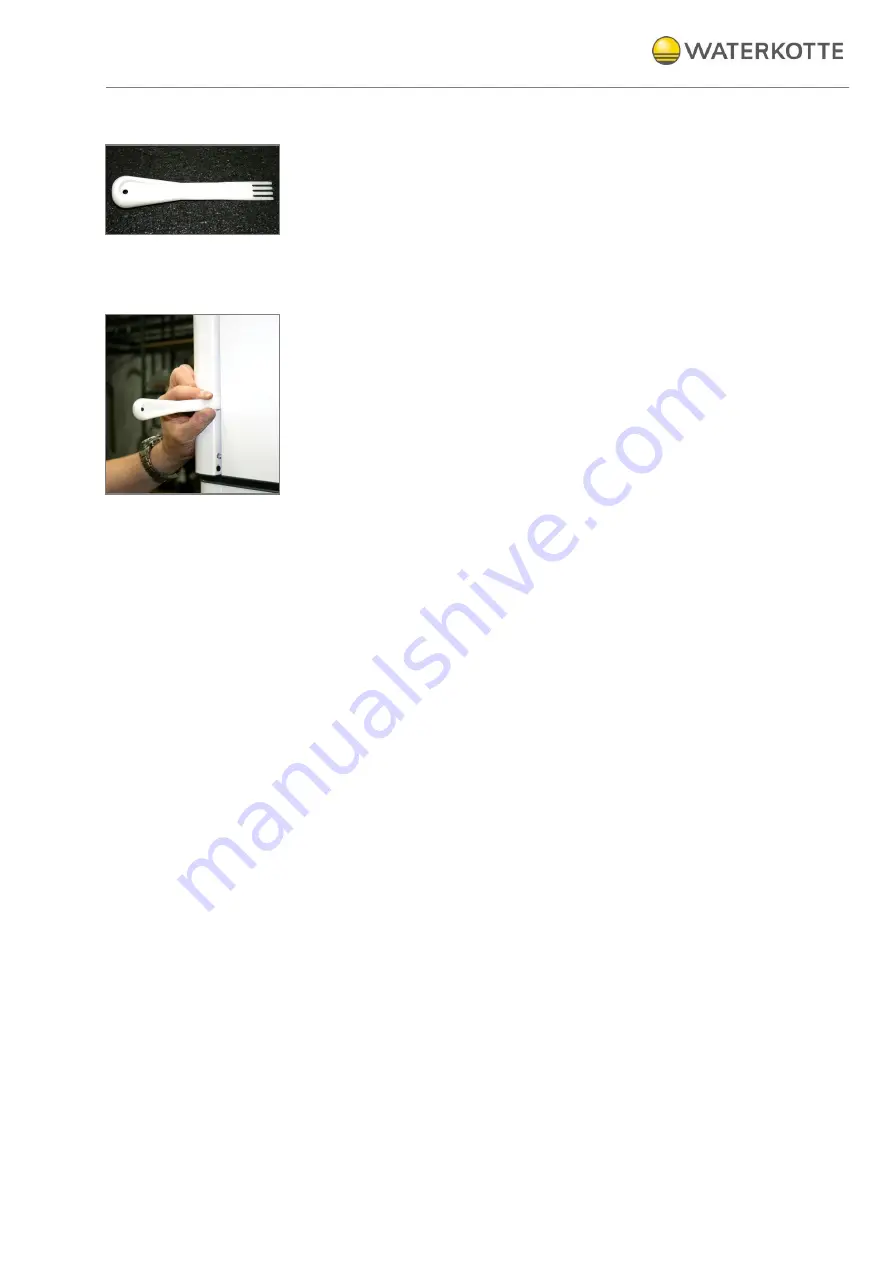
A disassembly tool is delivered with the heat pump. Use this tool to avoid 
damage while you are removing the housing parts. 


The housing parts are removed in reverse order of assembly (see figure 12).  
 
Procedure: 


Keep enough clearance with the tool to the upper and lower metal 
edge. So you can’t damage the retaining bolts (see figure). 


The removal tool is driven with moderate force, by hand, into the 
gap between the front and side panel. 


Содержание EcoTouch Ai1 Air

Страница 1: ...230 V 400 V 230 V 400 V Heating station EcoTouch Ai1 Air Indoor unit Outdoor units EcoTouch Ai1 Air Zubadan and Power Inverter WATERKOTTE GmbH Gewerkenstra e 15 D 44628 Herne Tel 0049 0 2323 9376 0 Fa...

Страница 2: ...for remaining errors or omissions or for possible damages Note This symbol mark applies only to countries within the European Union EU This symbol mark is in compliance with Directive 2002 96 EG Arti...

Страница 3: ...13 4 2 Construction and Controlling 13 4 3 Electronic heat pump control 13 4 4 Outdoor unit heat source 14 4 5 Overview ECOTouch Ai1 Air 14 4 5 1 Connection accessories 15 4 6 Sensor system 15 4 7 He...

Страница 4: ...of the electrical heating element 44 10 3 Connection diagram 45 10 3 1 EcoTouch Ai1 Air Zubadan and Power Inverter Overview clamps 400 V 45 10 3 2 EcoTouch Ai1 Air Zubadan and Power Inverter Overview...

Страница 5: ...ressor 67 12 Start up 68 12 1 Pre startup checks 68 12 2 Initial start of the heat pump 71 12 3 Control of entire operation 71 12 4 Turning heat pump off 72 12 5 Taking heat pump out of operation for...

Страница 6: ...ty precautions 1 2 1 Keep information available In addition to the operating manual also furnish operating instructions in terms of Labour Protection Law and Work Equipment ordinance Keep all safety a...

Страница 7: ...er the sewer system These materials must be collected stored transported and disposed of in appropriate containers 1 2 4 Modifications and repairs on the heat pump For safety reasons no unauthorised m...

Страница 8: ...f the installation room and consider the type of the refrigerant EN 378 1 Risk of burns During operation surface temperatures compressor and pressure line can climb above 100 C or drop below 0 C Do no...

Страница 9: ...You must ensure that The heat pump is only used as intended see also chapter 1 1 Intended use The heat pump is only operated in perfect fully functional condition and safety devices are checked regul...

Страница 10: ...rce is air By means of reverse cooling it is also possible to cool a building Figure 1 Heating system with domestic hot water production and heat source air To utilise air as thermal energy and for do...

Страница 11: ...WATERKOTTE GmbH Subject to changes 3 Product description and scope of delivery 3 1 Overview Heat distribution station indoor unit Heat source outdoor unit with domestic hot water tank Figure 2 Functi...

Страница 12: ...station 3 2 1 Heat distribution station EcoTouch Ai1 Air The heat distribution station consists of Condenser Air separator 6 kW electrical heating element Heating pump Electrical switchboard Three wa...

Страница 13: ...r start up and stand by electrical control domestic hot water tank made of stainless steel 204 l insolated with integral foam complete electrical and control engi neering touch display with Easy Con S...

Страница 14: ...e Operating manual for Heat pump control 4 4Outdoor unit heat source Split design with inverter technology ZUBADAN or Power Inverter Optimised defrost function Pre charged with R410A Euro flare connec...

Страница 15: ...1 Z18110 Euro Flare fittings 1 4 with Lokring connection for copper tube 6 35x0 8 mm 1 4 5004 5006 1 Z16982 Stabilisation insert for copper tube 10x1 mm 5004 5006 2 Z18108 Stabilisation insert for cop...

Страница 16: ...ces are mounted above each other at the installation site During transport it must be ensured that appropriate means of transport are used lift truck transport rollers handcart Heat pump outdoor unit...

Страница 17: ...eat distribution station Installation of heat distribution station storage tank must be performed at a flat and horizontal surface Wall clearance in front at least 1000 mm Because all connections are...

Страница 18: ...mpensate for minor unevenness we recommend use of an approx 10 mm thick rubber mat 6 2 1 Installation of the heat pump Transport the EcoTouch Ai1Air to installation site Align the heat pump unit in a...

Страница 19: ...engage with each other and aligned the rear walls clean Retain the construction at every steel profile and on the rear wall with the enclosed 16 lowing screws fillister head M8 self locking Z18595 Ti...

Страница 20: ...to be mounted finally Procedure Remove the yellow plug Install the tube connection at the hot water tank Then fit the top of the bleeder Z13683 on the tee of the connection tube see pointing arrow Use...

Страница 21: ...0 Copyright 2013 by WATERKOTTE GmbH Subject to changes 6 2 6 Connection terminal The terminals are installed at the front of the heat pump The clamps 1 and the mainboard 2 are to find here too Figure...

Страница 22: ...ling bend the clamping strap in the correct position see Figure 9 Then push the temperature sensor into the clamping strap of the hot water tank to the end position Connect the temperature sensor to t...

Страница 23: ...2 is attached before installing the housing parts Procedure Plug the connector of the prefabricated cable into the sockets on the back of the touch panel Connect the power switch to the cord Attach t...

Страница 24: ...Installation of the housing To avoid damage the delivered housing parts are not installed After preparation of all connections mount the housing parts to the intend ed positions insert and press Note...

Страница 25: ...Use this tool to avoid damage while you are removing the housing parts The housing parts are removed in reverse order of assembly see figure 12 Procedure Keep enough clearance with the tool to the up...

Страница 26: ...ns 400 V for compressors elec trical heating ele ment sensor etc B Raccords connec tions 230 V for compressors and electrical heating element 1 Hot water OUT G i 2 Cold water IN G i 3 Heat source IN h...

Страница 27: ...Installation and connection 05 06 2015 27 80 Copyright 2013 by WATERKOTTE GmbH Subject to changes 7 2 Connection measurements Figure 14 Connections in mm EcoTouch Ai1 Air rear...

Страница 28: ...handle the weight and vibration of the unit Avoid locations where the unit could be covered by snow To prevent snow from blocking or blowing against the air intake in regions subject to heavy snowfal...

Страница 29: ...opyright 2013 by WATERKOTTE GmbH Subject to changes 8 1 1 Dimensions of outdoor unit Figure 15 Dimensions of outdoor unit in mm Zubadan Figure 16 Dimensions of outdoor unit in mm Power Inverter left 5...

Страница 30: ...uided perpendicular to the direction from which sea sonal strong winds usually blow 8 1 3 Mounting on base plate or on the wall Secure the base of the unit firmly with four M10 screws to a proper base...

Страница 31: ...r and top 3 In recess Flow obstacle at rear and on both sides 4 In front of wall air outlet toward wall flows obstacle at front With air guides optional the minimum distance for 5014 5 is reduced to 5...

Страница 32: ...g screw clamps Z16957 5004 5 5006 5 The connection pieces of the two refrigerant lines are insulated up to trans fer point To install connecting lines use the supplied LOKRING elbow fig and reinforcem...

Страница 33: ...x 1 mm or 6 35 x 1 mm Cu pipe liquid side Heat pump series EcoTouch Ai1 Air Power Inverter 5004 5 5006 5 are connected with copper tube 12 7 x 1 mm fluid site and 6 35 x 1 mm liquid site Adapter piece...

Страница 34: ...connection Z17085 for 9 53 x 1 mm 3 8 to 10 x 1 mm Cu line and reinforcement sleeve Z17088 8 2 4 Installation of a LOKRING coupling example Procedure 1 Tube end preparation Cut tube ends must be free...

Страница 35: ...bes use C1220 copper phosphorus to connect the refrigerant tubes Ensure that the inside of the tubes is clean and free of harmful contaminants such as sulphuric com pounds oxidants debris or dust Use...

Страница 36: ...to the refrigerant lines through the service port C of the liquid stop valve A Do not increase pressure to the specified value at once but rather gradually 1 Pressurise to 0 5 MPa 5 bar wait five minu...

Страница 37: ...mperatures liquid re frigerant evaporates so rapidly that it may cause tissue freezing risk of going blind in case of skin or eye contact Should the refrigerant contact the skin flush the affected are...

Страница 38: ...ot be drained However to op timise the unit we recommend individual adjustment of refrigerant quantity to total volume refer to table Heat pump Factory pre charge kg Total charge at line length one wa...

Страница 39: ...to total volume refer to table Heat pump Factory pre charge kg Total charge at line length one way kg Power Invert er 11 20 m 21 30 m 31 40 m 41 50 m 51 60 m 61 75 m 75m 5004 5 5006 5 2 1 0 2 0 4 0 6...

Страница 40: ...pump hexagon wrench 4 mm Procedure 1 Connect vacuum pump to indoor unit Schrader valve opens automatically 2 Start vacuum pump 3 When using a high performance vacuum pump the required vacuum is gener...

Страница 41: ...nal R410A refrigerant according to the permitted tube lengths in the chart see chap 9 3 and 9 4 Procedure Charge stopped unit with additional refrigerant through the liquid stop valve after the pipe e...

Страница 42: ...tension to the cables Loos ened connections pose a risk of cables slipping from terminals or breaking this can result in overheating or fire Main switch at device beside Touch Screen At activated main...

Страница 43: ...ric shock For the power lines use standard cables of sufficient capacity Other wise there is a risk of short circuits overheating or fire When installing power lines do not apply tension to the cables...

Страница 44: ...rew connection sufficiently to allow sealing insertion of cable and to prevent water from en tering the housing When performing temporary installation sensor might have to be mounted on board which is...

Страница 45: ...KOTTE GmbH Subject to changes 10 3 Connection diagram All cable cross sections types must be specified on site by professional electrician in compliance with applicable DIN standards 10 3 1 EcoTouch A...

Страница 46: ...Electrical work 05 06 2015 46 80 Copyright 2013 by WATERKOTTE GmbH Subject to changes 10 3 2 EcoTouch Ai1 Air Zubadan and Power Inverter Overview clamps 230 V...

Страница 47: ...ctrical work 05 06 2015 47 80 Copyright 2013 by WATERKOTTE GmbH Subject to changes 10 3 3 EcoTouch Ai1 Air Zubadan and Power Inverter Overview clamps Compressor 230 V Electrical resistance heating 400...

Страница 48: ...Electrical work 05 06 2015 48 80 Copyright 2013 by WATERKOTTE GmbH Subject to changes 10 3 4 EcoTouch Ai1 Air Zubadan and Power Inverter Overview clamps X1 all models...

Страница 49: ...Electrical work 05 06 2015 49 80 Copyright 2013 by WATERKOTTE GmbH Subject to changes 10 3 5 EcoTouch Ai1 Air Zubadan and Power Inverter Overview clamps X2 all models...

Страница 50: ...Electrical work 05 06 2015 50 80 Copyright 2013 by WATERKOTTE GmbH Subject to changes 10 3 6 EcoTouch Ai1 Air Zubadan and Power Inverter Overview clamps X4 all models...

Страница 51: ...Electrical work 05 06 2015 51 80 Copyright 2013 by WATERKOTTE GmbH Subject to changes 10 3 7 EcoTouch Ai1 Air Zubadan and Power Inverter Input 400 V...

Страница 52: ...Electrical work 05 06 2015 52 80 Copyright 2013 by WATERKOTTE GmbH Subject to changes 10 3 8 EcoTouch Ai1 Air Zubadan and Power Inverter Input 230 V...

Страница 53: ...Electrical work 05 06 2015 53 80 Copyright 2013 by WATERKOTTE GmbH Subject to changes 10 3 9 EcoTouch Ai1 Air Zubadan and Power Inverter Input Compressor 230 V Electrical resistance heating 400 V...

Страница 54: ...Electrical work 05 06 2015 54 80 Copyright 2013 by WATERKOTTE GmbH Subject to changes 10 3 10 EcoTouch Ai1 Air Zubadan and Power Inverter Electric heating insert 400 V...

Страница 55: ...Electrical work 05 06 2015 55 80 Copyright 2013 by WATERKOTTE GmbH Subject to changes 10 3 11 EcoTouch Ai1 Air Zubadan and Power Inverter Electric heating insert 230 V...

Страница 56: ...Electrical work 05 06 2015 56 80 Copyright 2013 by WATERKOTTE GmbH Subject to changes 10 3 12 EcoTouch Ai1 Air Zubadan and Power Inverter Control power all models...

Страница 57: ...Electrical work 05 06 2015 57 80 Copyright 2013 by WATERKOTTE GmbH Subject to changes 10 3 13 EcoTouch Ai1 Air Zubadan and Power Inverter Control source and heating pump 400 V and 230 V...

Страница 58: ...Electrical work 05 06 2015 58 80 Copyright 2013 by WATERKOTTE GmbH Subject to changes 10 3 14 EcoTouch Ai1 Air Zubadan and Power Inverter Switched output extern 400 V and 230 V...

Страница 59: ...Electrical work 05 06 2015 59 80 Copyright 2013 by WATERKOTTE GmbH Subject to changes 10 3 15 EcoTouch Ai1 Air Zubadan and Power Inverter Digital output extern 400 V and 230 V...

Страница 60: ...Electrical work 05 06 2015 60 80 Copyright 2013 by WATERKOTTE GmbH Subject to changes 10 3 16 EcoTouch Ai1 Air Zubadan and Power Inverter Analoque signals extern 400 V and 230 V...

Страница 61: ...Electrical work 05 06 2015 61 80 Copyright 2013 by WATERKOTTE GmbH Subject to changes 10 3 17 EcoTouch Ai1 Air Zubadan and Power Inverter Expansion valve BUS and Display 230 V and 400 V...

Страница 62: ...Electrical work 05 06 2015 62 80 Copyright 2013 by WATERKOTTE GmbH Subject to changes 10 3 18 EcoTouch Ai1 Air Zubadan and Power Inverter Intern control board 400 V and 230 V...

Страница 63: ...Electrical work 05 06 2015 63 80 Copyright 2013 by WATERKOTTE GmbH Subject to changes 10 3 19 EcoTouch Ai1 Air Zubadan and Power Inverter WWPR 2 400 V and 230 V...

Страница 64: ...Failure to comply results in property damage If in doubt always check the existing DIP switch positions see below Factory default setting LED no Function LED 1 Steadily red Power supply circuit board...

Страница 65: ...not use water or other liquids to clean the unit Keep all electrical supply units locked at all times Any work on the electrical equipment of the heat pump shall only be per formed by professional ele...

Страница 66: ...oupling relay 230 V 1 W 6 A Z19141 on the control panel of the indoor unit Application maximum wire length 10 m 2 Coupling relay 230 V 1 W 6 A Z19141 in the outdoor unit Applica tion wire length great...

Страница 67: ...ows the circuit connection to the plug contact CNDM The operation of the outdoor unit depends on the external operating conditions and requirements of the indoor unit with reduced fan speed 11 3 Step...

Страница 68: ...er 0 12 1 Pre startup checks Before starting machine check first the requirements according to the following checklist All electrical feed lines in the corresponding cross sections are wired to the te...

Страница 69: ...fore turning main power switch off Otherwise there is a risk of water leaks or unit failure Risk of total loss Repeated restart of heat pump can result in total loss In case of heat pump failure an in...

Страница 70: ...ant accumulation in com pressor 3 After wires are connected and power is switched on compressor starts to warm up Remeasure insulation resistance based on acti vation times indicated below The insulat...

Страница 71: ...operation 2 To prevent compressor and electrical heating element from turning on prematurely turn off LS switches of compressor and electrical heating element 3 Turning on LS switch for compressor vol...

Страница 72: ...ontrol voltage and electrical heating element 12 5 Taking heat pump out of operation for extended period see 12 4 13 Defrost operation 13 1 Start Under certain weather conditions the outdoor unit can...

Страница 73: ...n is checked target actual comparison The inspection includes a diagnostic measurement of the thermodynamic part and can ensure optimal efficiency Typical inspection points Check heating circuit Syste...

Страница 74: ...50 Electrical power supply one phase only compres sor Heating three phase 220 240 1 50 220 240 1 50 Starting current A 29 5 13 35 1 13 Max operating current A 25 13 35 1 13 Max power consumtion kW 6 8...

Страница 75: ...rolled Refrigerant R410A pre charged Refrigerant volume kg 2 1 2 1 3 2 4 6 4 6 Minimum volume of the installation room m3 EN 378 1 m3 4 8 4 8 7 3 10 5 10 5 Sound power outdoor module 2 dB A 62 63 69 7...

Страница 76: ...Copyright 2013 by WATERKOTTE GmbH Subject to changes 16 Connection diagram 16 1 EcoTouch Ai1 Air with underfloor heating Basic circuit diagram 16 2 EcoTouch Ai1 Air with underfloor heating and single...

Страница 77: ...am 05 06 2015 77 80 Copyright 2013 by WATERKOTTE GmbH Subject to changes 16 3 EcoTouch Ai1 Air with radiators or fan convectors Basic circuit diagram 16 4 EcoTouch Ai1 Air with hydraulic filter Basic...

Страница 78: ...Connection diagram 05 06 2015 78 80 Copyright 2013 by WATERKOTTE GmbH Subject to changes 16 5 Overview EcoTouch Ai1 Air...

Страница 79: ...Connection diagram 05 06 2015 79 80 Copyright 2013 by WATERKOTTE GmbH Subject to changes...

Страница 80: ...Copyright 2013 by WATERKOTTE GmbH Subject to changes WATERKOTTE GmbH Gewerkenstra e 15 D 44628 Herne Tel 0049 0 2323 9376 0 Fax 0049 0 2323 9376 99 Service 0049 0 2323 9376 350 E Mail info waterkotte...

Отзывы: