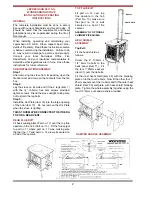
has caught fire adjust the primary air settings
to suit the heat requirements.
2.
The logs will burn slowly towards the rear of
the fire chamber and the rate of burning is
adjustable at all times by means of the pri-
mary air settings. The more air (wider open
ing) the faster the burning. Do not overfire
the stove. If the stove or chimney connector
glows, you are overfiring the stove.
3.
When the fire is reduced to embers, open the
door and carefully rake the embers towards
the front of the fire chamber and reload with
logs. After fuelling the stove hold the fire
door (part number 6) cracked open for 3-5
minutes to enhance combustion, close the
fire door (item 6) and adjust the Primary air
settings to give the required heat output.
4.
Keep all combustible materials at least three
feet away from the stove and connector
pipes. Never dry clothing on or over the
stove or within three feet of it.
5.
Use the main top of the stove for boiling, sim-
mering etc. You will soon learn the best
ways and means of using the stove in order
to attain maximum efficiency.
6.
Disposal of Ashes - Ashes should be
placed in a metal container with a tight fitting
lid. The closed container of ashes should be
placed on a non-combustible floor or on the
ground, well away from all combustible
materials, pending final disposal. If the
ashes are disposed of by burial in soil or oth-
erwise locally dispersed, there should be
retained in the closed container until all cin-
ders have thoroughly cooled.
7.
Creosote - Formation and Need for
Removal when wood is burned slowly, it pro
duces tar and other organic vapours, which
combine with expelled moisture to form cre-
osote. The creosote vapours condense in
the relatively cool chimney flue of a slow-
burning fire. As a result, creosote residue
accumulates on the flue lining. When ignited
this creosote makes an extremely hot fire.
The chimney connector and chimney should be
inspected at least twice monthly during the heating
season to determine if a creosote build-up has
occurred. If creosote has accumulated it should be
removed to reduce the risk of a chimney fire.
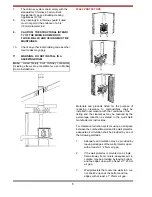
Inspect the chimney connector frequently. Tap the
connector with your finger when the pipe is cool. If
you hear a dull echo, the pipe may need cleaning.
Disassemble the chimney connector and clean the
sections. Replace corroded pipe sections. The fit-
ting of a slip-joint in the stove pipe makes the dis-
mantling easy for cleaning and inspection of chim-
ney and stove.
10
2.
Existing fuel-fired equipment in the house,
such as fireplaces or other heating appli-
ances, smell, do not operate properly, suffer
smoke roll-out when opened, or back-draft
whether or not there is combustion present.
3.
Opening a window slightly on a calm
(windless) day alleviates any of the above
symptoms.
4.
The house is equipped with a well-sealed
vapour barrier and tight fitting windows
and/or has any powered devices that
exhaust house air. (e.g. Extraction Hood or
Tumble Dryers etc..)
5.
There is excessive condensation on win-
dows in the winter.
6.
A ventilation system is installed in the house.
If these or other indications suggest that infiltration
air is inadequate, additional combustion air should
be provided from the outdoors. Outside combustion
air can be provided to the appliance by the following
means:
1.
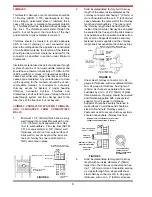
Direct connection: Refer to O.S.A. Hook-up
in this manual.
2.
Indirect method: for an appliance not
certified for direct connection of outside
combustion air, the outside air is ducted to a
point no closer than (12”) 300mm from the
appliance, to void affecting the performance
of the appliance.
3.
A mechanical ventilation system: if the
house has a ventilation system (air change
or heat recovery):
a. The ventilation system may be able
to provide sufficient combustion make-up
air for the solid-fuel-fired appliance.
b. The householder should be informed that
the ventilation system might need to be
re-balanced by a ventilation technician
after installation of the appliance.
SPILLAGE TEST
1.
Light/burn appliance under normal condi-
tions in accordance with this installation
manual.
2.
Close all doors and windows.
3.
Operate all appliances requiring a full rate
(eg. extraction hoods, tumble dryers etc).
4.
Check for spillage.
LIGHTING
1.
Lay a few crumpled sheets of paper on the
hearth, then a few small sticks or kindling to
get the fire started. Open the fire door and
light paper. Close the door and open the pri-
mary air control ALL THE WAY. The fire will
catch the kindling quickly, after which a full
size log may be placed on top. After the log


