


20
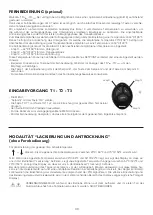
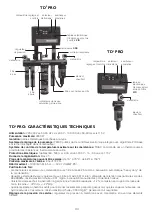
REMOTE CONTROL (optional)
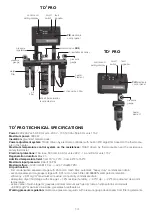
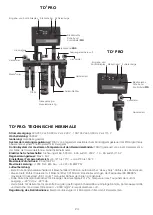
The Walcom
®
TD
3
PRO
-TD
1
PRO
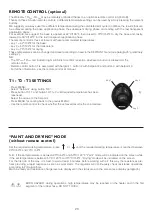
may be remotely controlled thanks to an optional remote control kit (photo 8).
Thanks to these 3-button remote controls, 3 different temperature settings can be used by simply pressing the relevant
buttons.
We suggest you always use three different temperature during the complete paint cycle to optimise the results that can
be achieved during the base application phase, the subsequent drying phase and ending with the last transparent
application phase.
For example, we suggest the base is applied at 42°C/109°F, then raised to 70°C/158°F to dry the base and, lastly,
lowered to 50°C/122°F for the last transparent application phase.
The remote control is thus set to work at these recommended temperatures:
- key 1 = 42°/109°F for the base;
- key 2 = 50°/122°F for the transparent;
- key 3 = 70°/158°F for drying.
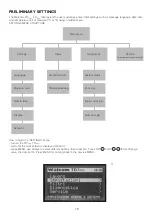
These temperatures can be changed and reset according to need in the SETPOINT menu (see paragraph “preliminary
settings”).
NB:
- The TD
3
PRO
-TD
1
PRO
red indicator light will blink to confirm reception whenever a button is pressed on the
remote control.
- Remote control button 1 is associated with Setpoint 1, button 2 with Setpoint 2 and button 3 with Setpoint 3.
- For further information, see the remote control kit manual.
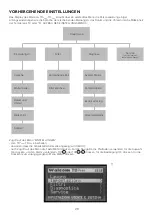
T1 - T2 - T3 SETTINGS
- Press MENU;
- Select “Setpoint” using button “OK”;
- Press button THT 1 and button THT 1+2 untill required temperature has been
reachead;
- Select the arrows to the Setpoint;
- Press MENU for coming back to the previus MENU;
- Use the remote control to check whether the achieved result is the one desired.
key 2
key 1
key 3
8)
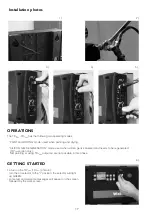
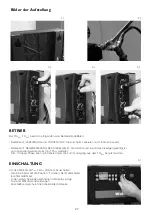
“PAINT AND DRYING” MODE
(without remote control)
Set the required working temperature: press or until the required working temperature is reached between
20°C/ 68°F and 70°C 158°F.
N.B.: If the set temperature is between 20°C/ 68°F and 50°C/ 122°F, “Paint” mode will be indicated on the screen while
if the set temperature is between 51°C/ 123°F and 70°C/ 158°F, “Drying” mode will be indicated on the screen.
For the first job of the day, it is best to wait at least 5 minutes before working with air: this way the resistances pre-
heat providing a rapid response as soon as work starts. The regulator will continuously check resistance operations
according to PID algorithms.
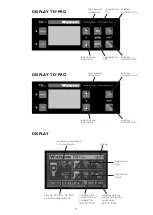
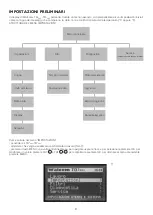
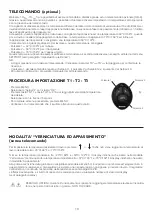
Machine ready and resistance charge level are displayed in the status area on the screen (see display paragraph).
BURN HAZARD: during operations, high temperatures may be reached on the heater and in the first
segment of the rubber hose. DO NOT TOUCH.
21
8)
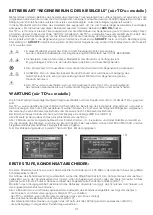
MAINTENANCE (TD
3PRO
only)
The frequency required for maintenance exclusively depends on the air quality supplying the TD
3
PRO
.
The TD
3
PRO
was programmed, according to estimated average tool use, to automatically indicated when filters require
replacement. Two subsequent expiry dates were programmed, the first after six months of operations and the second
after 12 months of operations.
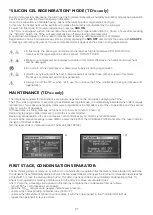
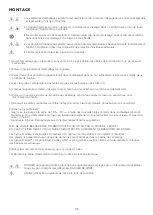
At these dates, a sliding message will appear on the screen (photo 9, photo 10).
Replacing the active carbon filter every 6 months is recommended.
Replacing condensation, oil, silica and active carbon filters every 12 months is recommended.
To cancel the screen message, press MENU, select the FILTER, then CHANGE FILTER and enter the reset code for
the type of filter/set of filters.
NB: the reset code is indicated in each ThermoKit (Ref. 60134).
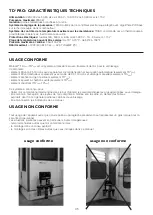
“SILICON GEL REGENERATION” MODE (TD
3PRO
only)
During normal system operations, the silicon gel drying element absorbs air humidity saturating: progressive saturation
can be seen through the three transparent indicators.
As soon as saturation is complete having reached the lowest window, regenerate silicon gel.
In this way, the heater heat will be exploited to release the humidity accumulated by the silica gel.
To switch to this mode from normal operations, press the
SRS ON
.
The TD
3
PRO
is equipped with an internal timer that sets maximum regeneration time to 4 hours: 4 hours after pressing
the “SRS ON” button, the TD
3
PRO
will automatically turn off also closing compressed air.
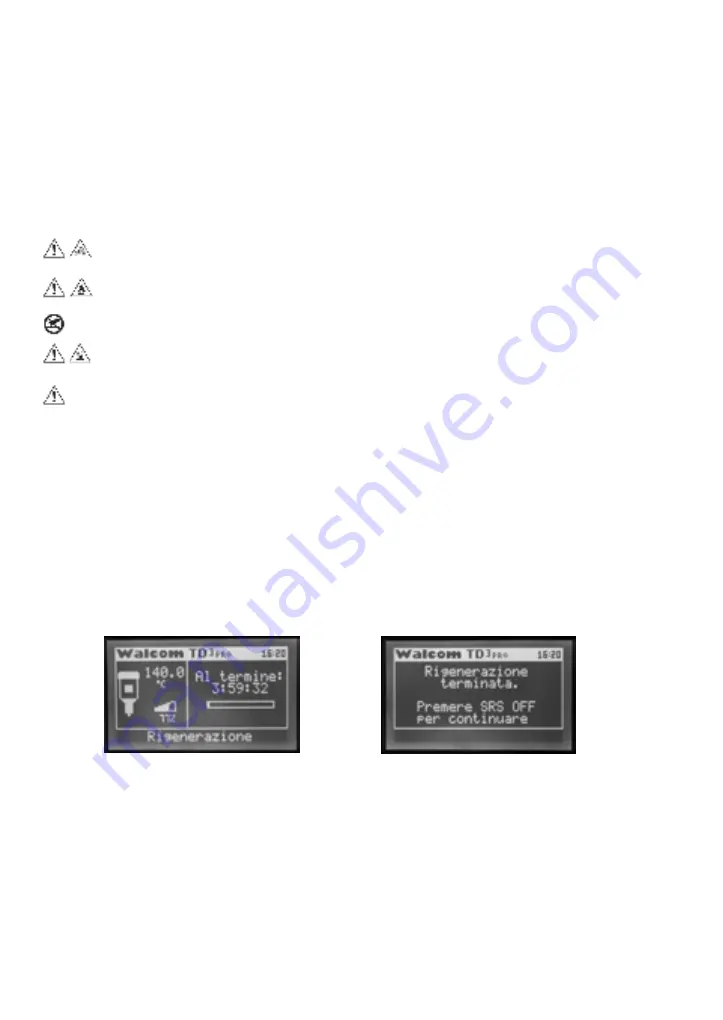
A countdown will appear on the screen to indicate time remaining until regeneration is completed.
Regeneration can be interrupted at any time by simply pressing the
SRS OFF
and confirm the output with
SRS OFF.
A message reminding the user not to use compressed air will appear on the screen during regeneration.
• In this mode, the silicon gel containment tube reaches high temperatures! DO NOT TOUCH.
Hot air exits the regeneration air drain silencer. DO NOT TOUCH.
• Make sure compressed air is always available in this mode! Otherwise the heater could over heat
and be damaged.
• Do not turn off the compressor or disconnect supply air during regeneration.
• (NOTE): very low flow will be had if compressed air at rubber hose output is used in this mode.
Do not use compressed air during regeneration.
• Always turn off the TD
3
PRO
when not in use. Do not leave the TD
3
PRO
unattended during normal use and
regeneration.
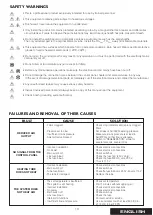
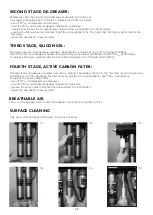
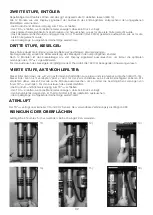
FIRST STAGE, CONDENSATION SEPARATOR:
The first filtering stage is made up of a 25 micron condensation separator filter that also removes larger dirt particles.
Condensation is automatically drained and can be manually drained: whenever the internal condensation level reaches
a threshold, or press the manual drain button, this drain opens and drains accumulated condensation (photo 11).
Check drain operations monthly and blow air into the filter to remove accumulated rust.
After 12 months, a message will appear on the display to replace the condensation filter as follows:
- turn off TD
3
PRO
compressed air and power;
- drain the TD
3
PRO
until pressure gauges indicate zero pressure;
- unscrew the corresponding container tube (photo 12);
- unscrew the filter element (photo 13) and replace it with the one supplied in the ThermoKit Ref. 60134;
- repeat the operations in reverse order.
9)
10)
Содержание TD1 PRO
Страница 66: ...66 Note ...


