English
4. If necessary, use the keypad to enter the data and press
ENTER
to confirm. If no data has to be entered,
press
ENTER
to switch to the next program step.
5. Select
Rec/Recycling phase
(the setting flashes) and press
ENTER
to confirm.
6. For the
Pressure increase Test time
, enter 1 min and press
ENTER
to confirm.
7. Deselect
Vacuum phase
using
No
(the setting flashes) and press
ENTER
to confirm.
8. Deselect
Filling phase
using
No
(the setting flashes) and press
ENTER
to confirm.
9. Select
Process start
by pressing
ENTER
.
10. After the extraction process is complete, disconnect the A/C service unit from the vehicle.
11. Disconnect the system components which cannot be flushed from the refrigerant circuit. These components
include:
• Compressor
• Line filter
• Fixed choke
• Collection containers
• Filter drying units
• Expansion valve
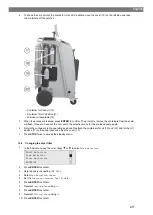
12. Connect the components for flushing to the service ports of the A/C service unit using special adapters and
in accordance with the manufacturer's specifications to form a flushing circuit.
Note
Observe the guidelines on repairs from the vehicle manufacturer.
13. In the basic menu use the cursor keys or to select
Other selections
.
Short selection
Free selection
Other selections
ENTER-OK
14. Press
ENTER
to confirm.
15. Use the cursor keys or to select
Flushing
.
Flushing
Reset scales.
Service.
ENTER-OK STOP-EXIT
16. If necessary, use the keypad to enter the data and press
ENTER
to confirm. If no data has to be entered,
press
ENTER
to switch to the next program step.
17. Use the cursor keys or to select whether to flush the entire air conditioning system or just individual
components:
Full flushing
Fast flushing
ENTER-OK STOP-EXIT
18. Press
ENTER
to confirm.
19. Follow the instructions in the display.
After flushing is completed, the basic menu for the A/C service unit appears.
20. If necessary, remove the adapter from the flushing circuit and reconnect all the components to the refriger-
ant circuit. Fit the connections of the A/C service unit to the vehicle air conditioning system and open them.
21. In the basic menu use the cursor keys or to select
Free selection
.
Short selection
Free selection
Other selections
ENTER-OK
22. Press
ENTER
to confirm.
26
Содержание AirCon Service 6300G
Страница 9: ...English 16 USB port 7...
Страница 42: ...English 17 1 Flowchart ASC6300 G Legend 40...
Страница 45: ...English 17 2 Flowchart ASC6400 G Legend 43...
Страница 48: ...English 17 3 Circuit diagram ASC6300 G 46...
Страница 49: ...English 47...
Страница 50: ...English 17 4 Circuit diagram ASC6400 G 48...
Страница 51: ...English 49...
Страница 93: ...French 17 1 Organigramme ASC6300 G L gende 91...
Страница 96: ...French 17 2 Organigramme ASC6400 G L gende 94...
Страница 99: ...French 17 3 Sch ma lectrique ASC6300 G 97...
Страница 100: ...French 98...
Страница 101: ...French 17 4 Sch ma lectrique ASC6400 G 99...
Страница 102: ...French 100...
Страница 143: ...German 17 1 Flussdiagramm ASC6300 G Legende 141...
Страница 146: ...German 17 2 Flussdiagramm ASC6400 G Legende 144...
Страница 149: ...German 17 3 Schaltplan ASC6300 G 147...
Страница 150: ...German 148...
Страница 151: ...German 17 4 Schaltplan ASC6400 G 149...
Страница 152: ...German 150...
Страница 154: ...4 4 Tel 49 0 2572 879 0 5 6 Domestic 152...
Страница 155: ...Russian 6 1 153...
Страница 156: ...Russian 6 2 R1234yf 405 C R134a 743 C R153A 6 3 154...
Страница 158: ...10 10 10 1 230 V 50 Hz 10 2 10 3 10 4 Short selection Free selection Other selections 156...
Страница 159: ...11 11 1 2 3 4 ECO 5 6 7 8 9 10 11 12 13 14 15 157...
Страница 160: ...Russian 16 USB 158...
Страница 185: ...Russian 2 D E 3 I 4 G 5 J 6 J 7 H G 8 9 10 Vacuum time 178 183...
Страница 193: ...Russian 17 1 ASC6300 G 191...
Страница 195: ...Russian X23 DO X3 UV X4 X5 Z2 X6 Z2 X7 HP X8 HP X9 RE 193...
Страница 196: ...Russian 17 2 ASC6400 G 194...
Страница 198: ...Russian X10 VC X16 CY X2 LP X23 DO X3 UV X4 X5 Z2 X6 Z2 X7 HP X8 HP X9 RE 196...
Страница 199: ...Russian 17 3 ASC6300 G 197...
Страница 200: ...Russian 198...
Страница 201: ...Russian 17 4 ASC6400 G 199...
Страница 202: ...Russian 200...
Страница 244: ...Spanish 17 1 Diagrama de flujo ASC6300 G Leyenda 242...
Страница 247: ...Spanish 17 2 Diagrama de flujo ASC6400 G Leyenda 245...
Страница 250: ...Spanish 17 3 Esquema de conexiones ASC6300 G 248...
Страница 251: ...Spanish 249...
Страница 252: ...Spanish 17 4 Esquema de conexiones ASC6400 G 250...
Страница 253: ...Spanish 251...
Страница 254: ...4445103554 2022 05 02...


