background image

22

Using the Phone

5.  Press 

CANCEL

 to cancel an operation, exit the menu display or return to the 

idle screen.

Main menu items

1. Features (see page 40) 


3. User Settings (see page 57)

2. Status (see page 56)  


4. Admin Settings (available 

     only 

to 

your 

system 

administrator)

Making calls

You can make a call at any time by choosing an off-hook method (such as lifting 

the handset, pressing a Line key, or pressing 

HEADSET

 or 

SPEAKER

), and then 

dialing a number. When the phone is in idle mode or has calls on hold, you can 

make a call by pre-dialing a phone number and then going off hook. 

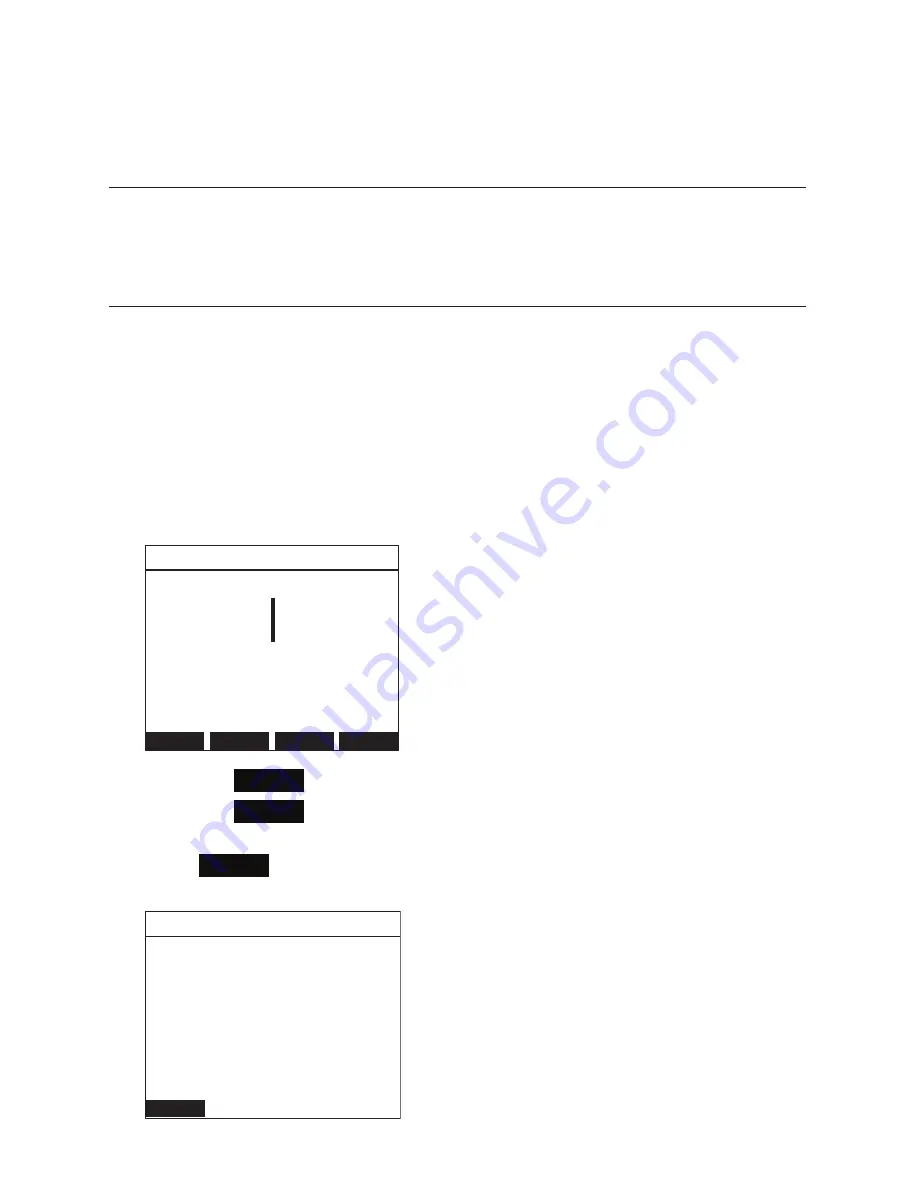
To go off hook and make a call:

1.  To use the default line, lift the handset, press 

HEADSET

, or press 

SPEAKER

. To use a specific line, press a Line key. You hear a dial tone.

2.  Use the key pad to enter the desired phone number.

Cancel

Backspc

123

Dial

11:09pm  01/25/14

             1/1

Line 1

232555

•  Press 

Backspc

 if you enter an incorrect digit.

•  Press 

123

 to change from entering digits to entering letters (if you 

need to enter a domain name as part of the number).

3. Press 

Dial

 , or, if the phone accepts the number as valid, it dials the 

number after a short delay.

End

11:09pm  01/25/14

             1/1

Line 1

Calling

2325550178

Note that the dialing screen soft keys 

are programmable and may differ 

from what is shown here.

Содержание ErisTerminal VSP735A

Страница 1: ...ErisTerminal SIP Deskset VSP735 User Guide ...

Страница 2: ...2 ...

Страница 3: ... all the feature operations and troubleshooting information necessary to install and operate your product You can also visit our website at businessphones vtech com or call 1 888 370 2006 Please note the serial number of your product which can be found on the back of the deskset Save your sales receipt and original packaging in case it is necessary to return your telephone for warranty service ...

Страница 4: ...ower 7 Do not place this product on an unstable table shelf stand or other unstable surfaces 8 Slots and openings in the back or bottom of the telephone base and handset are provided for ventilation To protect them from overheating these openings must not be blocked by placing the product on a soft surface such as a bed sofa or rug This product should never be placed near or over a radiator or hea...

Страница 5: ...pter is plugged into the power outlet or when the handset is replaced in its cradle This is a common event associated with the closing of any electrical circuit The user should not plug the phone into a power outlet and should not put a charged handset into the cradle if the phone is located in an environment containing concentrations of flammable or flame supporting gases unless there is adequate...

Страница 6: ... mounting studs until it locks into place Refer to the full instructions in Deskset Installation in this user guide 22 CAUTION Keep small metallic objects such as pins and staples away from the handset receiver SAVE THESE INSTRUCTIONS ...

Страница 7: ...all screen icons 20 Programmable feature key lights 21 Using the menu 21 Main menu items 22 Making calls 22 Answering calls 24 Putting a call on hold 25 Managing calls with FLASH 26 Forwarding calls 27 Transferring calls 29 Making a conference call 32 Setting up a Network Conference 33 Retrieving messages 34 Using a shared line 35 Call monitoring 35 Putting a shared line call on hold 35 Barging in...

Страница 8: ... Preferences 58 Setting the language 58 Setting the date and time 59 Display 60 Audio 61 Configuring the programmable keys 64 WebUI Using the WebUI 65 Status 67 Call Settings 68 User Preferences 70 Programmable Keys 72 Directory 75 Speed Dial 78 Troubleshooting General issues 79 Specifications Electrical and environmental specifications 80 Soft Keys Index of soft keys 81 Special Characters Enterin...

Страница 9: ...ct to the local area network through the deskset The VSP735 deskset supports paging and call transfers between system extensions and can connect you and two other parties on the same conference call The telephone also has 16 dual function programmable keys You or your system administrator can program these keys for functions such as quick dial redial Do Not Disturb call forwarding message retrieva...

Страница 10: ...alternate function of a programmable key Corded headset input on side SPEAKER Press to turn the speakerphone on or off MIC SCREEN Displays call information soft key labels and deskset menus SOFT KEYS Perform different actions depending on the on screen labels MENU Press to display the deskset menu MESSAGE Press to select a mailbox CALL HISTORY Press to access Call History DIRECTORY Press to select...

Страница 11: ...the phone is idle press to adjust the ringer volume HEADSET When a headset is connected to the deskset press to make answer or hang up a call SPEAKER Press to turn the speakerphone on or off FLASH During a call press to answer an incoming call when you receive a call waiting alert TRANSFER Press to transfer a call to an extension CONFERENCE Press to add another extension or outside line to an exis...

Страница 12: ...rward Busy or Call Forward No Answer Page If enabled press the Page key to call one or more phones Multicast Page This feature allows you to call up to ten paging zones Park Call Dials the access code to park your current call Retrieve Parked Call Dials the access code to retrieve a parked call In Call DTMF Dials a string of numbers while you are on a call Call Return Dials the number of the last ...

Страница 13: ...tion Protocol DHCP server is recommended and must be on the same subnet as the desksets so that IP addresses can be auto assigned In most cases your network router will have a DHCP server By default the deskset has DHCP enabled for automatic IP address assignment Note Some DHCP servers have default settings that limit the number of network IP addresses assigned to devices on the network You should...

Страница 14: ...her cordless telephones Excessive heat sources Noise sources such as a window with traffic outside motors microwave ovens refrigerators or fluorescent lighting Excessive dust sources such as a workshop or garage Excessive moisture Extremely low temperature Mechanical vibration or shock such as on top of a washing machine or work bench ...

Страница 15: ...gged into a ceiling under the table or cabinet outlet Router Plug the other end of the Ethernet cable into the router connecting to your console Route the Ethernet cable and power cord through these slots Plug one end of the Ethernet cable into the Ethernet port at the back of the phone Plug the small end of the phone power adapter into the power jack at the back of the phone if PoE cannot be prov...

Страница 16: ... points on the deskset base 3 Plug the end of the coiled handset cord into the jack on the left side of the telephone 4 Lift the deskset base to the desired angle There are three pairs of grooves designed to hold the phone at different angles for optimum visibility 5 Snap the kickstand into the desired grooves until it locks into place Deskset Installation Installing the phone ...

Страница 17: ...nd of the Cat 5 Ethernet cable into your computer s Ethernet port If a PC is connected to your network through a phone any phone resets and power or network interruptions will disrupt the PC s connection to the network To mount the phone on the wall 1 Prepare the wall mount screws The deskset will fit onto wall mount screws with centers 3 inches 8 2 cm or 4 inches 10 2 cm apart Most standard wall ...

Страница 18: ...of the standard wall plate Make sure the lower wall mounting hole on the mounting bracket also aligns with the lower tab of the standard wall plate Push the phone down until it clicks securely in place 7 Bundle the Ethernet cable and power adapter cord neatly with twist ties 8 Plug the Ethernet cable into the router your console is connected to and the power adapter into an electrical outlet not c...

Страница 19: ...If the Ethernet cable and power adapter cord are bundled untie them first 2 Push the phone up to remove it from wall Unplug the Ethernet cable from the router and the power adapter from the power outlet 3 See Installing the phone section above Deskset Installation Wall mount to tabletop installation ...

Страница 20: ...e 57 Idle mode screen icons In idle mode the following screen icons indicate your phone s current settings Icon Status Call Forward All is on See To set Call forward on page 42 The ringer is off Do Not Disturb is on See To set Do Not Disturb on page 42 The Ethernet cable is unplugged or the network is down Active call screen icons During a call the following screen icons indicate the call s status...

Страница 21: ...d phone is idle Monitored phone is on a call or has a held call The monitored phone is ringing Registration error See your system administrator Automatic Call Distribution Quickly flashing GREEN Steady GREEN Slowly flashing GREEN Steady ORANGE Slowly flashing ORANGE Quickly flashing ORANGE ACD agent wrap up state ACD agent ready state ACD agent unavailable state ACD logged on ACD loged off ACD sub...

Страница 22: ...g a phone number and then going off hook To go off hook and make a call 1 To use the default line lift the handset press HEADSET or press SPEAKER To use a specific line press a Line key You hear a dial tone 2 Use the key pad to enter the desired phone number Cancel Backspc 123 Dial 11 09pm 01 25 14 1 1 Line 1 232555 Press Backspc if you enter an incorrect digit Press 123 to change from entering di...

Страница 23: ...until you lift the handset Lifting the handset Pressing the desired Line key Pressing SPEAKER or HEADSET When the call is answered the active call screen appears End Hold Transfer Conf 11 09pm 01 25 14 1 1 Line 1 On a call 0 01 25 Angela Martin 7325550118 To end the call hang up or press End If you are on speakerphone and the handset is on hook press SPEAKER to end your call To make a call using q...

Страница 24: ...p to select the call you want to answer On the incoming call screen you can also press Reject to terminate the incoming call Forward to forward the call to another number Silence to mute the ringer If you don t respond to an incoming call the phone displays a missed call alert screen 11 09pm 01 25 14 Line 1 View Callback Clear 3 missed calls If a missed call alert screen appears you can press Clea...

Страница 25: ...hes green slowly New Resume Transfer End 11 09pm 01 25 14 1 1 Line 1 On hold 0 01 30 Angela Martin 7325550118 From the On hold screen you can press End to end the call New to dial a new call Resume to take the call off hold Transfer to transfer the held call to another party Conf to start a conference with the held call If another party puts you on hold you may see the message Held by far end This...

Страница 26: ... you are managing three or more calls Using the Phone Managing calls with FLASH End Hold Transfer Conf 11 09pm 01 25 14 1 1 Line 1 On a call 0 01 25 Angela Martin 7325550118 Cancel Backspc 123 Dial 11 09pm 01 25 14 2 2 Line 1 â Answer Reject Forward Silence 11 09pm 01 25 14 2 2 Line 1 Call from Mark Lee 5551231234 End Hold Transfer Conf 11 09pm 01 25 14 2 2 Line 1 On a call 0 00 17 Mark Lee 555123...

Страница 27: ... have problems forwarding calls because of the Call Forward No Answer setting ask your system administrator to extend your Call Forward No Answer delay See also Using the Call menu on page 41 To forward a call using manual entry 1 When an incoming call appears press Forward The deskset stops ringing and the Forward to screen appears Cancel 123 11 09pm 01 25 14 Line 1 Forward to If you press Cancel...

Страница 28: ... list or call history You can also navigate to the call history or directory using the deskset Features menu DFN 9LHZ DOO KLVWRU OO FDOOV 0LVVHG FDOOV 5HFHLYHG FDOOV LDOHG FDOOV HO DOO Back Select Directory 1 Local 2 Blacklist Select the call history folder or directory you want to access OO FDOOV KDUOLH RKQVRQ SP DYLG DUWHU SP QJHOD 0DUWLQ SP HOHWH QIR DFN LDO RFDO QJHOD 0DUWLQ RUN URQZ Q 0F RQDO...

Страница 29: ...all If you do not talk to the transfer recipient before transferring the call you are making a blind transfer You can also transfer a call to a held call To transfer a call supervised 1 During a call press Transfer The call is automatically put on hold and the transfer setup screen appears 2 Dial the number to which you want to transfer the call You can also use a number from a list such as the Di...

Страница 30: ... transfer setup screen The active call screen reappears End when the second call is active You will hang up on the second call Split when the second call is active You will stay connected to the second call Your first call remains on hold To transfer a call blind 1 During a call press Transfer The call is automatically put on hold and the transfer setup screen appears End Hold Transfer Conf 11 09p...

Страница 31: ...soft keys 2 Press XferCall The call is automatically put on hold and a list of held calls appears 3 On the Transfer to target screen press Select to talk to the held call and then press Transfer to transfer the first call Blind and then press Transfer to transfer the first call to the held call immediately The Call transferred screen appears and your phone returns to idle mode 11 09pm 01 25 14 2 2...

Страница 32: ...ference setup press Cancel on the conference setup screen The active call screen reappears End when the second call is established You will hang up on the second call and return to your first call Split when the second call is established You will remain on the second call and your first call remains on hold When you have an active call and a held call you can also create a conference with the hel...

Страница 33: ...e which joins both calls and returns your phone to idle mode Setting up a Network Conference A Network Conference is hosted by your service provider and allows multiple parties to join a conference A Network Conference works in a similar way to the regular conference described above except that the Split and Bridge functions will not be available In addition the soft keys Add and or AddCall will a...

Страница 34: ...ore than one line you may be able to access multiple mailboxes Press p or q to highlight the desired mailbox and press SELECT to access messages in that mailbox When there is no New Message alert screen you can access the Messages menu using the deskset menu To view the Messages menu 1 When the phone is idle press Menu 2 With Features highlighted press SELECT 3 Press q to highlight Message and the...

Страница 35: ...hat line will ring Call monitoring One of the main features of shared lines is the ability to monitor call activity You can monitor the call activity by observing the Line key LED On your deskset the LED is steady orange when a call has been answered at another deskset and flashes orange slowly when the user at another deskset puts a call on hold See Programmable feature key lights on page 21 Putt...

Страница 36: ...ble to barge in on calls Bridged calls differ from conference calls in that you can join a call in progress at any time However because the caller ID of the active call is not visible to you other participants in the call may need to notify you of an appropriate time to join Bridged calls can also have any number of participants unlike conference calls The number of participants on a bridged call ...

Страница 37: ...ey monitor The BLF feature may not be available on your deskset For BLF LED states see Programmable feature key lights on page 21 To dial a monitored extension 1 Press the BLF key for that extension The monitored extension can be idle or have an active or held call Your deskset dials the extension using the first available line key When the other person answers your deskset indicates two active ca...

Страница 38: ...put on private hold automatically To send a server based page 1 Press the Page feature key Your phone dials out the Page Feature Access Code 2 Follow the voice prompts to page To send a multicast page 1 Press the Multicast Page feature key You hear a paging tone before your phone broadcasts a page to the assigned paging zone 2 Press End to terminate the page Line CallFwd Directory Settings 11 09pm...

Страница 39: ...ey will display the ACD State Menu To set your ACD state 1 Press the ACD feature key The ACD State menu appears 2 Press q or p to select the desired state and then press SELECT If you select Unavailable you will have the option of entering a reason code Back Select ACD state 1 Sign In 2 Available 3 Unavailable 4 Wrap Up 5 Sign Out ...

Страница 40: ...access the Features menu 1 When the phone is idle press MENU The Main Menu appears 2 If necessary press p or q to highlight Features and then press SELECT The Features menu appears DFN 6HOHFW HDWXUHV DOO LUHFWRU DOO KLVWRU 0HVVDJH 6SHHG GLDO The Features menu includes the following items Setting See page Description 1 Call 41 Manages how your phone handles incoming calls 2 Directory 46 Stores cont...

Страница 41: ...ncoming calls are forwarded immediately and the phone does not ring Call forward busy incoming calls are forwarded if all your available lines are busy Call forward no ans incoming calls are forwarded after the no answer delay expires 3 Block anonymous 44 Enables the phone to reject incoming calls that have no caller ID 4 Dial as anonymous 44 Enables the phone to make outgoing calls with the Calle...

Страница 42: ...RW LVWXUE LQH 2II LQH 2II LQH 2II LQH 2II LQH 2II 4 When the desired line is highlighted press t or u to turn Do Not Disturb On or Off 5 Press Save When Do Not Disturb for your default line is on DND appears on the idle screen To set Call forward 1 From the Call menu press q to highlight Call forward 2 Press SELECT The Call forward menu appears DFN 6HOHFW DOO IRUZDUG 1 1 1 1 1 3 Highlight the line...

Страница 43: ...q 8 Enter the number to which you would like to forward calls 9 If you selected Call forward no ans earlier Press q 10 If you selected Call forward no ans earlier Press t or u to set the No answer delay between 1 to 10 rings 11 Press Save When Call forward for your default line is on FWD appears on the idle screen Note Your system administrator can also configure programmable keys to turn Call for...

Страница 44: ...n press t or u to turn anonymous call blocking On or Off for that line 4 Press Save To dial as an anonymous caller 1 From the Call menu press q to highlight Dial as anonymous 2 Press SELECT The Dial as anonymous menu appears DQFHO 6DYH LDO DV DQRQ PRXV LQH 2II LQH 2II LQH 2II LQH 2II LQH 2II 3 Highlight the desired line and then press t or u to turn anonymous call dialing On or Off for that line 4...

Страница 45: ...lerts 1 From the Call menu press q to highlight Call waiting 2 Press SELECT The Call waiting menu appears Cancel Save Call waiting Show alert Yes 3 Press t or u to turn call waiting alerts on Yes or off No 4 Press Save When Show alert is on and you are on a call incoming calls are displayed on the screen When Show alert is off incoming calls are rejected and no notification appears on the screen S...

Страница 46: ...l directory 1 Press the DIRECTORY key or a Press MENU b With Features highlighted press SELECT c Press q to highlight Directory and then press SELECT The Directory menu appears listing all your available directories and the blacklist Any directories other than Local and Blacklist are server based and will vary with your installation You can edit the Local directory and the Blacklist Back Select Di...

Страница 47: ... Press Insert to place the entry s number into the number field and then press Dial to dial the number You can use this feature when making a call forwarding a call transferring a call and setting up a conference call To add a directory entry 1 When viewing a directory entry press t or u until the Add soft key appears 2 Press Add A blank directory entry appears 3 Use the dial pad keys to enter the...

Страница 48: ...irectory entries 1 From the Directories screen or from a directory entry press Search The Local directory search screen appears DQFHO 6HDUFK Local By First name Search 2 To filter your search by first name or last name press t or u 3 Press q to move to the Search field Local Search By First name DQFHO DFNVSF 6HDUFK 4 Press a dial pad key to enter a letter for your first name or last name search Pr...

Страница 49: ...es a blacklist which is a list of numbers that cannot reach your phone If you experience nuisance calls you can add the callers contact information to the blacklist Calls from blacklisted numbers will not ring your phone or be recorded in your call history The Blacklist can be viewed and edited in the same way as the Local directory but is a completely separate directory listing Call history The c...

Страница 50: ...OV LDOHG FDOOV HO DOO 2 Press q to highlight the desired call history folder 3 Press View to see call history entries in the highlighted folder The first entry appears OO FDOOV KDUOLH RKQVRQ SP DYLG DUWHU SP QJHOD 0DUWLQ SP HOHWH QIR DFN LDO If the folder is empty the message No entries to display appears 4 Press q to view more entries The call history entry screen shows the time date name and num...

Страница 51: ... you to edit the number before pressing Dial Note If you view a call history entry when the deskset is in dial mode an Insert soft key appears instead of Dial Press Insert to place the entry s number into the number field and then press Dial to dial the number You can use this feature when making a call forwarding a call transferring a call and setting up a conference call To add a call history en...

Страница 52: ...spc to delete incorrect characters 5 Press Save to save the entry To delete a single call history entry 1 While viewing the desired entry press Delete To delete multiple call history entries 1 While viewing the list of call history folders press q to highlight the folder for which you would like to delete all entries All calls Missed calls Received calls or Dialed calls 2 Press Del all 3 When the ...

Страница 53: ...e Speed dial menu appears 4 Press q to highlight a speed dial entry marked Empty 5 Press Add A blank speed dial entry appears 6 Use the dial pad keys to enter the name and number Press 123 to switch between entering numbers lower case letters and upper case letters When you start entering characters the Cancel soft key changes to Backspc Press Backspc to delete incorrect characters After completin...

Страница 54: ...to highlight DECT headset and then press SELECT The DECT headset menu appears DFN 6HOHFW DECT headset 5HJLVWHU HUHJLVWHU 4 Lift the cordless headset out of its charging base and then place it back in the charger 5 With Register highlighted press SELECT on the deskset Registering appears while the deskset searches for the headset When registration is complete Registration succeeded appears and the ...

Страница 55: ...andard deregistration The deskset may be out of range or may have been removed from the system To deregister the cordless headset when the deskset is not available On the headset press VOL ON OFF VOL ON OFF VOL VOL ON OFF Cordless accessory registration and deregistration time out If the cordless device is registered to another deskset or telephone it must be deregistered first See Deregistering a...

Страница 56: ...us and then press SELECT 3 On the Status menu press q to highlight Product Info and then press SELECT Back Select Status 1 Network 2 Line 3 Product Info 4 Cordless Accessories 4 On the Product Info screen find Firmware Ver Product Info Model VSP735 Serial No VK900001923 MAC 00122A461388 Boot Version 1 x x Firmware Ver 1 x x V Series 1 xx xx 0 ENG Hardware Ver 1 ...

Страница 57: ...gs by pressing the MENU key and then pressing q to highlight User Settings and then pressing SELECT 3 User Settings on the dial pad The User Settings are Setting Options 1 Preferences Language Date Time Clock time Clock date Time zone NTP server Set manually Restart phone 2 Display Contrast Level 1 7 Backlight ON Off Low Medium High Backlight idle Off Low Medium High Timeout 10 60 seconds 3 Audio ...

Страница 58: ... 3 Audio 4 Programmable keys 5 DECT headset 2 On the User Settings menu ensure that Preferences is highlighted and then press SELECT The Preferences menu appears DFN 6HOHFW Preferences DQJXDJH DWH 7LPH 5HVWDUW SKRQH 3 Press p or q to highlight the desired option and then press SELECT The available options are Language Date Time Restart phone Setting the language 1 From the Preferences menu press p...

Страница 59: ...Clock date MM DD YY Time Zone DST Enabled NTP server Enabled Set manually To set the time format 1 From the Date Time menu ensure that Clock Time is highlighted 2 Press t or u to select a 12 hour clock 12am pm or 24 hour clock 3 Press Save To set the date format that appears on the idle screen 1 From the Date Time menu press q to highlight Clock date 2 Press t or u to select the desired date forma...

Страница 60: ...dministrator and Provisioning Guide To manually set the Year Month Day Hour and Minute 1 From the Date Time menu press q to highlight Set manually 2 Press SELECT Note If the NTP server is enabled you cannot modify this setting See To enable or disable the NTP Network Time Protocol server above 3 For each setting press t or u to select the desired setting and then press q to move to the next line 4...

Страница 61: ...ave To set the backlight level that applies when the phone is idle 1 From the Display menu press q to highlight Backlight idle 2 Press t or u to select Off Low Medium or High Off is the default setting 3 Press Save To set the backlight off timeout 1 From the Display menu press q to highlight Timeout 2 Press t or u to select between 10 and 60 seconds at 5 second intervals 30 seconds is the default ...

Страница 62: ...s highlighted and then press Select 2 On the Ringer tone menu press q if necessary to highlight a line for which to select a ringer tone and then press Select 3 On the selected line screen press t or u to select one of ten ringer tones The default is 1 Ringer tone samples play when selected 4 After selecting the desired ringer tone press Save To exit without saving a new ringer tone press Cancel C...

Страница 63: ...To set the audio mode 1 From the Audio menu press q to highlight Audio mode and then press SELECT The Audio mode menu appears DFN 6HOHFW XGLR PRGH 6SHDNHU HDGVHW 2 On the Audio mode menu press q to highlight the desired audio mode Speaker Headset or DECT Headset 3 Press SELECT When you press a Line key or Answer the call is started or answered using the selected audio mode Lifting the handset take...

Страница 64: ...ngs menu appears 2 Press q to highlight Programmable keys and then press SELECT The Programmable keys menu appears 3 Select the key to configure and then press Edit 4 Select a PFK type and then press SELECT Depending on the PFK type the screen may prompt you to configure additional settings For more details on PFK types see Programmable Keys on page 72 Edit Programmable keys Key 1 Line Key 2 Line ...

Страница 65: ...s and general information about your phone To access the WebUI 1 Ensure that your computer is connected to the same network as your deskset Your computer may already be connected to the network through the PC port on the back of your deskset 2 Find the IP address of your phone a When the phone is idle press MENU b Press q to highlight Status and then press SELECT The Status menu appears Back Selec...

Страница 66: ...ser 6 Under Password enter user or your own password if you have created one You can create or change a password after you log on 7 Click Log In The WebUI appears Click topics from the navigation bar at the top of the page and then click the desired setting on the left side of the WebUI to see the page for that setting You view and change settings in two different types of fields drop down lists a...

Страница 67: ...s information about your SIP account registration Network information regarding your phone s network address and network connection Cordless Status indicating whether a cordless headset is registered to the deskset The Status page has no settings that you can change You may need some of the status information for troubleshooting purposes ...

Страница 68: ... and Call Forward using the desket See Using the Call menu on page 41 When you have finished changing settings on this page click Save to save them General Call Settings Setting Description Anonymous Call Reject Select to block incoming calls that have no caller ID Enable Anonymous Call Select to make outgoing calls that remove your own caller ID information Do Not Disturb Settings Setting Descrip...

Страница 69: ...Select to enable call forwarding for calls when you are on another call on that account Target Number Enter a number to which calls will be forwarded when the line is busy Enable Call Forward No Answer Select to enable call forwarding for unanswered calls on that account Target Number Enter a number to which unanswered calls will be forwarded Delay Select the number of rings before unanswered call...

Страница 70: ...one For example English French Spanish etc English Phone Language Sets the language that appears on your phone Any language supported by your phone For example English French Spanish etc English Backlight Timer Sets how long the screen backlight stays on after the last button press 10 to 60 seconds 30 seconds Ringer Volume Sets the ringer volume for incoming calls You can also use the VOLUME q or ...

Страница 71: ...ne 10 300 seconds 30 seconds Call Waiting Settings Setting Description Range Default Call Waiting Off Rejects additional incoming calls No notification appears on the screen n a Select to enable Disabled Call Waiting On Shows additional incoming calls on the screen n a Select to enable Enabled Enable Call Waiting Tone Enables or disables Call Waiting Tone n a Select to enable Enabled Tone Interval...

Страница 72: ...rogrammable Keys page Keys can have identical functions depending on the Type of key For example you can assign several Line type keys to Account 1 so that you can manage multiple calls on Account 1 You can also assign multiple Quick Dial keys For the programmable key default settings see Programmable keys on page 12 Programmable keys continued ...

Страница 73: ...at you configure Call Forward settings on the Call Settings page Call Forward No Answer Configures the key to turn Call Forward No Answer on or off In the Account column select the account for which Call Forward No Answer will apply Before assigning the key ensure that you configure Call Forward settings on the Call Settings page Call Forward Busy Configures the key to turn Call Forward Busy on or...

Страница 74: ...r account 1 Retrieve Park Call Enables you to retrieve a parked call Pressing the key dials the Parked Call Retrieval feature access code FAC In the Account column select the account on which the feature access code will be dialed out For example choose Account 1 if you wish to use the Parked Call Retrieval FAC that your System Administrator entered for account 1 In Call DTMF Configures the key to...

Страница 75: ...irectory or import a local directory file The export function lets you back up your contacts to your computer Phone numbers appear as links If your service provider s click to dial feature is enabled you can dial a number by clicking its link The Local Directory lists entries on up to 10 pages with 20 entries per page Click Next First Last or a page number to view the desired page of entries Note ...

Страница 76: ...ntry 1 Click Add New Entry The Create Local Directory Entry page appears 2 Enter the required information At minimum a first and last name are required Setting Description Range Default First Name Enter the appropriate names in these fields n a n a Last Name Ringer Tone Sets a unique ringer tone for calls from this directory entry Auto Tone 1 10 Auto Account Sets the account used when you dial thi...

Страница 77: ...ote Directory files are xml files containing contacts and contact information For more information about creating or editing a directory file consult your system administrator To import a local directory file 1 Click Choose File 2 In the Choose File to Upload window navigate to the directory file 3 Click the file and then click Open 4 On the WebUI click Import Export Local Directory You can export...

Страница 78: ...or entry 10 press 0 For each speed dial number you enter you must assign the account on which the number will be dialed out You can also add speed dial entries using the deskset The Speed dial list is accessed through the Features menu See Speed Dial on page 53 After entering information on this page click Save to save it To enter speed dial numbers 1 In the Name column enter a speed dial label fo...

Страница 79: ...r if your phone doesn t answer a page automatically Calls are answered on the headset rather than the speakerphone after I press a Line key or Answer to answer a call Change the audio mode from Headset to Speaker See To set the audio mode on page 63 My computer can t connect to the network after plugging the Ethernet cable through the PC port Make sure the deskset is connected to power The PC port...

Страница 80: ...ns Electrical and environmental specifications RF frequency band 1921 536 1928 448 MHz Channels 5 Operating temperature 32 122 F 0 50 C AC adapter output voltage 5 0 Vdc 1000 mA Ethernet network jacks GigE RJ 45 ports ...

Страница 81: ...to enter digits for the conference target ConfLine Displays a list of held calls as a target for conferencing with the active call Del All Deletes all records in a list Delete 1 Deletes current entry 2 Deletes assignment 3 Deletes Directory group Dial Sends and dials currently displayed highlighted digits Directory Opens the list of available directories Edit Displays the entry group editor Edit D...

Страница 82: ... chime tone Split Breaks a conference or call progress into multiple calls Status Access the status submenu Transfer Opens the live dialing editor to enter or insert digits of the transfer target Type Switches between the Directory number types within an entry View Displays a database list XferLine Displays a list of held calls as a transfer target for the active call Yes Confirm Special Character...

Страница 83: ...rms Electrical storms can sometimes cause power surges harmful to electronic equipment For your own safety take caution when using electric appliances during storms Cleaning your telephone Your telephone has a durable plastic casing that should retain its luster for many years Clean it only with a soft cloth slightly dampened with water or a mild soap Do not use excess water or cleaning solvents o...

Страница 84: ...st Further by requesting and receiving the available code you release VTech its affiliates and its and their officers directors employees and representatives VTech Parties from any liability or responsibility relating to such code and you acknowledge that the VTech Parties make no representations with respect to the origin accuracy usability or usefulness of such code and the VTech Parties have no...

Отзывы: