39
8. START-UP
The laboratory power unit is not a charger. To charge batteries, use suitable
chargers with a charging current cut-off.
During a longer period of operation under nominal load, the surface of the housing
will heat up. Attention! Risk of burns! Therefore, make sure that there is adequate
ventilation of the power unit and never operate it partly or fully covered to avoid
any damage.
When connecting a consumer, ensure that it is not connected when switched on.
A switched-on consumer can result in sparks when connecting to the output
terminals of the power unit, which in turn can damage the sockets or the connected
cables and/or their clamps.
If your power unit is not required, switch it off and disconnect it from the mains.
The displays remain on for a few seconds after it is switched off to unload the
internal capacitors and to store the last parameters that were set.
Always ensure a sufficient conductor cross-section for the DC connection lines,
since overload may cause fire in the line.
Connecting the Power Cable
1. Connect the supplied grounding mains cable to the low-power device installation socket (12) on
the power unit. Ensure a tight fit.
2. Connect the power cable to a shockproof mains socket with protective grounding. The maximum
length of the power cable to the outlet must not exceed 3 m.
Unit Installation
Place the laboratory power unit on a stable, level and robust surface. Make sure that ventilation slots
in the casing are not covered up.
General Informations
The laboratory power unit is micro-processor-controlled and is operated through two digital controls
(incremental encoders without end position) with sensor function. This enables fine and coarse control
via a control.
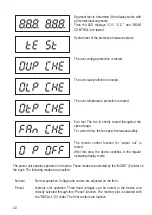
After the device switches on, a system check is performed. The test status is displayed on the two
displays. The displays are in the following order:
Display of the current software state.

