background image

7. Safety instructions

Read the operating instructions carefully and especially observe the safety  

information. If you do not follow the safety instructions and information on 

proper handling in this manual, we assume no liability for any resulting personal 

injury or damage to property. Such cases will invalidate the warranty/guarantee.

a)  General information

•  The device is not a toy. Keep it out of the reach of children and pets.
•  Do not leave packaging material lying around carelessly. This may become  

dangerous playing material for children.

•  Protect the device from extreme temperatures, direct sunlight, strong jolts, high 

humidity, moisture, flammable gases, steam, and solvents.

•  Do not place the product under any mechanical stress.
•  If it is no longer possible to operate the product safely, take it out of operation and 

protect it from any accidental use. Safe operation can no longer be guaranteed 

if the product:

 - is visibly damaged, 
 - is no longer working properly, 
 - has been stored for extended periods in poor ambient conditions or 
 - has been subjected to any serious transport-related stresses.

•  Please handle the product carefully. Jolts, impacts or a fall even from a low height 

can damage the product.

•  Consult an expert when in doubt about the operation, safety or connection of 

the device.

•  Maintenance, modifications, and repairs must only be completed by a technician 

or an authorised repair centre.

•  If you have questions which remain unanswered by these operating instructions, 

contact our technical support service or other technical personnel.

•  In schools, educational facilities, hobby and DIY workshops, the product must be 

operated under the supervision of qualified personnel.

•  Always comply with the accident prevention regulations for electrical equipment 

when using the product in commercial facilities.

19

Содержание 2299816

Страница 1: ...Nr 2299816 Seite 16 28 Operating Instructions PM 32 FIBRE OPTIC POWER METER Item No 2299816 Page 16 28 Mode d emploi PM 32 WATTMETRE OPTIQUE N de commande 2299816 Page 29 41 Gebruiksaanwijzing PM 32...

Страница 2: ...te 6 c Batterien Akkus 6 d Laser 6 8 Bedienelemente und Komponenten 7 a Messger t 7 b Display 8 9 Einsetzen der Batterien 8 10 Bedientasten Funktionen 9 11 Leistungsmessung 10 a Messen der absoluten...

Страница 3: ...ken wennSiedieses Produkt an Dritte weitergeben Heben Sie deshalb diese Bedienungsanleitung zum Nachlesen auf Bei technischen Fragen wenden Sie sich bitte an Deutschland www conrad de sterreich www co...

Страница 4: ...schl ssen Br nden oder elektrischen Schl gen f hren Lesen Sie sich die Bedienungsanleitung sorgf ltig durch und bewahren Sie sie sicher auf Reichen Sie das Produkt nur zusammen mit der Bedienungsanlei...

Страница 5: ...unbeabsichtigter Verwendung Der sichere Betrieb ist nicht mehr gew hrleistet wenn das Produkt sichtbare Sch den aufweist nicht mehr ordnungsgem funktioniert ber einen l ngeren Zeitraum unter ung nsti...

Страница 6: ...zur Besch digung des Ger ts f hren Nehmen Sie keine Batterien Akkus auseinander schlie en Sie sie nicht kurz und werfen Sie sie nicht ins Feuer Versuchen Sie niemals nicht aufladbare Batterien aufzula...

Страница 7: ...Messger t 1 2 3 4 5 6 7 8 1 Batteriefach R ckseite 2 Bedientasten 3 Klappst nder R ckseite 4 Display 5 Schutzabdeckung 6 Optische Laserquelle Anschluss f r Fehlersuche 7 Messeingang des optischen Leis...

Страница 8: ...nsetzen der Batterien 1 Nehmen Sie einen Kreuzschlitzschraubendreher zur Hand und entfernen Sie die Schrauben der Batteriefachabdeckung 2 Setzen Sie dann drei Batterien desTypsAAein und richten Sie si...

Страница 9: ...sch aus Messger t auf Null stellen Gedr ckt halten bis CLR im Display erscheint und zu blinken beginnt Dr cken um w hrend der Messung eines Lichtwellenleiters zwischen den folgenden beiden Einheiten u...

Страница 10: ...s sicher dass die Komponenten die Sie an das Ger t anschlie en frei von Verunreinigungen und Staub sind Lassen Sie beim Anbringen und Entfernen von Steckverbindern Vorsicht walten um Kratzspuren zu ve...

Страница 11: ...n Sie nun die Taste dB um den Messwert der absoluten optischen Leistung zu speichern Dieser wird als Bezugswert hinterlegt und als xx xx dBm in der zweiten Zeile des Displays angezeigt Die Einheit in...

Страница 12: ...rlicht die bei der Pr fung von Lichtwellenleitern auftreten 1 Entfernen Sie zun chst einmal die Schutzabdeckung und schlie en Sie den Lichtwellenleiter an den Ausgangsanschluss der Laserlichtquelle an...

Страница 13: ...in dungen ordnungsgem angeschlossen sind 15 Pflege und Wartung Verwenden Sie keine aggressiven Reinigungsmittel Alkohol oder andere chemische L sungsmittel da diese zu Sch den am Geh use und zu Fehlfu...

Страница 14: ...rgung im Hausm ll ist untersagt Schadstoffhaltige Batterien Akkus sind mit dem nebenstehenden Symbol gekennzeichnet das auf das Verbot der Entsorgung ber den Hausm ll hinweist Die Bezeichnungenf rdiee...

Страница 15: ...297 g ohne Batterien b Optische Laserquelle Wellenl nge 650 nm 10 nm Leistung 1 mW L nge des Lichtwellenleiters 1000 3000 m Steckertyp FC 2 5 mm Rote Laserdiode leuchtet blinkt Laserklasse 1 Laserleis...

Страница 16: ...Connected devices 20 c Rechargeable batteries 20 d Laser 20 8 Operating elements 21 a Meter 21 b Display 22 9 Insert battery 22 10 Button controls functions 23 11 Power measurement 24 a Absolute power...

Страница 17: ...ou pass on the product to any third party Therefore retain these operating instructions for reference If there are any technical questions please contact www conrad com contact 2 Explanation of symbol...

Страница 18: ...rds Read the instructions carefully and store them in a safe place Make this product available to third parties only together with its operating instructions All company names and product names are tr...

Страница 19: ...f operation and protect it from any accidental use Safe operation can no longer be guaranteed if the product is visibly damaged is no longer working properly has been stored for extended periods in po...

Страница 20: ...uldbereplacedatthesametime Mixingoldandnew rechargeable batteries in the device can lead to rechargeable battery leakage and device damage Rechargeable batteries must not be dismantled short circuited...

Страница 21: ...s a Meter 1 2 3 4 5 6 7 8 1 Battery compartment rear side 2 Button controls 3 Flip stand rear side 4 Display 5 Protective cover 6 Optical laser visual fault locator port 7 Optical power meter input 8...

Страница 22: ...E Wavelength F Battery level G Units 9 Insert battery 1 Remove the compartment cover screws using a cross head screwdriver 2 Insert 3x AA batteries matching polarities as indicated inside the compart...

Страница 23: ...s a flashing CLR Press to switch between units when measuring optical power Relative power dB absolute power dBm Press repeatedly to cycle through 8 calibrated laser wavelengths nm 850 980 1300 1310 1...

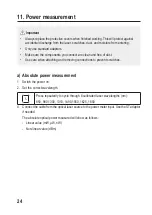
Страница 24: ...ree of dust Use care when attaching and removing connections to prevent scratches a Absolute power measurement 1 Switch the power on 2 Set the correct wavelength Press repeatedly to cycle through 8 ca...

Страница 25: ...al power measured It will be stored as a reference value and shown as xx xx dBm on the second line of the display The unit on the main display will switch to dB and should show 00 00 5 Now remove the...

Страница 26: ...ct the fiber optic cable to the laser output port 2 Press to turn the power ON 3 Press the button repeatedly to cycle the laser ON blinking OFF will be constant if the laser is on and blinks if the la...

Страница 27: ...th applicable regulatory guidelines Remove any inserted rechargeable batteries and dispose of them separately from the product b Rechargeable batteries You as the end user are required by law Battery...

Страница 28: ...180 x 38 mm Weight 297 g without battery b Optical laser source Wavelength 650 nm 10 nm Power 1 mW Optical fiber length 1000 3000 m Connector FC 2 5 mm Red laser diode continuous pulse Laser class 1...

Страница 29: ...33 c Piles accumulateurs 33 d Laser 33 8 l ments de fonctionnement 34 a Wattm tre 34 b cran 35 9 Insertion des piles 35 10 Boutons de commande fonctions 36 11 Mesure de puissance 37 a Mesure de la pu...

Страница 30: ...it un tiers Par cons quent conservez ce mode d emploi afin de pouvoir vous y r f rer ult rieurement Pour toute question technique veuillez vous adresser France email technique conrad france fr Suisse...

Страница 31: ...ectriques etc Lisez attentivement les instructions du mode d emploi et conservez le dans un endroit s r Ne mettez ce produit la disposition de tiers qu avec son mode d emploi Tous les noms d entrepris...

Страница 32: ...r et prot gez le de toute utilisation accidentelle Un fonctionnement s r ne peut plus tre garanti si le produit est visiblement endommag ne fonctionne plus correctement a t stock pendant une p riode p...

Страница 33: ...umulateurs anciennes et de nouvelles piles accumulateurs dans l appareil peut entra ner la fuite d accumulateurs et endommager l appareil Les piles accumulateurs ne doivent pas tre d mantel es court c...

Страница 34: ...1 2 3 4 5 6 7 8 1 Compartiment piles l arri re 2 Commandes 3 Support anti basculement l arri re 4 cran 5 Couvercle de protection 6 Port optique laser localisateur visuel de d fauts 7 Entr e du wattm t...

Страница 35: ...u de batterie G Unit s 9 Insertion des piles 1 Retirez les vis du couvercle du compartiment l aide d un tournevis cruciforme 2 Ins rez 3 piles AA en respectant les polarit s telles qu indiqu es l int...

Страница 36: ...s teint automatiquement au bout de 2 minutes d inactivit Mettre le compteur z ro Maintenez le bouton enfonc jusqu ce que CLR clignote l cran Appuyez sur ce bouton pour passer d une unit l autre lorsqu...

Страница 37: ...idit N utilisez que des adaptateurs standard Assurez vous que les composants que vous connectez sont propres et exempts de poussi re Faites attention lorsque vous fixez et retirez des connexions afin...

Страница 38: ...ssance optique absolue mesur e Elle sera enregistr e comme valeur de r f rence et affich e sous la forme xx xx dBm sur la deuxi me ligne de l cran L unit l cran principal passe dB et doit afficher 00...

Страница 39: ...au port de sortie du laser 2 Appuyez sur pour allumer l appareil 3 Appuyez plusieurs fois sur le bouton pour commuter le laser entre MARCHE cligno tement ARR T reste constant si le laser est allum et...

Страница 40: ...conform ment aux dispositions l gales en vigueur Retirez toutes les piles et tous les accumulateurs ins r s et liminez les s par ment du produit b Piles accumulateurs Le consommateur final est l galem...

Страница 41: ...x 38 mm Poids 297 g sans pile b Source laser optique Longueur d onde 650 nm 10 nm Puissance 1 mW Longueur de la fibre optique 1000 3000 m Connecteur FC 2 5 mm Diode laser rouge continue impuls e Clas...

Страница 42: ...Aangesloten apparaten 46 c Batterij accu s 46 d Laser 46 8 Bedieningselementen 47 a Meetapparaat 47 b Display 48 9 Batterij plaatsen 48 10 Toetsbedieningen fncties 49 11 Vermogensmeting 50 a Absolute...

Страница 43: ...evens deze gebruiksaanwijzing erbij Bewaar deze gebruiks aanwijzing voor toekomstige raadpleging Bij technische vragen kunt u zich wenden tot onze helpdesk Voor meer informative kunt u kijken op www c...

Страница 44: ...che schokken of andere gevaren Lees de gebruiksaanwijzing goed door en bewaar deze op een veilige plek Het product mag alleen samen met de gebruiksaanwijzing aan derden worden doorgegeven Alle bedrijf...

Страница 45: ...rijf en zorg ervoor dat niemand het per ongeluk kan gebruiken Veilig gebruik kan niet langer worden gegarandeerd als het product zichtbaar is beschadigd niet meer naar behoren werkt gedurende een lang...

Страница 46: ...te worden vervangen Het door elkaar gebruiken van oude en nieuwe batterijen accu s in het apparaat kan leiden tot batterijlekkage en beschadiging van het apparaat Batterijen accu s mogen niet worden o...

Страница 47: ...tapparaat 1 2 3 4 5 6 7 8 1 Batterijvak achterzijde 2 Toetsbedieningen 3 Uitklapsteun achterzijde 4 Display 5 Beschermende cover 6 Poort optische laser visuele foutzoeker 7 Ingang optische vermogensme...

Страница 48: ...atterijniveau G Eenheden 9 Batterij plaatsen 1 Draai de schroeven van het deksel op het batterijvak los met een kruiskopschroevendraaier 2 Installeer 3x AA batterijen en let daarbij op de polariteit g...

Страница 49: ...zal na 2 minuten zonder activiteit automatisch uitschakelen De meter terugzetten op nul Houd ingedrukt totdat de display een knipperende CLR weergeeft Druk in om van eenheid te wisselen tijdens het me...

Страница 50: ...k uitsluitend standaard adapters Zorg ervoor dat de componenten die u aansluit schoon en stofvrij zijn Ben voorzichtig wanneer u aansluitingen bevestigt of verwijdert om krassen te vermijden a Absolut...

Страница 51: ...en absolute optische vermogen op te slaan Het zal als een referentiewaarde worden opgeslagen en weergegeven als xx xx dBm op de tweede regel van de display Het apparaat zal op de hoofddisplay wisselen...

Страница 52: ...laseruitgangs poort 2 Druk op om het apparaat AAN te schakelen 3 Druk meerdere keren op de toets om laser AAN knipperend UIT te doorlopen zal constant branden wanneer de laser is ingeschakeld en knip...

Страница 53: ...et u het volgens de geldende wettelijke bepalingen voor afvalverwerking afvoeren Haal eventueel geplaatste batterijen accu s uit het apparaat en gooi ze afzonderlijk van het product weg b Batterij acc...

Страница 54: ...en B x H x D 79 x 180 x 38 mm Gewicht 297 g zonder batterij b Optische laserbron Golflengte 650 nm 10 nm Voeding 1 mW Glasvezellengte 1000 3000 m Connector FC 2 5 mm Rode laserdiode continu puls Laser...

Страница 55: ......

Страница 56: ...status at the time of printing Copyright 2021 by Conrad Electronic SE Ce document est une publication de Conrad Electronic SE Klaus Conrad Strasse 1 D 92240 Hirschau Allemagne www conrad com Tous droi...

Отзывы: