background image

b) Additional information on lithium rechargeable batteries

•  Li-Ion batteries installed in this device require special care during charging/discharging, ope-

ration and handling.

•  Never destroy or damage the rechargeable battery, do not drop it or puncture it with any 

objects. Protect the rechargeable battery from mechanical stress. This may cause a fire or 

explosion!

•  Ensure that the device does not overheat during use, charging, discharging, transport and 

storage. Do not place the device near heat sources and protect it from exposure to direct 

sunlight. If the device overheats, there is a risk of fire and explosion!

•  The device must not exceed a temperature of +60 °C.
•  If a device is damaged or the outer cover is puffed/swollen, discontinue use of the device. Do 

not recharge it. This may cause a fire or explosion!

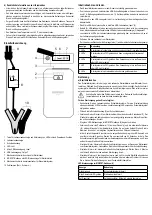
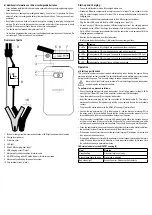
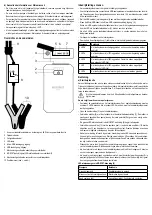
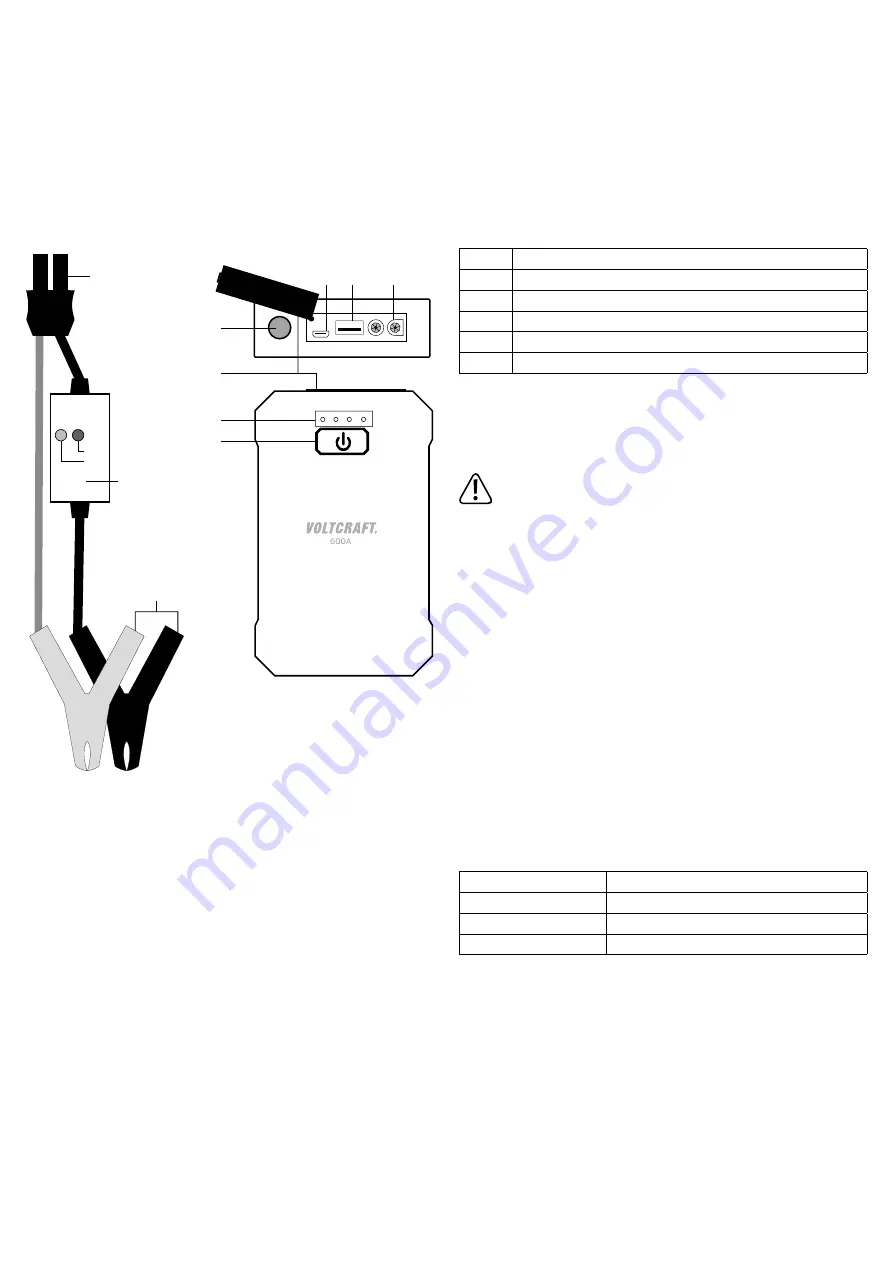
Overview of parts

1

2

3

4

5

6

7

8

9

10

START

ERR

1  Button for charge level indicator and activation of LED light and power bank function
2  Charge level indicator
3  Protective cover
4  LED light
5  Micro USB charging input “Input”
6  USB charging output “Output”
7  Mechanically coded connection for starter cable
8  MOSFET housing with LED status indicator for starter operation
9  Mechanically coded plug for quick start system
10 Pole terminals (red +, black -)

Start-up and charging

•  The quick start system must be fully charged before use.
•  Standard USB quick chargers with a charging current of at least 1 A are suitable for char-

ging. An output charging current of at least 1.5 A is recommended because it shortens the 

charging time.

•  Connect the included charging adapter cable to the USB charger (not included).
•  Plug the Micro USB cable into the Micro USB charging input “Input” (5).
•  As soon as your USB charger provides sufficient charging current, the charging process 

is indicated by the LEDs of the charge level indicator (2), which light up one after another.

•  If all 4 LEDs of the charge level indicator light up at the same time or are permanently lit, the 

charging process is completed. 

•  Remove the charging cable from the start system. 
•  Briefly press the activation button (1) to display the current charge status.

View

Meaning

4 LEDs

Start system is fully charged and can be used without restriction.

3 LEDs

Start system is 75% charged and can be used without restriction.

2 LEDs

Start system is 50% charged. It can only be used as power bank or LED light.

1 LED

Start system is 25% charged. It can only be used as power bank or LED light.

0 LED

Start system is not ready for use and must be charged.

Operation

a) Start support function

The quick start system can support a weak starter battery when starting the engine. During 

start-up a very high current is needed. The quick start system emits multiple high current pulses 

during the start-up phase. This is usually enough to support a weak starter battery. 


Never short-circuit the two pole terminals. This will discharge the quick start system 

and damage the rechargeable battery.

To perform start-up, proceed as follows:
•  Check the charge status of the quick start system. For a start-up support at least 3 LEDs 

must light up. If fewer LEDs are lit, the quick start system must first be charged.

•  Open the protective cover (3) on the quick start system.
•  Insert the starter cable plug (9) into the connection for the starter cable (7). The plug is 

mechanically coded and fits together only with the correct polarity. Ensure firm and reliable 

contact.

•  The green LED status indicator on the MOSFET housing (8) starts to flash.
•  Connect the red pole terminal (10) to the plus pole (+) and the black pole terminal (10) to 

the minus pole (-) of the car battery. Ensure that the contact is connected properly. Turn the 

terminals back and forth to break possible oxide layers on the poles.

•  Once the contact is established, the green LED glows steadily after a few seconds and you 

will hear a short beep. Start your car within 30 seconds. The quick start system now emits 

multiple current pulses during the start-up phase. They should be enough to start the engine.

•  When the engine starts, disconnect the quick start system and remove the starter cable from 

the quick start system. Close the connections with the protective cover.

•  If the engine does not start, disconnect the quick start system. Wait approx. 5 minutes and 

then repeat a start-up operation.

•  If the engine still does not start after three attempts, the start support process must be termi-

nated. Probably, the car battery is defective, or there is another problem. In this case, have 

the vehicle checked by a specialist workshop.

LED status indicator on the MOSFET housing (8)

View

Meaning

Green flashing

Quick start system is ready

Green steady light with beep

Start mode is activated

Red steady light

Connection error. Please check all contacts

Содержание 2127443

Страница 1: ...kt längere Zeit nicht verwendet werden soll z B während der Lagerung trennen Sie alle angeschlossenen Kabel vom Gerät Laden entladen Sie keine beschädigten auslaufenden oder verformten Akkus Es besteht Brand und Explosionsgefahr Entsorgen Sie unbrauchbare Akkus umweltgerecht Verwen den Sie solche Akkus nicht weiter Laden Sie das Gerät ca alle 3 Monate auf da anderenfalls die Gefahr besteht dass si...

Страница 2: ... zu 50 geladen Eine Verwendung ist nur als Powerbank oder LED Licht möglich 1 LED Startsystem ist zu 25 geladen Eine Verwendung ist nur als Powerbank oder LED Licht möglich 0 LEDs Startsystem ist nicht einsatzbereit und muss geladen werden Bedienung a Starthilfefunktion Das Schnellstartsystem ist in der Lage eine schwache Starterbatterie beim Motorstart zu un terstützen Während des Startvorgangs w...

Страница 3: ...cht Aus Um die Leuchtfunktion aus jedem Modus abzuschalten halten Sie die Taste 1 für ca 3 Se kunden gedrückt Wird die Licht Funktion nicht benötigt schalten Sie diese aus Vermeiden Sie den direkten Blick in die Lichtquelle Durch die helle LED Lichtquelle wird das Auge geblendet und es kann zu kurzzeitigen Sehschwierigkeiten kommen Entsorgung Elektronische Altgeräte sind Wertstoffe und gehören nic...

Страница 4: ...product for a long time for example during storage discon nect all cables from the device Do not charge discharge damaged leaking or deformed rechargeable batteries This may cause a fire or explosion Dispose of unusable rechargeable batteries in an environmentally friendly manner Do not continue to use these rechargeable batteries Charge the device about every 3 months otherwise there is a risk th...

Страница 5: ...hout restriction 2 LEDs Start system is 50 charged It can only be used as power bank or LED light 1 LED Start system is 25 charged It can only be used as power bank or LED light 0 LED Start system is not ready for use and must be charged Operation a Start support function The quick start system can support a weak starter battery when starting the engine During start up a very high current is neede...

Страница 6: ...t SOS signal Strobe light Off To disable the light function in any mode press and hold down the button 1 for approx 3 seconds Disable the light function if you do not need it Do not look directly into the light source The bright LED light source blinds the eye and can cause short term vision problems Disposal Electronic products are raw material and do not belong in the household waste At the end ...

Страница 7: ...s le produit pendant une longue période par exemple lors du range ment débranchez tous les câbles raccordés à l appareil Ne chargez déchargez pas d accumulateurs endommagés usés ou déformés Risque d incendie et d explosion Éliminez les accumulateurs inutilisables conformément aux nor mes environnementales Ne continuez pas d utiliser de tels accumulateurs Chargez l appareil env tous les 3 mois pour...

Страница 8: ... 2 LED Le système de démarrage est chargé à 50 Il ne peut s utiliser que comme Powerbank ou lampe à LED 1 LED Le système de démarrage est chargé à 25 Il ne peut s utiliser que comme Powerbank ou lampe à LED 0 LED Le système de démarrage n est pas prêt à l emploi et doit être chargé Utilisation a Fonction d aide au démarrage Le système de démarrage rapide peut aider au démarrage d un moteur dont la...

Страница 9: ...dant env 3 secondes Si la fonction d éclairage n est pas utile désactivez la Évitez tout contact visuel direct avec la source lumineuse La source lumineuse à LED éblouirait les yeux ce qui pourrait engendrer des problèmes de vue tempo raires Élimination des déchets Les appareils électroniques sont des matériaux recyclables et ne doivent pas être éliminés avec des ordures ménagères En fin de vie él...

Страница 10: ... langere tijd niet wordt gebruikt bijvoorbeeld tijdens opslag kop pel dan alle aangesloten kabels los van het apparaat Laad ontlaad geen beschadigde lekkende of vervormde accu s op Er bestaat brand en explosiegevaar Gooi onbruikbare accu s volgens de milieuvoorschriften weg Gebruik der gelijke accu s niet langer Laad het apparaat ongeveer elke 3 maanden op anders bestaat het risico dat de accu doo...

Страница 11: ...systeem is tot 50 opgeladen Gebruik is alleen mogelijk als powerbank of LED licht 1 LED Het startsysteem is tot 25 opgeladen Gebruik is alleen mogelijk als powerbank of LED licht 0 LED s Het startsysteem is niet klaar voor gebruik en moet worden geladen Bediening a Starthulpfunctie Het snelstartsysteem kan een zwakke startaccu ondersteunen bij het starten van de motor Tijdens het opstarten is een ...

Страница 12: ...Stroboscooplicht Uit Houd de knop 1 gedurende ongeveer 3 seconden ingedrukt om de lichtfunctie vanuit elke modus uit te schakelen Als de lichtfunctie niet nodig is dan schakelt u deze uit Kijk niet rechtstreeks in de lichtbron De heldere LED lichtbron verblindt de ogen en kan op korte termijn problemen met het gezichtsvermogen veroorzaken Verwijdering Gebruikte elektrische en elektronische apparat...

Отзывы: