Volirium Flytec Balloon Live Sensor Скачать руководство пользователя страница 21

Balloon Live Sensor  

User 

Manual 

Page 21 

Firmware FS.04.17  


Date: 2021-05-13 

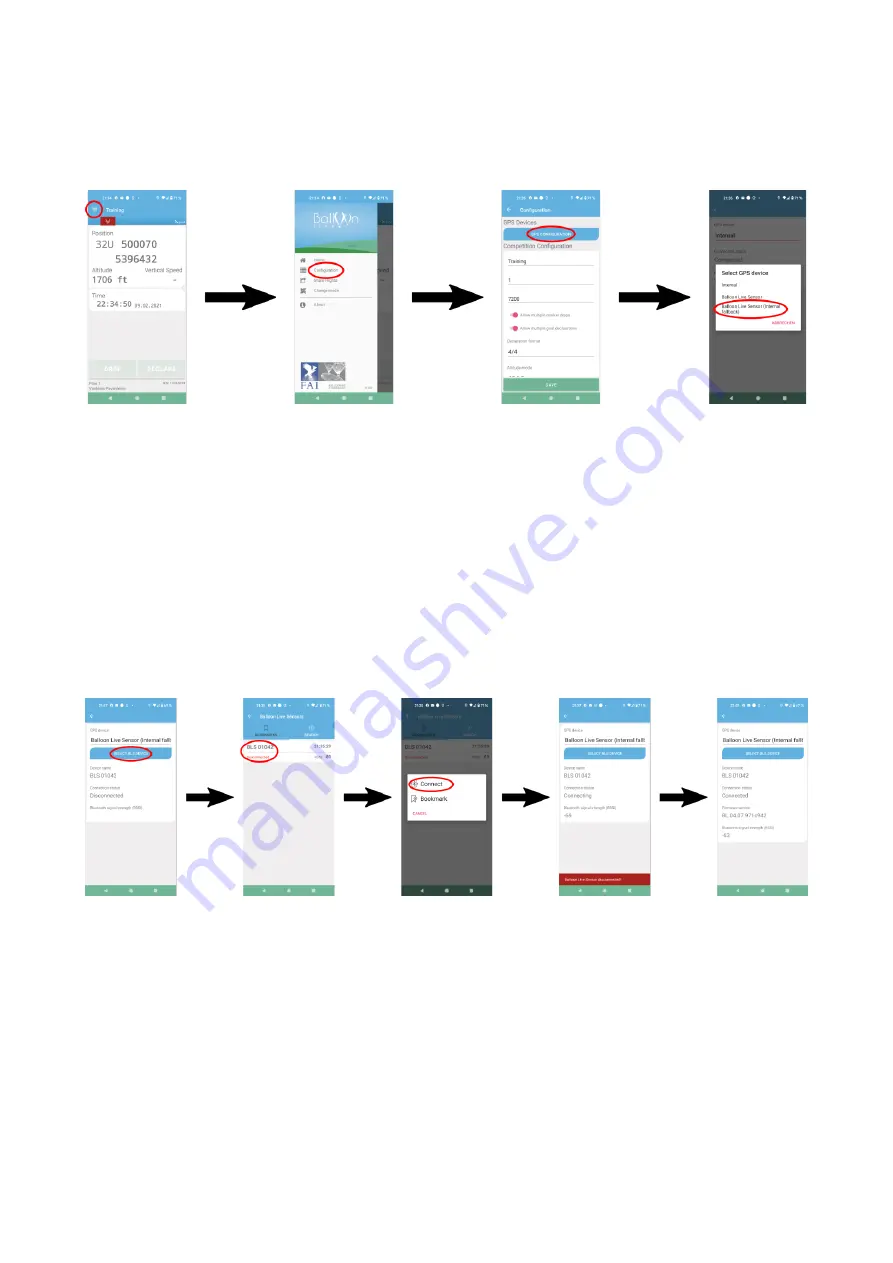
Selection  of  the  GPS  device  type  in  the  Balloon  Live App  can  be  started  from  the  main 
screen by selecting the three-bar menu on the top left of the screen to open the main menu 
and then selecting option 

Configuration

. Pressing the 

GPS configuration 

button opens the 

selection menu where one of the three GPS device types can be chosen. 


Select Balloon Live Sensor


Once  the  GPS  device  type  has  been  set  to  one  of  the  Balloon  Live  Sensor  types  the 
configuration screen will show a button called 

Select BLS Device

 to choose which Balloon 

Live Sensor device the app should connect to. Pressing this button opens a search screen 
which will show all nearby Balloon Live Sensors that are turned on and not yet connected to 
an app. Each device will be listed with an individual name made up of the text 

BLS

 and the 

5 digit serial number that is printed on the rear of the device next  to 

S/N

. Tapping on the 

desired Balloon Live Sensor opens a small menu from where the option 

Connect

 will start 

the  connection  process.  The  connection  is  established  when  the  selected  Balloon  Live 
Sensor is shown with its serial number, firmware version, and connection status 

Connected


in the configuration screen. 


After a Balloon Live Sensor has been connected, the back button of the mobile device or 
the white left arrow at the top left part of the screen can be used to get back to the main 
screen of the Balloon Live App. 

The Balloon Live App will remember the last connected Balloon Live Sensor and will try to 
reconnect every time the app is started. If no connection is possible, a red warning bar will 
be shown at the bottom of the app screen. Should the previously used Balloon Live Sensor 
no  longer  be  available  for  connection,  then  a  new  BLS  device  needs  to  be  selected  as 
described above. 


Содержание Flytec Balloon Live Sensor

Страница 1: ...Firmware FS 04 17 Date 2021 05 13 User Manual http balloonlive org...

Страница 2: ...12 Altimeter function 13 Barometric pressure 13 Clock 13 Memory usage 14 Accessing files on the SD card 16 Removing and inserting the SD card 17 Working with recorded track files 18 Upgrading the firm...

Страница 3: ...e ensuring the privacy and integrity of the data from the sensor to the scoring official Besides the integrated functionalities the Balloon Live Sensor can also be used as a position source to any ele...

Страница 4: ...the Balloon Live Sensor case will render it useless for competitions as the encryption key of the device will be deleted automatically The Balloon Live Sensor needs to be sent in for repair to assign...

Страница 5: ...w Front view Rear view No Description On Off Button on top side Status icon bar Function mode icon bar Value display OK mode config button Buzzer Selection up button Selection down button No Descripti...

Страница 6: ...er with a USB port can be used as a power source Charging the device can take several hours depending on the battery status While the battery is charging the battery status indicator will keep moving...

Страница 7: ...eception areas not all signal strength segments will be visible and it is recommended to improve the placement of the device to get an unobstructed view of the sky Track recording indicator This symbo...

Страница 8: ...ction mode is indicated not all symbols are currently used Symbol Description Altimeter The value shown on the LCD display indicates the current altitude Variometer The value shown on the LCD display...

Страница 9: ...he OK mode config button It is used to confirm actions OK for example when the device is turned on or off It is also used to select the desired function mode by pressing it shortly multiple times unti...

Страница 10: ...or is turned on by shortly pressing the On Off button on the top of the device which will prompt the user to confirm that the device should be turned on The OK mode config button needs to be pressed w...

Страница 11: ...he display mode can be switched by pressing the OK mode config button shortly once or multiple times The display mode is changing in the following order every time the button is pressed When pressing...

Страница 12: ...n or after waiting for 30s The following table lists the function modes the available units and the mode settings available Symbol Function Unit switching Settings configuration long press Altimeter f...

Страница 13: ...QNH can be adjusted to a known pressure by long pressing the OK mode config button for about 3s The current QNH will start flashing to indicate that it can now be adjusted with the Selection up or th...

Страница 14: ...en automatic track recording is turned off and track recording has not been started manually The symbol is visible all the time when a track is currently recorded If the symbol is flashing then automa...

Страница 15: ...e automatic track recording mode the takeoff is determined by a position or altitude change exceeding a threshold while the landing is determined when both the position and altitude remain unchanged o...

Страница 16: ...using a micro USB cable The SD card will appear as a mass storage device upon successful connection Two folders will be visible when the newly detected mass storage device is opened in the computer s...

Страница 17: ...e SD card For normal operations it is not necessary to remove the SD card from the Balloon Live Sensor Reasons to remove the SD card are a defective SD card or the inability to access the files on the...

Страница 18: ...g index php info balloon logger management blm Upgrading the firmware The firmware software for the Balloon Live Sensor is improved continuously to provide the best possible function Therefore it is r...

Страница 19: ...the On Off switch is pressed at the same time The Balloon Live Sensor will then search the SD card for a firmware image and will initiate the upgrade process if an upgrade file is found Firmware upgra...

Страница 20: ...t can of course be used from different mobile devices running the app at different times Select GPS device type To connect the Balloon Live App with the Balloon Live Sensor first the GPS device type m...

Страница 21: ...ed with an individual name made up of the text BLS and the 5 digit serial number that is printed on the rear of the device next to S N Tapping on the desired Balloon Live Sensor opens a small menu fro...

Страница 22: ...ct and Remove bookmark to manage the bookmark table Monitoring the status of a connected Balloon Live Sensor When a Balloon Live Sensor is connected to the Balloon Live App it is immediately visible o...

Страница 23: ...pairing The Balloon Live Sensor will be displayed in the search results with its device name Balloon Live Sensor xxxxx where xxxxx is replaced with the 5 digit serial number that is printed on the re...

Страница 24: ...be found in the Bluetooth other devices dialog by clicking on the option More Bluetooth options a bit further down This opens the Bluetooth Settings dialog on which the tab COM Ports needs to be selec...

Страница 25: ...source with the micro USB cable to charge the battery before trying to turn the device on again In rare cases it may be possible that the Balloon Live Sensor does not react when pressing the On Off bu...

Страница 26: ...pressing the On Off button If that does not reset the device the SD card needs to be removed from the device and the three button combination be used again Once the device has been reset the SD card c...

Страница 27: ...ive Sensor User Manual Page 27 Firmware FS 04 17 Date 2021 05 13 Other problems In case of problems that go beyond this manual the FAQ on the Balloon Live website may list additional hints for trouble...

Страница 28: ...ons Internal memory up to 60 000 track points Battery Internal LiPo battery 2 200 mAh runtime 15 20 hours Dimensions 62 x 121 x 17 5 mm Firmware history New functionality and bug fixes are provided to...

Отзывы: