background image

Supplied By www.heating spares.co  Tel. 0161 620 6677

15

5.9.1

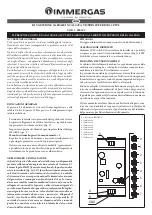
SETTING THE DOMESTIC HOT WATER TEM-
PERATURE
The DHW outlet temperature can be adjusted
between 40 ºC - 65 ºC via the Hot Water thermo-
stat knob (see fig.1).

5.10

SETTING THE SYSTEM DESIGN PRESSURE
The design pressure should be a minimum of 1
BAR and a maximum of 1.5 BAR.
The actual reading should ideally be 1BAR plus
the equivalent height in metres (0.1 BAR = 1
metre) to the highest point in the system above
the base of the appliance (up to the maximum of
1.5 BAR total).
N.B. The safety valve is set to lift at 3 BAR/30
metres/45 psig.).
To lower the system pressure to the required
value, water can be drained from the heating
system drain cock or from the boiler drain cock.

5.11

REGULATING THE HOT WATER
The appliance is fitted with a flow rate restrictor
that limits the maximum flow rate that can be
drawn through the appliance.

The restrictor eliminates the need to manually
adjust the DHW flow rate. However if it is felt
necessary to further increase or decrease the
available flow rate, spare restrictors are included
in the accessory pack.
The spare flow rate restrictors can be fitted to
either increase or decrease the maximum flow
rate. The tables above denote the size of restrictor
fitted and the spare restrictors supplied in the
accessory pack. Each restrictor is colour-coded
to enable identification.

5.11.1 CHANGING THE FLOW RESTRICTOR

Refer to 6.19 for detailed instruction on changing
the flow restrictor.

5.11.2 REGULATING THE CENTRAL HEATING SYS-

TEM
Fully open all radiator and circuit valves and run
the appliance for both heating and hot water until
heated water is circulating. If conditions are warm
remove any thermostatic heads. Adjust radiator
return valves and any branch circuit return valves
until the individual return temperatures are cor-
rect and are approximately equal.

5.12

FINAL CHECKS

ENSURE ALL TEST NIPPLES ON THE APPLI-
ANCE GAS VALVE HAVE BEN TIGHTENED

AND CHECKED FOR SOUNDNESS.

ENSURE THE APPLIANCE FLUE SYSTEM
IS FITTED CORRECTLY AND IS PROPERLY
SECURED.

ENSURE ALL PIPE WORK IS RE-CHECKED
FOR SOUNDNESS.

RE-FIT APPLIANCE CASING.

COMPLETE BENCHMARK CHECKLIST.

Complete details of the boiler, controls, installa-
tion and commissioning in the Benchmark check-
list at the back of this book. It is important that
the Benchmark checklist is correctly completed
and handed to the user. Failure to install and
commission the appliance to the manufacturers
instructions may invalidate the warranty.

5.13

INSTRUCTING THE USER
Hand over all documentation supplied with this
appliance - including these instructions - and
explain the importance of keeping them in a safe
place.
Explain to the user how to isolate the appliance
from the gas, water and electricity supplies, and
the locations of all drain points.
Show the user how to operate the appliance and
any associated controls correctly.
Show the user the location of the filling valve and
how to top-up the system pressure correctly, and
show the location of all manual air release points.
Explain to the user how to turn off the appliance for
both long and short periods and advise on the
necessary precautions to prevent frost damage.
Explain to the user that for continued safe and
efficient operation, the appliance must be serv-
iced annually by a competent person.

5.14

TECHNICAL ASSISTANCE
Should you require technical advice or assistance
on this product, please contact ‘Heating Services’
on 0870 264 1220 or Heating Services, PO BOX
167, BRADFORD, BD19 4WL.

 9-litre (Orange)

10-litre (Blue)

11-litre (Beige)

Spare

Fitted

Spare

100 HE

 8-litre (White)

9-litre  (Orange)

10-litre (Blue)

Fitted

Spare

Spare

 85 HE

Содержание ProCombi 100 HE

Страница 1: ...Supplied By www heating spares co Tel 0161 620 6677 Installation Servicing Instructions THESEINSTRUCTIONS TO BE RETAINED BY USER 0694...

Страница 2: ...instructions Page 6 1 General 16 6 2 Routine annual servicing 16 6 3 Replacement of components 16 6 4 Component removal procedure 16 6 5 Pump assembly 16 6 6 Safety valve 16 6 7 Automatic air release...

Страница 3: ...ector switch 32 Fault indicator led 33 CHposition 34 Timeclock The PRO Combi HE range of appliances is comprised of 2 models of high efficiency combination boiler with inputs to heating DHW of 25 29 k...

Страница 4: ...shut down and the boiler will perform a three minute anti cycle timer de lay When the request for heat has been satisfied the appliance pump and fan may continue to operate to dissipate any residual...

Страница 5: ...r Minimumburnerpressure centralheating 3 50mbar 2 70mbar Minimumburnerpressure domestichotwater 1 50mbar 1 20mbar Gross rate central heating max min 2 64 1 59 m3 h 3 07 1 59 m3 h Injectors size 12 x 1...

Страница 6: ...ner or boundary 300 mm I Above ground roof or balcony level 300 mm J From a surface or boundary facing the terminal 1200 mm K From a terminal facing a terminal 1200 mm L From an opening in the car por...

Страница 7: ...s supplied by the gas supplier must be checked to ensure that it is of adequate size to deal with the maximum rated input of all the appliances that it serves Installation pipes must be fitted in acco...

Страница 8: ...o ensure air is carried naturally to air release points and that water flows naturally to drain cocks Except where providing useful heat pipes should be insulated to avoid heat loss and in particular...

Страница 9: ...lication IGE UP 7 Guide for Gas Installations in Timber Frame Buildings 3 11 INHIBITORS It is recommend that an inhibitor suitable for use with copper and aluminium heat exchangers is used to protect...

Страница 10: ...oiler the wall bracket appliance template anaccessoriespackcontainingapplianceserv ice connections and washers the instruction pack containing the installation servicing instructions user instructions...

Страница 11: ...0 metre Reduction for bends Part No Description Min Max Length 490 Vertical flue terminal 497 Pitched roof flashing plate N A 498 Flat roof flashing plate N A 492 0 5mextension 500 mm 493 1 0mextensi...

Страница 12: ...whilst tightening with another 4 6 1 GAS fig 6 10 The appliance is supplied with a 15mm service valve connect a 15mm pipe to the inlet of the valve and tighten both nuts NOTE It will be necessary to...

Страница 13: ...ews A that se cure the outer casing to the appliance see fig 11 lift the casing upward to disengage it from the top locating hooks and then remove store the casing and screws safely until re quired Re...

Страница 14: ...ed out ensure all gas service valves from the meter to the appliance are open and the supply pipe has been properly purged ensure the proper electrical checks have been carried out see 7 7 particularl...

Страница 15: ...ds Adjust radiator return valves and any branch circuit return valves until the individual return temperatures are cor rect and are approximately equal 5 12 FINALCHECKS ENSUREALLTESTNIPPLESONTHEAPPLI...

Страница 16: ...d that this appliance will give years of reliable trouble free service the life spanofcomponentswillbedeterminedbyfactors such as operating conditions and usage Should the appliance develop a fault th...

Страница 17: ...er 1 2 fromthemain heatexchanger NB it may be necessary to disconnect or remove the flow pipe from the heat exchanger to facilitate this Replace in the reverse order 6 11 HIGH LIMIT THERMOSTAT fig 18...

Страница 18: ...lthecovertowards you before lifting and disengaging Disconnect the electrode lead Ease the electrode sealing grommet from its seating 4 FIG 22 locateandremovethefourscrewswhich secure the burner in po...

Страница 19: ...tor on theheatexchanger Theheatexchangercannow be withdrawn from the appliance Replace in the reverseorder Ensureallsealsareingoodcondition taking care to ensure they are replaced correctly 6 18 AIR P...

Страница 20: ...26a Replace in the reverse order ensuring that the seating cam inserts into the locating groove correctly see fig 26a Ensure all seals are in good condition taking care to ensure they are replacedcor...

Страница 21: ...nd remove the 4 screws that secure the vessel see fig 28 The expansion vessel can now be removed Replace in the reverse order Take extreme care when refitting the wiring to the air chamber Ensure all...

Страница 22: ...n the DHW position if no heat request is active The appliance will respond to any heating or DHW requests Active functions frost protection system pump anti block valve actuator anti block fan pumpove...

Страница 23: ...supplied to the gas valve modulating coil is pro gressively increased from minimum to maximum over a period of 8 seconds During this period the ignition electrode sparks continuously even if the burn...

Страница 24: ...reading on the manometer with the value de scribed in 2 3 If adjustment is required turn the inner red crosshead screw clockwise to in crease or counter clockwise to decrease the burner pressure whil...

Страница 25: ...carry out a short circuit test between the Live Neutral connec tions at the appliance terminal strip fig 12 Repeat above test on the Live Earth connec tions at the appliance terminal strip fig 12 NOTE...

Страница 26: ...7 3 3 P4 to be used to set adjust the minimum heating output P5 set at maximum EFFECT OF JUMPER TAGS part code 7232 FITTED TO THE MAIN PCB AT JP1 disables DHW function JP2 cancels anti cycle function...

Страница 27: ...EEN TERMINALS CN8 3 CN8 5 ON PCB NO NO YES MADE A LINK BETWEEN BLACK BLACK WIRES AT BOILER TERMINAL STRIP AND CLOSE THE TIMER CONTACT SWITCH ON BOILER AND SELECT MODE TO WINTER C H THERMOSTAT AT MAX Y...

Страница 28: ...2 ON PCB IS THERE 0 Vdc BETWEEN TERMINALS CN8 7 CN8 8 ON PCB NO YES NO CHECK WIRING AND CONNECTIONS NO DO THE AIR FLOW SWTCH TURN ON CHECK WIRING AND CONNECTIONS AIR FLOW SWITCH AND CONTROL BOARD YES...

Страница 29: ...CH AND HYDRAULIC CIRCUIT NO RECHECK SUPPLY FUSE CONNECTORS TO BOILER TERMINALS MAINS PRESENT BETWEEN BLUE BROWN WIRES AT BOILER TERMINAL STRIP NO REPLACE WIRING OR CONNECTIONS TERMINAL STRIP AND CONTR...

Страница 30: ...R AND SELECT MODE TO SUMMER DHW THERMOSTAT AT MAX START YES SWITCH DHW THERMOSTAT AT MIN DO BURNER AND FAN SWITCH OFF IS TEMPERATURE 40 C WAIT D H W TEMPERATURE 40 C REPLACE CONTROL BOARD YES NO YES N...

Страница 31: ...THE TIMER CONTACT SWITCH ON BOILER AND SELECT MODE TO WINTER C H THERMOSTAT AT MAX START RESTART THE TEST NO NO YES REPLACE WIRE AND CONNECTIONS REPLACE CONTROL BOARD REPLACE MODULATOR COIL IS THE RE...

Страница 32: ...MAX DO BURNER AND FAN SWITCH ON IS WATER FLOW TEMPERATURE 80 C WAIT WATER FLOW TEMPERATURE 80 C NO YES REPLACE CONTROL BOARD REMOVE JUMPER IS TIMER JUMPER ON RESTART THE TEST DO BURNER AND FAN SWITCH...

Страница 33: ...s programmable room thermostats In addition the appliance can be used in con junction with a typical S Plan system please contact the technical help line 0870 264 1220 for further detailed instruction...

Страница 34: ...tting timer JP3 Natural gas or L P G selector JP4 Jumper disable enable DHW absolut thermostat P1 Domestic hot water temperature control P2 Central heating temperature control P3 Off summer winter com...

Страница 35: ...N OF BOILERS OF RATED NOT EXCEEDING 60kW BS5449 PART1 FORCEDCIRCULATIONHOTWATERSYSTEMS BS5546 INSTALLATIONOFGASHOTWATERSUPPLIESFORDOMESTICPURPOSES BS5440 PART1 FLUES BS5482 PART1 DOMESTICBUTANE PROPAN...

Страница 36: ...UCER BEEN FITTED YES NO WHAT TYPE OF SCALE REDUCER HAS BEEN FITTED FOR THE DOMESTIC HOT WATER MODE MEASURE RECORD GAS RATE 3 hr MAXIMUM BURNER OPERATING PRESSURE IF APPLICABLE mbar COLD WATER INLET TE...

Страница 37: ...ANY NAME TEL No CORGI ID CARD SERIAL No COMMENTS SIGNATURE SERVICE 3 DATE ENGINEER NAME COMPANY NAME TEL No CORGI ID CARD SERIAL No COMMENTS SIGNATURE SERVICE 4 DATE ENGINEER NAME COMPANY NAME TEL No...

Страница 38: ...Supplied By www heating spares co Tel 0161 620 6677...

Страница 39: ...Supplied By www heating spares co Tel 0161 620 6677...

Страница 40: ...ating Services provides after sales assistance and Technical advice for Procombi HE Boilers Service Technical Helpline 0870 264 1220 Heating Services PO BOX 167 BRADFORD BD19 4WL We reserve the right...

Отзывы: