


8
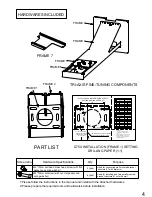
FRAME 7
A:4-M8*70
SETSCREW
STEP2
SETTING DRILLING PAPER
OF ULTRA SHORT SERIES
(1:1) TO THE PROPER
POSITION IN UP SCREEN
FRAME 1
STEP3
M:VERTICAL ROTATION
ADJUSTMENT FIXING
SCREW
FRAME 2
STEP4
FRAME 3
STEP5
FRAME 4
E:VERTICAL ROTATION
ADJUSTMENT FIXING
NUT
G:TRAPEZOID ADJUSTMENT NUT
FRAME 6
STEP6
D:4-M4*10 PARALLEL
ADJUSTMENT FIXING
SCREW
B:4-M4*10 VERTICAL ROTATION
ADJUSTMENT FIXING SCREW
STEP4
C:2-M4*10 PARALLEL
ADJUSTMENT FIXING SCREW
STEP5
H:3-M4*10 BRACKET
7 TIGHTEN SCREW
I:3-M4*10 PROJECTOR
CONNECTION SCREW
STEP6
F:PARALLEL ADJUSTMENT
FIXING SCREW
FRAME 5
ASSEMBLY BREAKDOWN DIAGRAM
ROTATION ASIX
Quick Installation Steps:
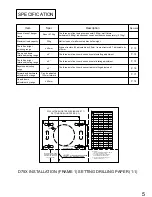
Step 1: frame #1 setting drilling paper of ultra short series (1:1) to the proper position in up screen (see
details please refer to P.9). Perforate the setting wall. (percussion drill and drill 8.5, 60mm
depth)
Step 2: Install M8*70 setscrew in the wall’s hole.
Step 3: Use M8*70 setscrew (4X) fix structure frame # 1 to the wall’s hole.
Step 4: Install structure frame # 2 on structure frame # 1 (see P.10), switch it to intermediate position
and use screw B (M4*10 up and down adjusting fixing screw) to lock it yet.
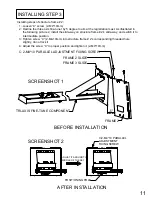
Step 5: Loosen screw “C”, decline structure frame # 3 by 5 degree to aim at the positioning peg, and
position the slider structure into structure frame # 2’s slide-way. Adjust the slide-way to
intermediate position and tighten the screw “C” into structure frame # 2 ‘s threaded hole, but do
not lock it. When the positioning is in place, tighten the screw “C”. (see details please refer to
P.11)
Step 6: Use “I” screw to connect structure frame # 7 and projector. Fix them, and install them on
structure frame # 6. After adjusting structure frame # 7 to a proper position, lock screw “H”. (see
P.12)


