background image

Laser FM Velvet Mouse – MSFLU 20                          


- 4 - 

Introduction 

Welcome, you have made an excellent choice ... 
by deciding in favour of an innovative technology which provides you 
with unique benefits. Take a few minutes to 
read this instruction manual carefully. It will help you to understand 
and master the different functions. 
Instead of the customary ball your mouse has a newly-developed 
optical laser sensor. This is in the position to guarantee precise 
scanning and cursor control on almost all surfaces. The special 
surface of the mouse ensures pleasant and safe working even over 
longer periods of time. 
 

Important Ergonomic Information 

Some experts believe that using any mouse or trackball may cause 
serious injury to hands, wrists, arms, neck, or 
back. If you feel pain, numbness or weakness in these areas, see a 
qualified health professional. 
To reduce the risk of injury, follow these precautions: 
· Take frequent breaks, get up and walk around several times every 
hour. 
· Vary your tasks throughout the day. 
· Keep your shoulders relaxed with your elbows at your side. 
· Position your keyboard and mouse so that you do not have to 
stretch. 
· Adjust your chair and keyboard so that your upper arms and wrists 
are straight. 
· Avoid resting your wrists on sharp edges. 
 

System Requirement 

· Mouse compatible with standard Microsoft® mode 
· 3rd button and wheel function require Win® 98 SE/2000/ME/XP 
· The 4th and 5th keys require Windows® XP or 2000 or rather, 
  installation of the enclosed drivers 
· The 6th button requires the installation of the enclosed  driver 
· If you use Windows® 98SE, please have your Windows® 
  Installation CD ready when installing 
 

Before you begin 

· Keep this installation guide for future reference! It contains 
important troubleshooting information. 
 

Package Contains 

Your Laser FM Velvet Mouse package includes the following: 
1. Laser Mouse 
2. Recharging station with integrated USB Hub 
3. This manual 
4. Driver CD 
Note: If any part is missing, please contact your dealer immediately 
for a replacement. 
 

USB installation  

1. Connect the USB plus of the mouse to a USB on your PC 
2. The PC recognises new hardware and loads standards drivers 
from the Windows CD 
3. The basic functions of the mouse are now available 
4. Place the driver CD in the drive of the PC 
5. Double click on your CD drive in Explorer or on your desktop. 
    Double click to start the file "Setup.exe" 
6. The installation routine starts automatically. Follow the instructions 
on the screen. 
Upon completing installation you will be asked if you want to restart 
the PC or wait until later. Please note that all alterations do not 
become effective until the PC is restarted. 
 

Connect mouse and receiver 

Normally mouse and receiver are now connected already via radio. 
Should this not be the case execute the following steps: 
a) place the mouse near the receiver (max. distance 30cm) 
b) turn the mouse round on the back and press once quickly on the 
„connect“ button using a biro or a paper clip. 
c) press quickly on the „connect“ button of the receiver (max. 6 
seconds later) to establish the connection 

d) move the mouse, the mouse cursor should now move. If this is 
not the case please check all connections and begin at a) 
 

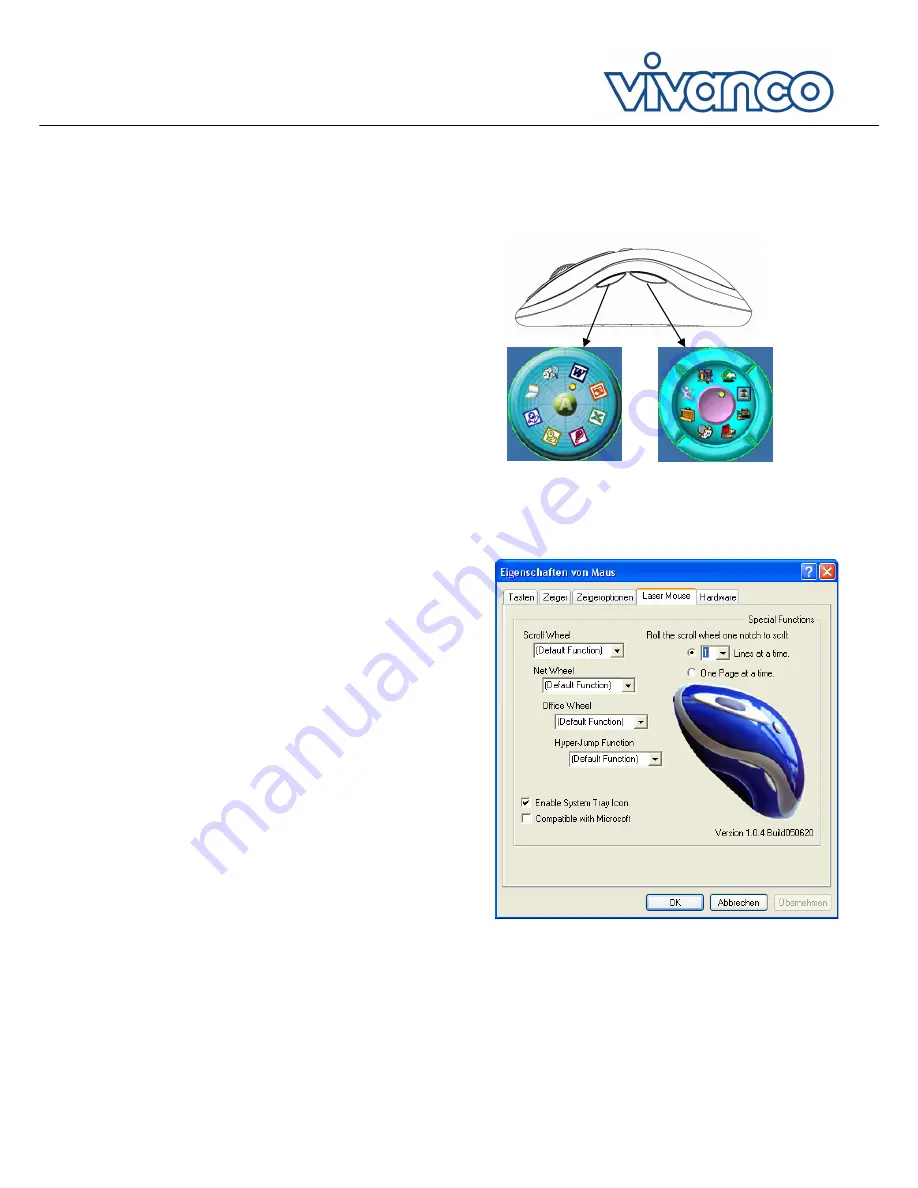
Programming the keys 

After the drivers are installed, the mouse buttons have the following 
default functions: 


„Office Shortcuts”  

„Internet Shortcuts” 

Direct start of 


Direct start of  

Office applications   

Internet applications 

 
You can also change the key functions. Click on the task bar and 
open "Mouse Settings": 


Select the required function for the respective button from the list. 
Then click on "Apply" and "OK" to activate the new function. 


Change of the mouse sensitivity 

By pressing the „1.600 dpi“ button on the top of the mouse you can 
switch the sensitivity of the laser sensor from 800 to 1.600 dpi (and 
vice versa). Depending on the application a smaller or greater 
sensitivity is useful. The blue LED marks the selected resolution (on: 
1.600dpi, off: 800dpi). 


Содержание Laser FM VelvetMSFLU 20

Страница 1: ......

Страница 2: ...eben Sie diese Installationsanleitung auf Sie enth lt wichtige Informationen zur Probleml sung Packungsinhalt Die Verpackung Ihrer Laser FM Velvet Mouse beinhaltet 1 Laser Mouse 2 Ladestation mit inte...

Страница 3: ...llten Sie diese mehrere Stunden am besten ber Nacht aufladen Sinkt der Ladezustand der Mouse unter eine gewisse Marke so blinkt die im Scrollrad integrierte LED Sie k nnen noch eine Weile weiter arbei...

Страница 4: ...integrated USB Hub 3 This manual 4 Driver CD Note If any part is missing please contact your dealer immediately for a replacement USB installation 1 Connect the USB plus of the mouse to a USB on your...

Страница 5: ...echarge the mouse as soon as possible Saving energy In order to maximize the battery lifetime the mouse has 3 different energy saving modes Standby Mode is triggered after the mouse has not been moved...

Страница 6: ...on Elle contient des informations importantes de d pannage Contenu de l emballage L emballage de votre souris contient 1 Souris laser 2 Station de rechargement avec r p teur multiports USB int gr 3 Ce...

Страница 7: ...ill de recharger celle ci pendant plusieurs heures de pr f rence la nuit Si le niveau de charge de la souris baisse au dessous d un certain niveau la DEL int gr e dans la molette de d filement clignot...

Страница 8: ...n tenga preparado el CD de instalaci n de Windows Instalaci n Guarde estas instrucciones que contienen informaciones importantes en cuanto a la soluci n de problemas Volumen de suministro La caja de...

Страница 9: ...at n durante varias horas mejor durante la noche Cuando la carga del rat n decae por debajo de un determinado nivel la LED integrada en la rueda de scroll empieza a parpadear Podr seguir trabajando du...

Страница 10: ...importanti informazioni di diagnostica dei problemi Contenuto della confezione L imballaggio del mouse contiene 1 Mouse Laser ottico 2 Base caricabatteria con HUB USB integrato 3 Le presenti Istruzion...

Страница 11: ...e scende al di sotto di un certo livello il LED incorporato nella rotella scroll comincia a lampeggiare Potete continuare a lavorare ancora per breve tempo dovreste per caricare al pi presto il mouse...

Страница 12: ...volgende onderdelen aan 1 Lasermouse 2 Laadstation met ge ntegreerde USB hub 3 Dit handboek 4 Stuurprogramma CD Opmerking mocht de inhoud van de verpakking onvolledig zijn wend u dan per omgaande tot...

Страница 13: ...r een bepaald niveau daalt dan knippert de in het scrollwieltje ge ntegreerde LED U kunt nog een poosje verder werken maar u moet de mouse dan zo snel mogelijk opladen Stroom besparen Om de levensduur...

Страница 14: ...mus Laser FM Velvet Mouse indeholder 1 Lasermus 2 Ladestation med integreret USB hub 3 Denne h ndbog 4 Driver CD Bem rk Skulle pakkens indhold v re ufuldst ndig bedes De straks henvende Dem til Deres...

Страница 15: ...jde et stykke tid endnu men b r dog snarest genoplade musen Str mbesparelse For at udnytte batteriets levetid bedt muligt r der musen over 3 forskellige slags str mbesparelser Standby modus tr der i k...

Страница 16: ...s Laser FM Velvet cont m 1 Laser Mouse 2 Esta o de carregamento com hub USB integrado 3 Este manual de utilizador 4 CD do controlador Anota o Se por acaso o conte do da embalagem n o estiver completo...

Страница 17: ...de seguran a o LED integrado na roda scroll pisca Ainda pode continuar a trabalhar durante mais algum tempo mas o rato deve ser carregado o mais depressa poss vel Economizar energia Para se aproveita...

Страница 18: ...ego Windows Zanim zaczniesz Zachowaj instrukcj obs ugi poniewa zawiera wa ne informacje dotycz ce rozwi zywania problem w Zawarto opakowania Opakowanie z myszk radiow Laser FM Velvet zawiera 1 Laser M...

Страница 19: ...lepiej przez noc W przypadku obni enia si stanu na adowania akumulatora myszy poni ej okre lonego poziomu zacznie miga dioda LED zintegrowana w k ku przewijania W takim przypadku mo na jeszcze chwil p...

Страница 20: ...Pozn mka V p pad e je balen nekompletn obra te se pros m bez zbyte n ho odkladu na sv ho prodejce a dejte n hradu Instalace hardwaru 1 Spojte z str ku USB my i s portem USB na sv m PC 2 PC rozpozn no...

Страница 21: ...itou hranici pak za ne blikat integrovan LED dioda na kole ku my i Je t chv li m ete d l pracovat m li byste ale my co mo no nejd v dob t Jak et it baterie Abyste co nejl pe vyu ili ivotnost bateri di...

Отзывы: