D-302756
13
Enroll button continuously until the red & green LEDs turn ON and then release.
The PowerMax10-G2 will indicate the result on its LCD display.
For Keyfobs:
Press the '
*
' button until the red LED blinks rapidly and then release
(the LED will continue blinking) then press the same button again. The LED lights
green and the PowerMax10-G2 will indicate the result on its LCD display.
The PowerMax10-G2
display reads [
DEVICE ENROLLED
]
(or
[
ID accepted
] if
the device was enrolled manually by entering the ID number)
, a
"Happy Tune"
☺
sounds and the PowerMax10-G2 display will then change to
[
K01:Keyfob /
Z01:Motion Sens / S01:Siren
depending on the type of enrolled device]
.
However, if the device was previously enrolled in the system
,
the PowerMax10-
G2 display reads [
ALREADY ENROLLED
].
Repeat the above procedure for each device to be enrolled in the PowerMax10-
G2 system.
Continue to section 4.4.2.1 Assigning a Location, Zone Type and Chime Option.
When exiting "
ZONES / DEVICES
" menu the PowerMax10-G2 system displays the
number of devices that need to be updated, as follows: DEV UPDATING NNN.
* If you enter the 7-digit number, you must physically install the device to
complete the procedure. If the device is not installed, the system will display
the device as "
NOT NET
" (device is pre-enrolled – not networked).
You can now press the
button to enroll the next device of the same type or
press the
OK
I
button to move to the "
LOCATION
" menu (see section 4.4.2.1) or
press the
button to take you to "
<OK> TO EXIT
".
☺
……..
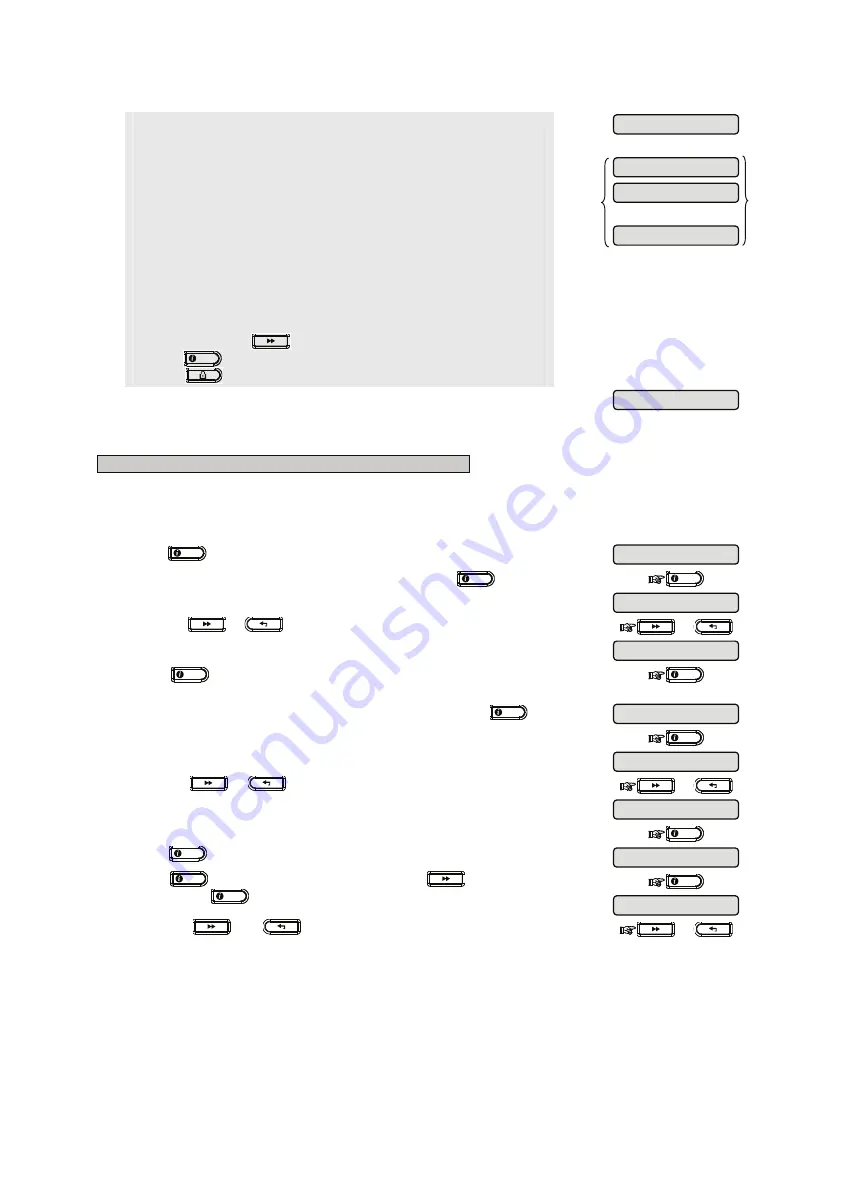
4.4.2.1 Assigning a Location, Zone type and Chime Option
B. To Assign a Location, Zone Type and Chime Option
The PowerMax10-G2 system behavior is defined according to one of 15 zone types assigned to each of the system's 30
(wireless & wired) zones.
Note:
This step is applicable to detectors only.
Continue below from the previous section.
1.
Press
OK
I
.
The PowerMax10-G2 display will read [
Z01: LOCATION
].
2.
When the PowerMax10-G2 display reads
[
LOCATION
]
,
press
OK
I
.
OK
I
The PowerMax10-G2 display will read [
Front door
].
3.
Press the
or
button repeatedly to select a location, or, enter the
location number, for example, "
Master Bdrm
".
or
4.
Press
OK
I
to confirm. The PowerMax10-G2 display will read [
Z01:ZONE
TYPE
].
OK
I
5.
When the PowerMax10-G2 display reads [
Z01: ZONE TYPE
], press
OK
I
.
The PowerMax10-G2 display will read [
12.Non-Alarm
].
OK
I
6.
Press the
or
button repeatedly to select a zone type, or, enter
the zone type number, for example, pressing 03 selects "
3. Home Delay
".
To understand the behavior of each zone, see section 4.4.2.3 Zone Types.
or
OK
I
7.
Press
OK
I
to confirm.
The PowerMax10-G2 display will read [
SET CHIME
].
8.
Press
OK
I
to change chime settings or press the
button to skip.
After pressing
OK
I
, the PowerMax10-G2 display will read [
chime OFF
].
OK
I
9.
Press the
and
buttons to select between "
CHIME OFF
" and
"
melody-chime
".
or
Chime off
Z01: SET CHIME
12.Non-Alarm
3. Home Delay
Master Bdrm
Z01:ZONE TYPE
Front door
Z01: LOCATION
ALREADY ENROLLED
S01:Siren
Z01:Motion Sens
K01:Keyfob
DEVICE ENROLLED


