background image

34

V

ISIONEER

 S

TROBE

 XP 220 S

CANNER

 U

SER

S

 G

UIDE

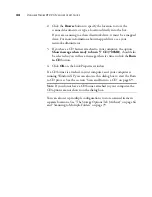
Select Format

—A set of file formats for the scanned image. The 

formats are based on the type of Destination Application you select. 
This example shows the formats that apply to the Microsoft Outlook.

The icon names indicate their file types. See “Selecting Format 
Options” on page 47 for more about the formats.

Options tab

—Switches to the view for choosing options related to the 

selected Destination Application. Click the 

PaperIn

 tab to return to the 

previous view without closing the window.

Refresh button

—Updates the links between OneTouch 4.0 and 

compatible Destination Applications on your computer. 

Properties button

—Displays a window for selecting properties for each 

type of Destination Application. See “Setting Destination Application 
Properties” on page 37

New/Copy/Edit/Delete buttons

—Click 

New

 or 

Copy

 to add new 

scan configurations to the list. Click 

Edit

 or 

Delete

 to change or remove 

them. See the sections “Creating a New Scan Configuration” on page 57 
and “Editing or Deleting Scan Configurations” on page 66.

OK/Cancel/Apply buttons

OK

 accepts any changes and closes the 

window. 

Apply

 accepts any changes but leaves the window open so you 

can continue making additional changes. 

Cancel

 closes the window 

without accepting any changes.

Important:

 If you install new software that can be used as a 

Destination Application, click the 

Refresh

 button to link the new 

software to OneTouch 4.0. Note that some software installed on your 
computer may be incompatible with OneTouch 4.0. Incompatible 
software will not be listed as a Destination Application.

Содержание Strobe XP 220

Страница 1: ...for Windows Visioneer Strobe XP 220 Scanner User s Guide...

Страница 2: ...Visioneer Strobe XP 220 Scanner User s Guide F O R W I N D O W S...

Страница 3: ...STRATION IS NOT RECEIVED DURING THE INITIAL 90 DAY PERIOD THE 12 MONTH WARRANTY IS NO LONGER AVAILABLE AND YOUR PRODUCT WARRANTY WILL TERMINATE AFTER THE 90 DAY INITIAL PERIOD EXPIRES THIS IS VISIONEE...

Страница 4: ...iew the User Guides 22 Register Your Scanner 24 Scanning 25 Scanning Basics 26 Scan a Document 26 Paper Return Options 27 Scan a Photo 28 Scan Using OneTouch 29 Check or Change Scan Settings Before Sc...

Страница 5: ...the TWAIN Interface to Scan 92 Getting Help with the PaperPort Software 97 Setting Up Your Scanner to Work with PaperPort 98 Scanning from the WIA Interface 105 Fine Tuning Your Scans 108 Maintenance...

Страница 6: ...ges on your computer WHAT S IN THE BOX Please check the contents of the box to make sure that all parts are included If any items are missing or damaged contact the dealer where you purchased the scan...

Страница 7: ...ges of the document when inserted into the scanner Page feed Automatically feeds the document through the scanner when the sensor inside the scanner detects the presence of a document Paper return Can...

Страница 8: ...set to at least 800 x 600 pixels To set your monitor s colors and resolution Open the Windows Control Panel Double click on Display then select the Settings tab DOCUMENTATION The following documentati...

Страница 9: ...e sure to turn it back on again when installation is finished If you already have a scanner connected to your computer it is recommended that you remove that scanner s driver program prior to installi...

Страница 10: ...installed and it may not work properly Note If the CD does not start automatically check the following Make sure the CD drive s door is completely shut Make sure the CD was inserted in the drive in t...

Страница 11: ...ioneer Installation window opens automatically 3 On the Main Menu click Install Products The next window lists the software that is available to install on your computer 4 Select Nuance PaperPort and...

Страница 12: ...be installed 9 On the Customer Information window accept the current values or enter new information then click Next 10 On the Setup Type window keep the default Setup Type and click Next 11 Click In...

Страница 13: ...tup Wizard opens 15 Click Next 16 On the Visioneer License Agreement window read the license agreement If you accept the terms select I Agree then click Next If you choose not to accept the license ag...

Страница 14: ...interface for TWAIN Selecting this installation option means you can use either the OneTouch software or the TWAIN interface to scan This User Guide explains how to use both methods to scan TWAIN Driv...

Страница 15: ...nned items look good on your monitor Gamma controls the brightness of the midtones of colors That setting can be changed later on as you re scanning 20 Select the option that looks best to you and cli...

Страница 16: ...Visioneer scanner you are installing 22 Click the Strobe XP 200 XP 220 image the middle one If you want to see more about the scanner before installing it click its Learn More button 23 Click OK You w...

Страница 17: ...USB Cable on page 13 Reminder If your computer is running AntiVirus or AntiSpyware software you may see messages asking you to allow installation Select the option to allow installation to proceed No...

Страница 18: ...l wall outlet at your location The three plug adapters are for 2 Position the adapter so it aligns with the edges of the power supply and will slide onto the post in the middle of the two contacts Gen...

Страница 19: ...outlet 2 Plug the scanner connector on the Y cable into the connection port on the back of the scanner Please be sure the arrows on the scanner connector line up with the arrows on the back of the sca...

Страница 20: ...dy plugged into an electrical outlet If you are using Windows XP Service Pack 2 and have plugged the USB cable into a USB 1 1 port an information bubble may open explaining that A HI SPEED USB device...

Страница 21: ...received with your scanner for the calibration process The calibration page is in a plastic storage bag Remove the calibration page from its plastic storage bag 3 Before you start the calibration plea...

Страница 22: ...ge feed in the direction of the arrows on the page The scanner grabs the page and feeds it through the scanner The scanner will pass the page back and forth several times Do not remove the page until...

Страница 23: ...eting the Found New Hardware Wizard window Do not proceed until you receive a message that your computer has found the new hardware or updated the driver database If your computer is running Windows X...

Страница 24: ...ompletely loaded return to the Complete the installation by connecting your hardware window and click OK 12 Click Close on the Installation Complete window 13 You may now remove the installation CD un...

Страница 25: ...ADDITIONAL APPLICATIONS FOR YOUR SCANNER Your scanner includes free additional applications on the installation CD To install the additional applications 1 Return to the Main Menu and click Install P...

Страница 26: ...ed photos You can use PhotoImpression to change a photo s brightness and contrast sharpen the image change its color tones remove red eye from pictures of faces and crop and resize the image PhotoImpr...

Страница 27: ...The Installation CD also contains User Guides for your scanner and for all the software you received with it To view the user guides 1 On the Main Menu click User Guides 2 The Visioneer User Guides wi...

Страница 28: ...CD is a newer version than the one currently installed on your computer 3 Click the name of a User Guide you want to view and it will open in Acrobat Reader Use the Acrobat Reader Save command to sav...

Страница 29: ...rom the pop up menu 3 Follow the instructions on the screen and register your scanner by entering your scanner s serial number and your email address The serial number is located on the underside of t...

Страница 30: ...ouch panel on the computer screen before scanning and make the changes Then insert the document into the scanner and it will be scanned with the new settings See Scan Using OneTouch on page 29 TWAIN I...

Страница 31: ...it straight into the page feed Note Always remove any staples or paper clips from documents before inserting them into the scanner Staples and paper clips can jam the feed mechanism and scratch the i...

Страница 32: ...returned back towards you move the Paper Return to the Down position To feed a document straight through the scanner move the Paper Return to the Up position as shown below The Paper Return icons on...

Страница 33: ...ner is for scanning photographs To scan a photo using the photo sleeve 1 Separate the clear plastic sleeve from the paper backing and slide the photo into the sleeve so it fits snugly at the corners 2...

Страница 34: ...document through the scanner 3 The item is scanned using predefined settings from the OneTouch software To change OneTouch settings see Selecting New OneTouch Scan Settings on page 35 4 A window shows...

Страница 35: ...s so you can choose new settings before scanning Use this window to select a new Destination Application file format and so forth See Selecting New OneTouch Scan Settings on page 35 to modify the sett...

Страница 36: ...s of the current settings 3 Click the green arrows at the top left of the Panel to switch between the panel s Detail View and Hardware View The Detail View shows the icon of the Destination Applicatio...

Страница 37: ...e button on the side of the scanner Click the OneTouch icon at the bottom right of the screen then right click the PaperIn icon The OneTouch Properties window opens and shows the current options selec...

Страница 38: ...Configuration The list of available scan configurations A configuration s basic settings include scanning mode resolution dpi page size brightness Br and contrast Cr To see a selected scan configurat...

Страница 39: ...properties for each type of Destination Application See Setting Destination Application Properties on page 37 New Copy Edit Delete buttons Click New or Copy to add new scan configurations to the list...

Страница 40: ...ch Properties Window on page 53 to display a full list of the Destination Applications that you can use with the scanner 2 From the Select Configuration list select a scan configuration Selectasoftwar...

Страница 41: ...pplication you select For example if you select Microsoft Word as the Destination Application the available formats are for text such as txt and rtf However if you select Microsoft Paint as the Destin...

Страница 42: ...roperties that you can select 1 On the OneTouch Properties window click a Destination Application 2 Click the Properties button A OneTouch 4 0 Link Properties dialog box opens for the type of Destinat...

Страница 43: ...ating the folder to receive your scanned items 1 Select the PaperPort folder where you want the file of the scanned image to be located 2 Click OK 3 Click OK or Apply on the OneTouch Properties window...

Страница 44: ...for the options you want The options will apply to all the applications in the group Always send a file even when no text was found The scanned file is sent to the OCR reader even if the image does n...

Страница 45: ...t is the icon that will appear in the OneTouch Destination List 5 In step 4 of the dialog box select the file formats that the application will accept Refer to the documentation you received with the...

Страница 46: ...reen Resolution Use this option to ensure that an image will fit on the computer s screen When a computer screen is set to a lower resolution bitmap images with a higher resolution may be too big to f...

Страница 47: ...2 To add another application to the list click the Add Application button See the steps on page 39 to add an application to the list 3 Click OK 4 Click Refresh on the OneTouch Properties window 5 Clic...

Страница 48: ...irst opening it in an application The file will be named with the current date The Storage Properties dialog box is where you can change the storage location on your computer s hard drive and can also...

Страница 49: ...ould also be selected so you will see a message when it s time to click the Burn to CD button 4 Click OK on the Link Properties window If a CD burner is attached to your computer and your computer is...

Страница 50: ...AOL you need to know which folder contains the scanned documents so you can manually attach them to your email messages 1 Click the Browse button under Folder for storing attachments and choose a fold...

Страница 51: ...to AOL Click OK to close the Internet Options Control Panel 4 Select the options for color document handling Convert Bitmaps using Screen Resolution Use this option to ensure that an image will fit o...

Страница 52: ...andard image file formats generally used if you want to do additional image processing such as photo touch up or color correction Both of those file formats tend to be larger than the JPEG format Beca...

Страница 53: ...or your scanned images Minimize Size Smallest file size lowest image quality Normal Medium file size some loss of image quality Maximum Quality Largest file size no loss of image quality Your selectio...

Страница 54: ...le formats available depending on the Destination Application you select The specific file format is the file name extension on the text format icon As you select Destination Applications that are tex...

Страница 55: ...The txt file format Text with no formatting used by the standard Microsoft Notepad application Rich Text Format The rtf file format Text that retains formatting when converted Available with Microsof...

Страница 56: ...the Destination Application with their text ready for editing and other text processing To select OCR settings 1 Select the Destination Application 2 Right click on a text format icon Note Visioneer r...

Страница 57: ...ically rotate an improperly oriented page image so the text is recognizable by the OCR process Single column output Select this option to produce a single column of text in the Destination Application...

Страница 58: ...en the OneTouch Properties window and click the Options tab 2 Select options as described below Show All Destinations This option selects all the Destination Application categories The list of Destina...

Страница 59: ...r details about attaching scanned documents to your email messages Storage and CD R W is for either storing scanned documents in a folder or sending them to a CD burner to create a CD containing the s...

Страница 60: ...ed in the folder specified in the Folder Copy Options section see the description below and the figure on page 64 This option is not available if either the Document Management or Storage and CD R W o...

Страница 61: ...owing example shows the folders when the selections are Group items by type and Group items by month 4 Click Apply and then click the PaperIn tab to see the new settings on the OneTouch Properties win...

Страница 62: ...ilable New configurations will be unlocked until you manually lock them To create a new configuration 1 Open the OneTouch Properties window and make sure the PaperIn tab is selected 2 Scroll through t...

Страница 63: ...ion Properties dialog box type a name Tip If you re going to set up the new configuration for special types of scans include that in the name such as Scan for Dark Print as a reminder that you designe...

Страница 64: ...50 dpi The higher the dpi setting the sharper and clearer the scanned image However higher dpi settings take longer to scan and produce larger files for the scanned images Brightness and Contrast Some...

Страница 65: ...to Original Select this option to let the scanner automatically determine the size of the item being scanned For example if you scan a 5 x 7 inch photo the scanner will determine the size of the phot...

Страница 66: ...ngle the image may not scan correctly In that case re scan the page using the alignment arrows to feed the paper in straight Invert Image Only available for Black White Mode this option reverses the b...

Страница 67: ...e color your eyes see as reflected from the image and gamma controls the brightness of the midtones of the color 9 Drag the sliders to the left and right to change the color settings As you do the ima...

Страница 68: ...age will automatically be reduced to fit the page Actual size crop image if necessary If the scanned image is too big to be printed or faxed on a single page the image will automatically be cropped ar...

Страница 69: ...alog box when the selected Destination Application is set as Transfer to Storage You use the options on this tab to select where you want to save your scanned items for storage when scanning with that...

Страница 70: ...e documents Type refers to the file type selected as the Format on the OneTouch Properties window By default the location of the archived documents is at C Documents and Settings your user name My Doc...

Страница 71: ...you keep those configurations locked and do not edit or delete them That way you will always have the factory settings available If you do edit or delete them and want to get the factory pre sets bac...

Страница 72: ...n make changes to a configuration but for the changes to be saved the configuration must first be unlocked Click the lock icon to unlock the configuration Clicking it toggles between locking and unloc...

Страница 73: ...ies window 2 Select the scan configuration Configure Before Scan 3 Right click on Configure Before Scan to get the menu and choose an interface to use for configuring before scanning TWAIN The TWAIN I...

Страница 74: ...t a blank CD into your computer s CD Drive 2 Open the OneTouch Properties window 3 Select Burn to CD as the Destination Application The Burn to CD Destination Application is only available if you have...

Страница 75: ...operties window opens 8 Make sure a CD is in the CD burner 9 Click the Burn to CD button The CD burner begins and your scanned documents are written to the CD Note Until you click the Burn to CD butto...

Страница 76: ...eTouch software will automatically make sure the storage location is correct To create a custom configuration for CD burning select Burn to CD as the Destination Application then click the New button...

Страница 77: ...n use it to continue with the scanning To scan with event forwarding 1 Open the OneTouch Properties window 2 Select Still Image Client as the Destination Application If Still Image Client is not liste...

Страница 78: ...canning a page A dialog box opens for you to select the application to use for scanning 6 Select the application in the box and click OK Now the application you selected opens and you can continue the...

Страница 79: ...s essentially from your scanner to a web ready format in one automatic step To scan and create an HTML web page 1 Open the OneTouch Properties window 2 Select Microsoft Explorer as the Destination App...

Страница 80: ...hoose the Internet Explorer Save As command give the page a name and save it in the location you use for web page files You may also want to write down the address shown in the Address bar so you ll k...

Страница 81: ...scan and transfer to storage 1 Open the OneTouch Properties window 2 Select Transfer to Storage as the Destination Application If Transfer to Storage is not listed as a Destination Application click t...

Страница 82: ...wn in the example above is the default place where your scanned documents are stored if you haven t created any new scanning configurations or selected a new storage location If you create a new scan...

Страница 83: ...stored 1 Open the OneTouch Properties window 2 Select Transfer to Storage as the Destination Application 3 Choose a text format as the file format 4 Right click on the text format icon and choose the...

Страница 84: ...of documents using the scan configuration with the appropriate storage location for that set Then switch to another scan configuration and scan the next set of documents to store them in their folder...

Страница 85: ...rage for Business Receipts 6 Click the Scan Settings Page Settings and Advanced Settings tabs and select the settings you want 7 Click the Storage Options tab 8 Click the Browse button 9 Select the fo...

Страница 86: ...h as Business Receipts 11 Click OK The new configuration is now listed as a Transfer to Storage configuration 12 Repeat the process to create additional new configurations such as one named Storage fo...

Страница 87: ...s you created for storage 3 Click Apply or OK 4 Scan the first set of documents The documents are scanned to the folder specified for the configuration 5 When scanning is finished return to the OneTou...

Страница 88: ...a server or mapped drive You select a mapped drive using the Browse button 1 See Scanning to Multiple Folders on page 79 or Transferring Scanned Documents to Storage on page 76 for the steps to selec...

Страница 89: ...the scanned documents Servers and mapped drives are represented by an icon that indicates its network connection 3 Click OK Now when you scan using Transfer to Storage as the Destination Application t...

Страница 90: ...e from the pop up menu You can also click the Hardware icon at the top of the OneTouch Panel If the Hardware View of the panel is open you can also right click on the Visioneer Strobe XP 220 icon The...

Страница 91: ...86 VISIONEER STROBE XP 220 SCANNER USER S GUIDE 2 Click the Properties button...

Страница 92: ...Paper pickup delay also becomes available The Paper pickup delay is the amount of time you want the scanner to wait until it feeds the item into the scanner to start scanning 2 To set the Paper pickup...

Страница 93: ...r scanner uses the TWAIN standard and this guide shows how to scan with it But you can also open the same TWAIN interface from many other graphics and imaging applications and scan from them as well B...

Страница 94: ...to ScanSoft PaperPort then click PaperPort The PaperPort desktop opens with its Folders Pane The Folders Pane shows folders for organizing your scanned images 2 Click the Scan or Get Photo icon on th...

Страница 95: ...the Available Scanners window opens If a scanner already listed in the Scan Pane but you want to choose another one click Select to open the window Scan pane If this Scan button is not active when yo...

Страница 96: ...are scanned with the PaperPort scan profile selected on the Scan Pane 8 Click the Scan button on the Scan Pane The TWAIN interface opens You re ready to start scanning Note Please wait a few moments...

Страница 97: ...ode Black White to scan in black and white The scanning pixels are all the same size and are either black or white Use this setting for letters memos and other black and white material This scan mode...

Страница 98: ...o the difference between the lighter and darker portions of the image Increasing the contrast emphasizes the difference between the lighter and darker portions decreasing the contrast de emphasizes th...

Страница 99: ...ter just shows the text and not the red watermark The Filter option applies to Black White or Greyscale Mode Reduce Moire Patterns Moire patterns are wavy rippled lines that sometimes appear on the sc...

Страница 100: ...the name of the units inches or mm millimeters to toggle between them Click OK The currently selected page size appears in the middle of the TWAIN interface on the lefthand side The Define page size...

Страница 101: ...feature is not turned on The scanner starts scanning and a progress box shows the image 11 Click the Done button on the TWAIN interface when the scanning is finished and then click Done on the PaperPo...

Страница 102: ...software includes a complete set of help topics that answer questions about each feature of the software To open the Help Topics window press the F1 key or choose PaperPort Help from the Help menu You...

Страница 103: ...r scanner to work with PaperPort Note Setting up your scanner is a one time only process for each option listed in the Available Scanners window Therefore you may have to set up your scanner once each...

Страница 104: ...scanner to work with PaperPort 1 On the TWAIN Scan Pane click the Select button The Available Scanners window opens 2 Select one of the scanner options such as TWAIN Visioneer Strobe XP 220 3 Click th...

Страница 105: ...R USER S GUIDE 4 Click Yes then click Next The next window offers you the option to run hardware diagnostics 5 Click Yes recommended then click Next The next window is for checking the connection betw...

Страница 106: ...s necessary because your scanner was already tested when you installed the OneTouch 4 0 software If other tests are checked click in their boxes to uncheck them 7 Click Next Although the next window i...

Страница 107: ...ANNER USER S GUIDE 8 Without inserting a page in the scanner simply click Next on the window to proceed The TWAIN interface opens Note If you are setting up your scanner for the WIA scanning option th...

Страница 108: ...Scan button is not active yet and a message at the bottom of the window tells you that no document is in the scanner 10 Now insert a page into the scanner face up The scanner will grab the page but wi...

Страница 109: ...ert the page and click the Scan button on the TWAIN interface again 12 Click Next on the Basic scan test passed window The final Setup window opens to let you know the setup process is finished 13 Cli...

Страница 110: ...as Windows Image Acquisition WIA for acquiring images from scanners digital cameras and other digital devices This section shows how to use Microsoft Paint to scan using the WIA interface but you can...

Страница 111: ...ROBE XP 220 SCANNER USER S GUIDE To scan using WIA from Microsoft Paint 1 On the Windows taskbar click Start point to Programs point to Accessories then click Paint 2 From the File menu choose From Sc...

Страница 112: ...button most appropriate for the item you re scanning To scan with the Custom Settings option see the next section Fine Tuning Your Scans 4 Align the document between the alignment arrows and insert i...

Страница 113: ...UR SCANS You can select new settings before you scan an item to fine tune exactly how you want to scan it To select the scanner settings before you scan 1 On the scan window click Adjust the quality o...

Страница 114: ...e the dots per inch dpi of the resolution The maximum resolution is 600 dpi the minimum is 50 dpi The higher the dpi setting the sharper and clearer the scanned image However higher dpi settings take...

Страница 115: ...tion but after many hours of use you may find that scanned images may not be as sharp and clear as when you began using the scanner In that case recalibration may solve the problem If your scanned ima...

Страница 116: ...how Hardware from the pop up menu Click the small scanner icon on a OneTouch Panel or right click the scanner icon on the OneTouch Hardware Panel to open the Hardware Properties window right away If t...

Страница 117: ...S GUIDE 3 The Hardware Properties window opens 4 Click the Properties button 5 The Device Configuration Properties window opens and shows the Device Settings Note that the Last calibrated date is red...

Страница 118: ...eaning window opens Note The Device Configuration Properties window is also available from the Windows Control Panel under Scanners and Cameras For Windows XP Right click on the Visioneer Strobe XP 22...

Страница 119: ...tion is finished 9 When calibration or cleaning is complete close the Device Configuration Properties window and remove the calibration page or cleaning page and replace it in its plastic bag Note Do...

Страница 120: ...n What s wrong Check for one of these possible problems Are the cables loose or not plugged in securely Inspect the cable connections Make sure the cables are plugged in securely Did you restart the c...

Страница 121: ...What do I do Close any other active applications so that additional memory is available If you click Continue PaperPort moves the file to the PaperPort data directory and renames the file with the pr...

Страница 122: ...ou received with your scanner for the telephone number or email address to contact Visioneer Technical Support Problem If the USB cable is disconnected during a scan the scanner does not reconnect whe...

Страница 123: ...opens and asks if you are sure you want to remove OneTouch 4 0 from your computer Click Yes The OneTouch 4 0 software is removed from your computer 5 Unplug the scanner USB cable 6 Close all open wind...

Страница 124: ...e click the Add or Remove Programs icon c Select OneTouch 4 0 then click on the Remove button d An Add or Remove message box opens and asks if you are sure you want to remove OneTouch 4 0 from your co...

Страница 125: ...h electrical outlets in different countries To remove and replace an adapter 1 Unplug the power supply from the wall outlet 2 Press down on the latch that holds the adapter in place 3 While keeping th...

Страница 126: ...a document Typically you turn off AutoLaunch when you want to use the scanner with some other scanning application You turn AutoLaunch off and on from either the OneTouch icon or from the Windows Cont...

Страница 127: ...122 VISIONEER STROBE XP 220 SCANNER USER S GUIDE The Hardware Properties window opens 3 Click the Properties button The Device Configuration Properties window for the Visioneer Strobe XP 220 opens...

Страница 128: ...ows Control Panel for Windows XP 1 On the Windows taskbar click Start point to Settings then click Control Panel 2 Double click the Scanners and Cameras icon The Scanners and Cameras window opens 3 In...

Страница 129: ...check the option Enable the generation of events when paper is inserted into the scanner to turn off the AutoLaunch feature 6 Click OK then close the Scanners and Cameras Control Panel window 7 To tur...

Страница 130: ...Windows taskbar click Start point to Programs point to PaperPort then click PaperPort The PaperPort desktop opens 2 Click the Scan icon on the PaperPort command bar 3 From the Scanner drop down list...

Страница 131: ...roperties button The Device Configuration Properties window opens The options are the same as shown on the Windows Device Configuration Properties window on page 124 7 Click to uncheck the option Enab...

Страница 132: ...nch is turned off you can still scan from the OneTouch Panel 1 Open the OneTouch Panel 2 Insert the document The scanner rollers will grab the top edge of the paper but won t feed it through yet 3 Cli...

Страница 133: ...ompatible with USB 1 1 Scanner dimensions Height 2 0 inches 5 08 cm Width 2 5 inches 6 40 cm Length 11 0 inches 28 45 cm Weight 1 3 pounds 0 59 kg Operating temperature 50 104 F 5 35 C without condens...

Страница 134: ...r scanner Visit our web site at www visioneer com to order replacement parts Part Part Name Part Number Calibration Page and Cleaning Page 05 0621 000 Photo Sleeve 05 0559 000 USB Y Cable 35 0064 000...

Страница 135: ...130 VISIONEER STROBE XP 220 SCANNER USER S GUIDE...

Страница 136: ...re Before Scan 68 Contrast 93 109 contrast 59 contrast slider 59 D Destination Application 35 36 OCR 35 text file format 49 Device Settings 58 63 Document Format 35 Document Management 54 documentatio...

Страница 137: ...ach 13 replace 120 Properties button 34 37 R recalibration 110 Refresh button 34 Resolution 41 59 93 109 Rich Text Format 50 rtf file format 50 S saturation 62 Scan Configuration 35 scan with event fo...

Страница 138: ...INDEX 133 TWAIN 68 73 TWAIN standard 88 V Visioneer Web site 115 W watermark remove 61 94 Web site for help 115 WIA 68 105 Windows Image Acquisition 105 X xls file format 50...

Страница 139: ...INDEX 134...

Страница 140: ...Copyright 2007 Visioneer Inc 05 0730 000 visioneer...

Отзывы: