background image

29

Visit 

help.c5k.info

 for more information and support

5.1 Manual Configuration of 1 Apartment Door Station & 2 Monitors

When setting up an Apartment style intercom, One-Key configuration is not available. A Windows computer with a LAN 

port is required. It is recommend to setup the devices on a bench before installation, to save time traveling between 
each individual apartment once the Indoor Monitors are installed. The below steps will allow for calling to each Indoor 
Monitor Individually.

These are the 

example details 

that we will be using for this guide. (Refer to 

6.10 Finding Available IP Addresses

)

Device

IP Addresses

Subnet Mask

Gateway

Password

Type

Main/Sub

Room No.

Door Station

192.168.1.108

255.255.255.0

192.168.1.1

admin123

VTO

Main

N/A

Indoor Monitor 1

192.168.1.111

255.255.255.0

192.168.1.1

888888

VTH

Main

1

Indoor Monitor 2

192.168.1.112

255.255.255.0

192.168.1.1

888888

VTH

Main

2

1.  Connect

 the intercom equipment (Refer to 

2. Wiring & 

Connections

)

2.  Connect your Windows computer to the network switch/

modem with a CAT5 cable.

3. 

Configure your computer to be in the 

same IP address range 

as the Door Station

  (Refer to 

Section 6.9

.

)

4.  Open a 

web  browser

 (Internet Explorer is recommended) 

and enter the 

default  IP  address  of  the  Door  Station


(192.168.1.108) into the address bar.

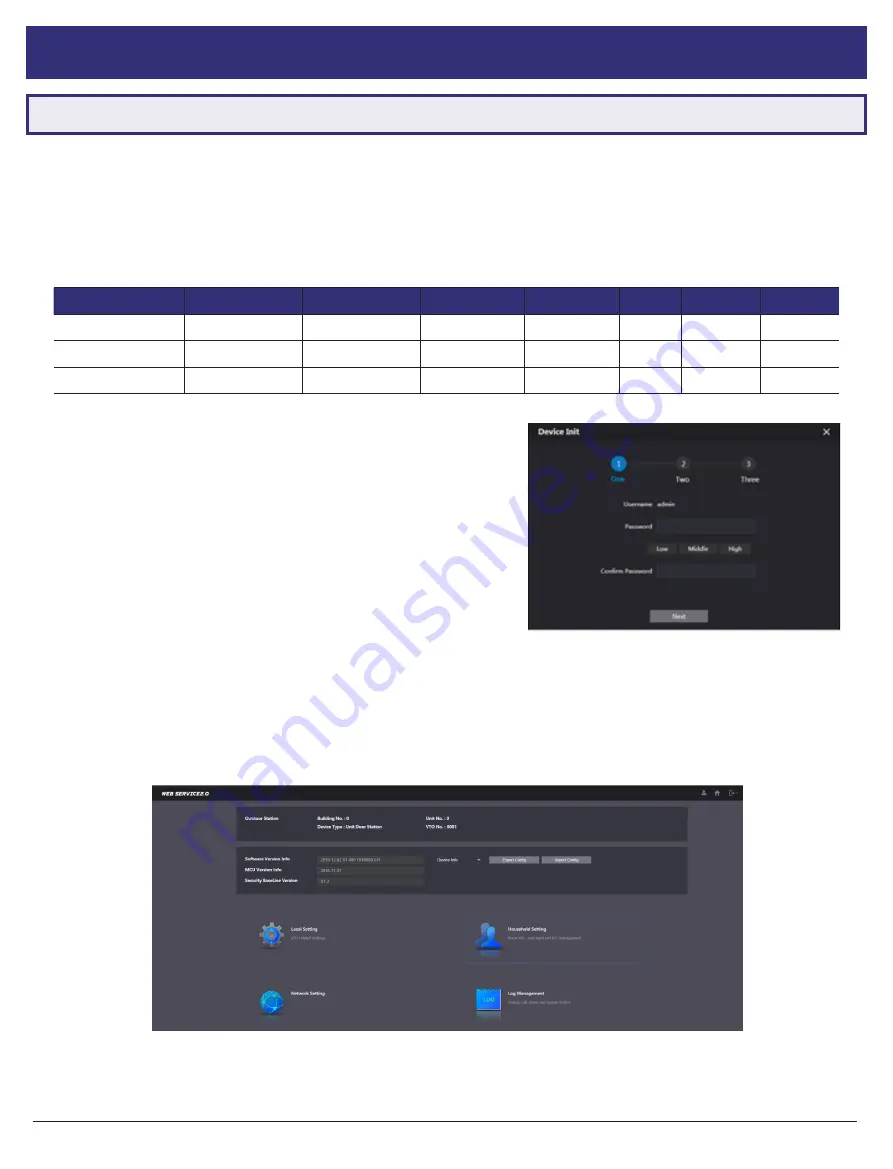
5.  You will be prompted to enter a 

password 

(admin123)

. Select 

Next. 

(Fig 5.1)

6.  Tick the check box and enter an email address

 - this will be used to reset the password if it is ever forgotten. 

Select 

Next

. (Fig 5.1)

7. 

Log in

 to the Door Station. The username is admin and the password is the one set in Step 5. (Fig 5.2)

Continued on next page 

g

5. Apartment Intercom Manual Setup

Fig 5.1:

 Door Station Initialisation

Fig 5.2:

 Door Station Web Interface

Содержание Apartment Series

Страница 1: ...Residential Apartment Intercom Systems Installation Manual Supports models from INT Q320...

Страница 2: ...itor 20 4 2 Manual Configuration of Additional Indoor Monitor s 23 4 3 Manual Configuration of Additional Door Stations 24 5 Apartment Intercom Manual Setup 5 1 Manual Configuration of 1 Apartment Doo...

Страница 3: ...ng Devices With Config Tool 42 6 13 Modify Device IP Addresses with VDP Config Tool 43 7 Mobile App 7 1 Remote Access for Residential Systems 44 7 2 Push Notifications 45 7 3 Apartment Intercom Remote...

Страница 4: ...4 1 Pre Installation Thank you for purchasing this Intercom System This install guide covers basic setup installation and use of your intercom system help c5k info For detailed technical support and s...

Страница 5: ...00 NFC cards Connect with intercom monitor s via Ethernet Door control alarm and RS485 input output relay Weather and vandal resistant IP65 IK08 aluminium body Power over Ethernet 12VDC 802 3af Reside...

Страница 6: ...d or Multiple Door Stations Setup Section 3 2 p19 21 Apartment Series Intercom Setup Section 5 1 p29 32 2 or 4 Button Door Station Setup Section 5 1 Section 5 2 p29 p33 2 Wire Intercom 1 Indoor Monito...

Страница 7: ...does not If this is your first time purchasing a VIP Residential IP Intercom we recommend setting it up on the bench before installation to familiarize yourself with the product Upon installation we...

Страница 8: ...ut 2 Wire connection port ALARM_COM Alarm common contact ALARM_NO Alarm normally open contact RS485A For use with the INTIPDM RS485B For use with the INTIPDM 12V_OUT 12V DC positive output 100ma max c...

Страница 9: ...12V DC negative input Ground connection for FEEDBACK or Unlock NO Door relay normally open contact COM Door relay common contact NC Door relay normally closed contact FEEDBACK Door latch feedback inp...

Страница 10: ...g removed from the wall 12 Pin Connector 12V 12V DC positive input GND 12V DC negative input NO Door relay normally open contact COM Door relay common contact NC Door relay normally closed contact FEE...

Страница 11: ...card reader LED connection GND Ground connection for 12V_OUT RS485B For use with the INTIPDM RS485A For use with the INTIPDM 12 Pin Connector DC_IN 12V DC positive input GND 12V DC negative input ALM_...

Страница 12: ...or as a basic alarm 6 Alarm Inputs 1 Alarm Output Network Port RJ 45 Connection Note Below is INTIPMONGW and INTIPMONGB Indoor Monitor other models vary slightly Name Description 2 Wire Input 2 Wire C...

Страница 13: ...a dry contact relay rated at Max 2A 30VDC If you require 2 door latch outputs to be triggered individually the INTIPDM is required to trigger a second latch In the diagram right the INTIPRDSG Door Sta...

Страница 14: ...laced 2 Wire cable needs to be a minimum of 24 strand 0 20mm in size The cable needs to have 2 insulated conductors 4 core or 6 core cable can be used but you must ensure only 2 cores of the cable are...

Страница 15: ...t 2 5 Intercom Wiring cont Method 2 Using a PoE Switch connected to a router OR using 12VDC and an Ethernet switch connected to a Router Devices connected to a modem Ethernet switch and powered with 1...

Страница 16: ...tch connected to a router and 24VDC power supply This wiring configuration is only suitable for use with the INTIPRDSG Door Station and INTIPMON2W 2 Wire Indoor Monitor No other devices will work in t...

Страница 17: ...dresses Subnet Mask Gateway Password Type Main Sub Door Station 192 168 1 108 255 255 255 0 192 168 1 1 admin123 VTO Main Indoor Monitor 192 168 1 109 255 255 255 0 192 168 1 1 888888 VTH Main 1 Conne...

Страница 18: ...VTO Set the device type to Main and set the IP Address 192 168 1 108 Netmask 255 255 255 0 and Gateway 192 168 1 1 Set the Time and Date Select OK Fig 3 7 10 Once all devices have had their IP address...

Страница 19: ...uide If you intend on connecting the intercom to your network for remote access you will need to obtain the local IP address details for your network Refer to 6 10 Finding Available IP Addresses Repla...

Страница 20: ...tation VTO and set a user password admin123 and email Select OK 8 Select Initialize next to the second uninitialized Door Station VTO and set a user password admin123 and email Select OK Fig 3 12 9 On...

Страница 21: ...ed details are correct Refer to Section 9 for troubleshooting 15 Once the devices have successfully configured select OK 16 The devices will reboot allow up to 10 minutes for them to connect 11 Select...

Страница 22: ...6 Tick the check box and enter an email address this will be used to reset the password if it is ever forgotten Select Next 7 Log in to the Door Station The username is admin and the password is the...

Страница 23: ...uit your network If no remote connection is required use the example in the table above Select Save The Door Station will reboot Fig 4 3 10 If prompted to choose Apartment or Villa select Villa then s...

Страница 24: ...ese will be the IP Address username and password of the Door Station 192 168 1 108 admin admin123 Do not modify the register password 123456 by default Select OK Fig 4 8 17 Select VTO Config Set the M...

Страница 25: ...m of one Door Station and one Indoor Monitor connected and working before following the below steps 4 Press and hold down the Settings button after 6 seconds a prompt will appear Enter your password 8...

Страница 26: ...tation 192 168 1 108 into the address bar 4 You will be prompted to set a password admin123 Select Next When adding additional monitors follow the steps above ensuring each Indoor Monitor has its own...

Страница 27: ...ed open a web browser and log into the Door Station using the new IP address set in the previous step 10 Select Network Setting then select SIP Server Uncheck the Enable box and enter the IP Address S...

Страница 28: ...Fig 4 18 4 3 Manual Configuration of Additional Door Stations Cont 15 On the Master Indoor Monitor press and hold down the Settings button after 6 seconds a prompt will appear Enter your password 8888...

Страница 29: ...tor 1 192 168 1 111 255 255 255 0 192 168 1 1 888888 VTH Main 1 Indoor Monitor 2 192 168 1 112 255 255 255 0 192 168 1 1 888888 VTH Main 2 1 Connect the intercom equipment Refer to 2 Wiring Connection...

Страница 30: ...way to suit your network If no remote connection is required use the example in the table above Select Save The Door Station will reboot Fig 5 3 10 Open a web browser and log back into the Door Statio...

Страница 31: ...8 and email Select OK Fig 5 6 14 If prompted with Do you want to do quick configuration select Cancel 15 Press and hold down the Settings button after 6 seconds a prompt will appear Enter your passwor...

Страница 32: ...the Main_VTO Name to an easily identified name for the door e g Gate or Doorbell Set the VTO IP Address User Name and Password These will be the IP Address Username and Password of the Door Station Tu...

Страница 33: ...the list and click Save Click Confirm to finish 1 Log into the Door Station s web interface 2 Select Local Settings then Basic 3 Turn on Group Call 4 Reboot the Door Station 5 Log back into the Door...

Страница 34: ...ddress bar 5 You will be prompted to login with a username and password enter the details and select Login 6 Select the Network Setting button 7 Modify the IP Address Subnet Mask and Gateway to suit t...

Страница 35: ...camera icon on the bottom of the screen then select the camera you wish to view Note The intercom monitor cannot display cameras that have their image rotated 90 or the substream set to H 265 1 On the...

Страница 36: ...will take up a single channel for each Door Station The Door Station will be recording constantly it is not able to be set for motion detection recording 1 Select Main Menu then Camera then Camera Li...

Страница 37: ...you are going to issue the card to by selecting the icon Fig 6 1 6 3 Issuing Cards For Door Stations with a Built In Card Reader 4 Select Issue Card You will have 120 seconds in total to scan cards a...

Страница 38: ...ter to be in the same IP address range as the Door Station Refer to Section 6 9 2 Open a web browser Internet Explorer is recommended and enter the IP address for the Master Door Station into the addr...

Страница 39: ...ion 6 6 Changing Door Station Video Audio Settings 1 Configure your computer to be in the same IP address range as the Door Station Refer to Section 6 9 2 Open a web browser Internet Explorer is recom...

Страница 40: ...he Door Station Refer to Section 6 9 2 Open a web browser Internet Explorer is recommended and enter the IP address for the Door Station into the address bar 3 Login to the Door Station using the user...

Страница 41: ...g 1 Press the Settings button A prompt will appear Enter the general settings password 123456 2 In the Ring menu you can adjust volume settings to suit the installation environment 6 8 Adjusting Moni...

Страница 42: ...trying to access 192 168 1 108 use a IP address in the 192 168 1 x range Note This cannot be the same as the device you are trying to connect to or any other device on the same network Save your chan...

Страница 43: ...e for the Intercom If the intercom devices are being installed on a business or managed network contact an IT representative for assistance 4 In our example the IP address is 10 0 0 61 To check what I...

Страница 44: ...ment Search and fill in your desired IP range 6 12 Initializing Devices With Config Tool When setting up multiple intercom devices for use in an apartment it is quicker to initialize them with the VDP...

Страница 45: ...to change the local IP address of the device with the VDP Config Tool 1 Press the Search Settings button and enter the password of the device s you wish to modify 2 Check the box next to the device yo...

Страница 46: ...nded and enter the IP address for the Door Station into the address bar 3 Once logged in go to Network Setting Basic 7 Mobile App 4 Select the Enable box then select Save 5 After waiting 2 minutes pre...

Страница 47: ...ent Intercom Remote Access If using the INTIPDDS2 or INTIPDDS4 remote access is possible by following the steps below If using the INTIPADSD this model has no function for remote access 1 Configure yo...

Страница 48: ...will record audio and video which will then be stored in the Indoor Monitors MicroSD Card if fitted You can automatically capture snapshots to the Micro SD Card when someone rings the Door Station an...

Страница 49: ...ing from an Extension monitor to the Master monitor enter the room number e g 9901 0 You can create favourites to call between rooms instead of dialing the room number each time you wish to make a cal...

Страница 50: ...until it has booted to the home screen 2 Remove the monitor from the wall while leaving it powered on 3 Using a thin object such as a paper clip press and hold the reset button on the back on the mon...

Страница 51: ...r settings are correct and the register password is 123456 Indoor Monitor rings but unable to unlock or live view the Door Station Check the VTO Config page and ensure the IP address username and pass...

Страница 52: ...heck the device is receiving 12V or PoE Ensure the power supply meets or exceeds the current rating for the device you are powering Check that the cable is terminated correctly to TIA 568A or TIA 568B...

Страница 53: ...53 Visit help c5k info for more information and support Notes...

Страница 54: ...designs and software may be subject to change without prior written notice Information layout and graphics presented in this guide are the property of their respective owners See www c5k info for more...

Отзывы: