background image

66550060-EN - V1.0 - 04/02/14

29

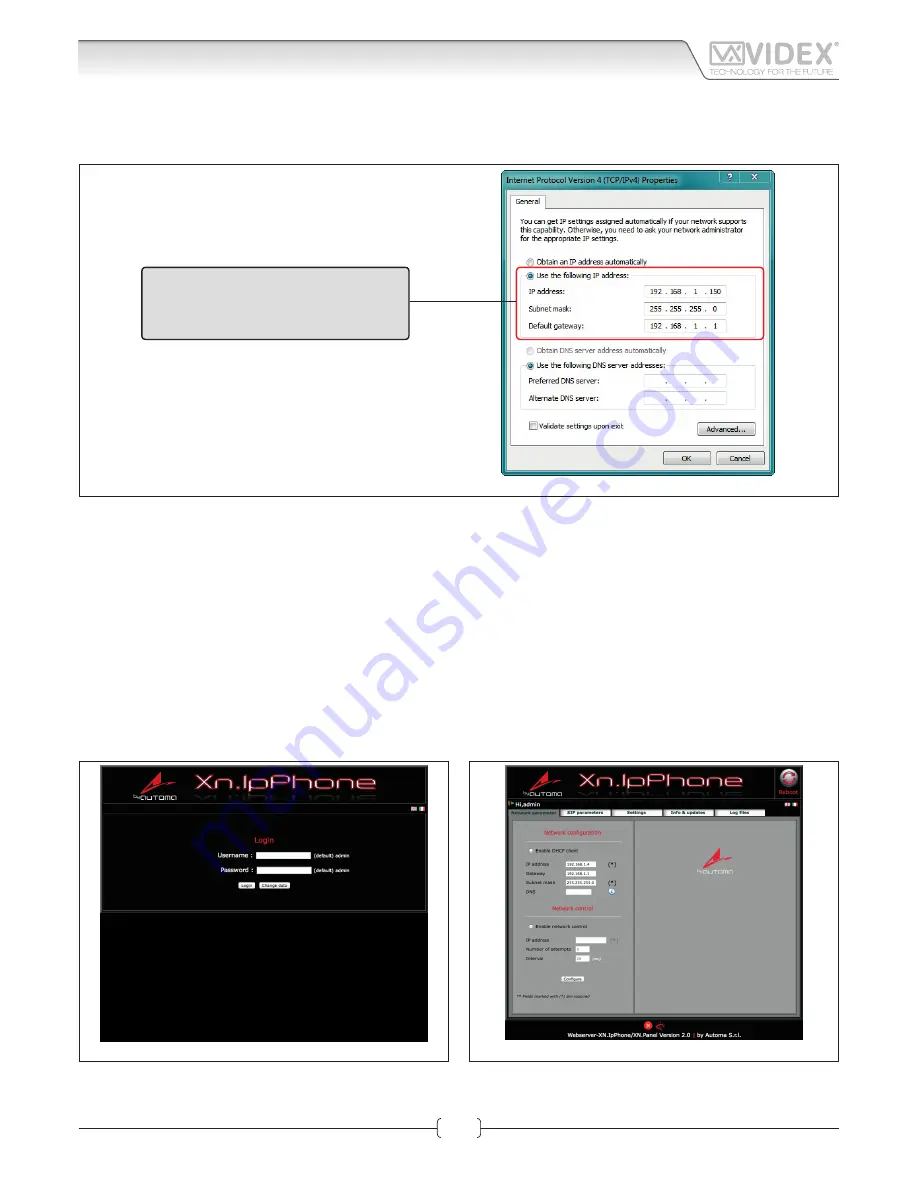
The “Internet Protocol Version 4 (TCP/IPv4) Properties” window shown in Fig. 9 will appear. Before changing settings in this window 

first make a note of the current IP Address, Subnet mask and default gateway settings as you will need to restore them once the task 

is complete. Select “Use the following IP address:” and complete the following details as highlighted.

Use the following IP address:

IP address: 

192.168.1.150

Subnet mask: 

255.255.255.0

Default gateway: 192.168.1.1

Fig. 9 


IMPORTANT NOTE!
The default IP address of the Art.KRV98/96 is preset as “192.168.1.4”. When entering the information in the “Internet Proto-

col Version 4 (TCP/IPv4) Properties” window (as shown above) the IP address that is entered must be within the same range 

as the default IP address “192.168.1.4” in this example we are using “192.168.1.150”. The range of IP addresses can be be-

tween 1 to 255. Only the last set of digits of the IP address needs to be changed “192.168.1.n” where n = 1 to 255.

After completing the details (as shown above) click on “OK” and close all windows and exit “Control Panel”.

Your PC/laptop is now ready to change the Art.KRV98/96 default IP address to one suitable for your network.

Repeat these steps later to restore your PC/laptop back to its original settings.

Next click on the internet browser icon on your desktop and enter the following web address “http://192.168.1.4/” as shown then press enter.

NETWORK PARAMETERS CHANGES

Fig. 10 


Fig. 11 


The “LOGIN” web page shown on Fig. 10 should appear. Enter the default Username (in lower case) and Password then click on the 

“Login” button.

Art. KRV98-KRV96 

 Hardware setup

IPVK - IPVKC Series IP videokit

IPVK-IPVKC - Installation handbook

Содержание IPVK KRISTALLO

Страница 1: ...66550060 EN V1 0 06 02 14 by VIDEX VIDEOKIT IPVK KRISTALLO SERIES IP One way two way videokit IPVK IPVKC KRISTALLO Installation handbook...

Страница 2: ...N andWAN With the integration of the SIP protocol as standard it is also possible to connect theVidex door stations to third party telephone systems which also support the SIP protocol WiFi can also b...

Страница 3: ...One way with codelock Two way Two way with codelock Art AMR2 12 Art KRV981 flus surface flus surface flus surface flus surface flus surface IPVK 1 98 IPVK 1 96 IPVK 1S 98 IPVK 1S 96 IPVKC 1 98 IPVKC 1...

Страница 4: ...able Standard or Wi Fi Router AMR2 12 12Vdc Power supply Art KRV96 98 IP videophone Art 4503 IP door panel DC electric lock 2 2 2 Ethernet cable Ethernet cable Standard or Wi Fi Router AMR2 12 12Vdc P...

Страница 5: ...12 12Vdc Power supply Art KRV96 98 IP videophone Art KRV96 98 IP videophone Art 4503 1D IP door panel AC electric lock Art 321 12Vac Power supply 2 2 2 2 Ethernet cable Ethernet cable Ethernet cable S...

Страница 6: ...S LAN REQUIREMENTS FOR INSTALLATION The IP devices included in the kit can work when directly connected together but to use the services that require an internet con nection it is better to connect th...

Страница 7: ...ompatible with the network follow the procedure below change these settings 1 Using a PC Laptop or desktop manually change it s IP address subnet mask and gateway to the following a Set the static IP...

Страница 8: ...e connected with VOIP switchboard systems It recognizes DTMF tones complying with RFC2833 specific tion In built web server to set operation parameters Possibility to connect up to 66 call buttons an...

Страница 9: ...or 12Vac 1 3A PSU 230V 12Vdc Art AMR2 12 or 12Vdc 2A PSU 12V 4503 0 4503 1 4503 1D Stainless Steel Aluminium High Brass green verde green white verde bianco orange arancione orange white arancione bia...

Страница 10: ...ores the module IP address and the user name password access to the factory preset Other settings are not affected by this procedure Power down the module Make a link between the PTE and GND terminals...

Страница 11: ...r cable PC Laptop Fig 1 2 Standard or Wi Fi Router AMR2 12 12Vdc Power supply Patch Ethernet cable Patch Ethernet cable Art 4503 IP door panel PC Laptop PC Laptop Fig 2 HARDWARE SET UP NOTES These fir...

Страница 12: ...on The window shown on Fig 5 will appear Select Change adap tor settings option on the left hand side The window shown on Fig 6 will appear Double click on the Local Area Connection icon Fig 4 Fig 5 F...

Страница 13: ...operties button The Local Area Connection Properties window shown on Fig 8 will appear Highlight Internet Protocol Version 4 TCP IPv4 from the list then click on the Properties button Fig 7 Fig 8 Art...

Страница 14: ...nge as the default IP address 192 168 1 3 in this example we are using 192 168 1 150 The range of IP addresses can be be tween 1 to 255 Only the last set of digits of the IP address needs to be change...

Страница 15: ...the details click on OK and close all windows and exit control panel 10 Your PC Laptop is now ready to change the Art 4503 default IP address to one suitable for your network 11 Follow the steps as de...

Страница 16: ...the factory preset following the procedure described in the section Restore the factory preset on page 10 NETWORK PARAMETERS This tab allows the editing of all network parameters Fig 2 NETWORK CONFIG...

Страница 17: ...a fully qualified domain After completing the SIP server connection fields emember to check the Enable registration to server Press the Configu e button followed by Apply configu ation A short countd...

Страница 18: ...g a button during a call or conversation will end that call and begin a new call Ring duration 10 60s The maximum ring time before the call will clear down if not answered Factory preset 30 Call durat...

Страница 19: ...GS Network settings IP Address Gateway Subnet Mask and DNS must be set according to the local area network LAN This information will normally be available from the network administrator but may also b...

Страница 20: ...hen the IP address is in use and another should be used Finally use the details obtained above to complete the Subnet Mask Gateway and DNS Server field The Gateway and DNS Server settings are particul...

Страница 21: ...H G H Y G C F E D B A C L H L P O N M H M M C Q P C D W N N C H fig 1 fig 8 fig 4 fig 5 fig 6 fig 7 fig 3 fig 10 fig 11 fig 15 fig 12 fig 16 fig 13 fig 17 fig 14 fig 18 fig 2 fig 9 EXAMPLE INSTALLING...

Страница 22: ...frames carefully fix them to the surface box using the screwdriver provided P torx end and the pin machine torx screws Q Fig 11 Note do not over tighten the screws more than is necessary INSTALLING A...

Страница 23: ...ng handsfree version or surface mount version with handset for handsfree or conventional A desk mount kit is available for the surface with handset version 10 100 Mbit Ethernet interface PoE or 12Vdc...

Страница 24: ...VIGATION BUTTON If the videointercom is in stand by but the monitor is switched off first p ess any button to switch on the display or With the videointercom in stand by and switched on it selects the...

Страница 25: ...96 W white B black H L CANBUS ConnecttoaPOE PowerOver Ethernet SwitchorRouter ConnecttoaPOE PowerOver Ethernet SwitchorRouter Fig 4 LAN 12Vdc GND Made in Italy KRV98 KRV96 W white B black H L CANBUS L...

Страница 26: ...cable PC Laptop Art KRV96 98 IP videophone Fig 1 2 Standard or Wi Fi Router AMR2 12 12Vdc Power supply Patch Ethernet cable Patch Ethernet cable PC Laptop Art KRV96 98 IP videophone Fig 2 HARDWARE SE...

Страница 27: ...Center option The window shown in Fig 5 will appear Select Change adaptor settings option on the left hand side The window shown in Fig 6 will appear Double click on the Lo cal Area Connection icon Fi...

Страница 28: ...k on the Properties button The Local Area Connection Properties window shown in Fig 8 will appear Highlight Internet Protocol Version 4 TCP IPv4 from the list then click on the Properties button Fig 7...

Страница 29: ...the same range as the default IP address 192 168 1 4 in this example we are using 192 168 1 150 The range of IP addresses can be be tween 1 to 255 Only the last set of digits of the IP address needs t...

Страница 30: ...leting the details click on OK and close all windows and exit control panel 21 Your PC Laptop is now ready to change the Art KRV98 96 default IP address to one suitable for your network 22 Follow the...

Страница 31: ...p the IP Videointercom through the different tabs In case of problems or mistakes the videointercom can be restored to the factory preset following the procedure described in the IP videointercom rest...

Страница 32: ...qualified domain After completing the SIP server connection fields remember to check the Enable registration to server Press the Configu e button followed by Apply configu ation A short countdown sig...

Страница 33: ...nfigu ation A short countdown signals that the device is updating the changes MODIFY PASSWORD The password that you can modify in this tab is the protection password required to access the advanced se...

Страница 34: ...will be used as melody From the video intercoms user interface it will be possible to select these file LOG FILES This tab is for technical support purposes If necessary it is pos sible to download th...

Страница 35: ...lso be retrievable using a PC smart phone or tablet already connected to the network This example uses Microsoft Windows 7 Other versions of Windows may differ slightly Open the Control Panel then dou...

Страница 36: ...en the IP address is likely to be available If you re ceive replies then the IP address is in use and another should be used Finally use the details obtained above to complete the Subnet Mask Gateway...

Страница 37: ...ed but the server has still not confi med the registration GREEN registration to SIP server enabled and the server has confi med the registration DATE TIME If an internet connection is available the d...

Страница 38: ...1 Relay 2 Press the button to go back to the main menu CHRONOLOGY This submenu shows the list of call events The icon on the left of the event specifies the e ent type Incoming Call Outgoing Call and...

Страница 39: ...ctive selection navigate among the subpages using the or buttons Press the button to go back to the main menu AUDIO SETTINGS This subpage Fig 7 allows you to change the ringtone melody the ringtone vo...

Страница 40: ...ng the or buttons Press the button to go back to the sub page navigation no parameters highlighted Press the button to go back to the main menu or navigate among the subpages by pressing the or button...

Страница 41: ...shows the number of devices found While in progress you can inter rupt the search by pressing the button Once the search is complete Fig 14 the unit shows the search results and asks for confi mation...

Страница 42: ...eo Press the button to enable or disable the microphone mute When muting call on mute message the but ton icon changes from this to this and goes back to this when disabling conversation message Press...

Страница 43: ...14 43 IPVK IPVKC Series IP videokit IPVK IPVKC Installation handbook Kristallo Series Flush and surface videomonitor wall mounting instructions 135cm 135cm fig 1 fig 1a fig 2a fig 4 fig 4a fig 4b fig...

Страница 44: ...st the videophone by inserting the hooks in the corresponding openings and hook the plate by pushing it down as shown in figure 4 5 Test the system for correct operation SURFACE MOUNT KRISTALLO VIDEOP...

Страница 45: ...Note...

Страница 46: ...Note...

Страница 47: ...Note...

Страница 48: ...w videx security com marketing videx security com Northern UK office VIDEX SECURITY LTD Unit 4 7 Chillingham Industrial Estate Chapman Street NEWCASTLE UPON TYNE NE6 2XX Tech Line 44 0191 224 3174 Pho...

Отзывы: