background image

7

4212 PC SOFTWARE PROGRAMMING GUIDE

4212 PC Software Programming Guide

EN-UK - V.1.0 - 17/09/15

USING THE SOFTWARE

Launching the Software

Launch the 2X00PC software by double clicking on the desktop icon.

The initial launch window will appear 

(as shown on 

the right)

. At the top of the window the software 

will show that it is checking for any devices 

connected to the PC or laptop.

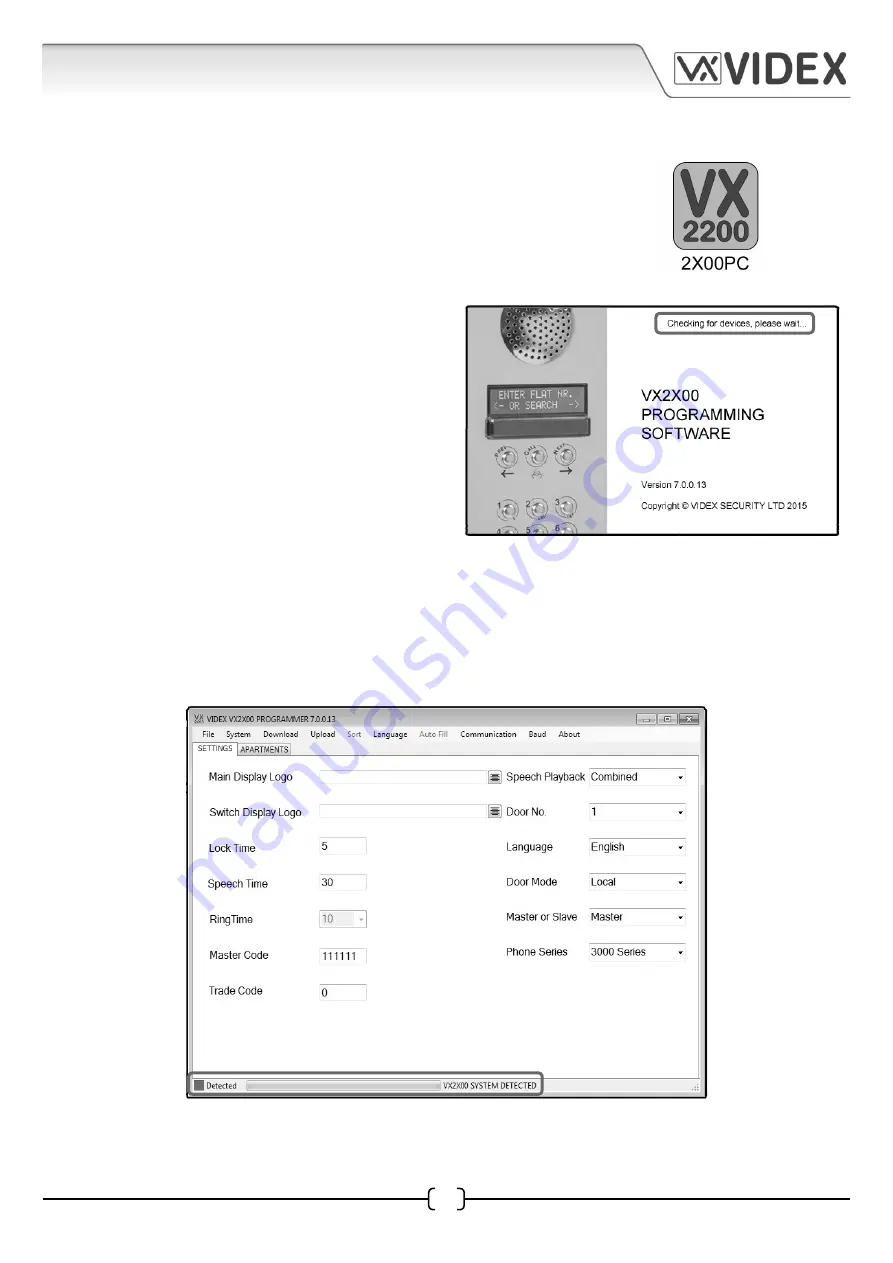
After a brief period the main programmer screen will appear.

If a device has been detected this will be shown at the bottom of the main programmer screen with 

a green square 

(see below)

. On this screen several programming options can be selected.

THE MAIN PROGRAMMER SCREEN

The main programmer screen shows several menu options at the top and two selectable windows 

on the main screen; ‘settings’ and ‘apartments’. The default window is the ‘settings’ tab.

Содержание 4212 Series

Страница 1: ...2 PC SOFTWARE PROGRAMMING GUIDE EN UK V 1 0 17 09 15 4212 PC SOFTWARE PROGRAMMING GUIDE WE RECOMMEND This equipment be installed by a Competent Electrician Security Installation or Communications Engineer ...

Страница 2: ...ack Door No Language Door Mode 11 Master or Slave Date Format Mode Security Level 12 Wiegand Format Fob Format Prox Type Set the Time and Date 13 Check Time and Date Direct Call Home2 Present RFID Enabled 14 APARTMENTS WINDOW 15 17 Mem Apt No Phone ID 15 Block ID Access Code Name Floor 16 EN enable disable 17 LOGO WINDOW 17 21 Draw Icon 17 Erase Icon Draw Box Icon Erase Box Icon Import Image Icon ...

Страница 3: ...Apartments Settings Upload Prox Upload Code 32 Upload Code Prox Upload Logo Speed 33 DOWNLOADING AND UPLOADING 33 LANGUAGE 33 AUTO FILL 33 35 Apartment No Phone ID Block ID 34 Name Floor 35 COMMUNICATION 36 Comm Port Refresh List Check Connection Manually Connect 36 BAUD 36 ABOUT 36 PROGRAMMER SCREEN STATUS AND PROGRESS BAR 36 38 Not Detected 36 Detected Opened File Saved File Downloading Settings...

Страница 4: ...voice annunciation module For technical support using this program please call 0191 224 3174 SOFTWARE INSTALLATION First of all install the USB driver which can be found on the installation CD supplied USB Driver Installation 1 Insert the 2X00PC installation CD into the CD rom drive of the PC 2 Select RUN from the start menu 3 Type in D CDM20824_setup exe then press the OK button 4 The relevant dr...

Страница 5: ...f you do not already have a pdf reader to view the pdf version of the manual click this option to install a free pdf reader If the the autorun does not begin automatically explore the CD and run the autorun exe program Install the program to your PC by clicking on the INSTALL button from the start up screen or alternatively browse the CD and select setup exe from the route of the CD The 2X00PC pro...

Страница 6: ...V Also see switches V1 Balanced video signal sync V1 PTE Push to exit input switched 0V TRD Trade signal from Art 701T NO Relay output normally open contact C Relay output common contact NC Relay output normally closed contact SL Accessory control signal switched 0V output BS Busy signal L Bus connection positive Bus connection negative 12 12Vdc power supply input OC OUTPUT Open collector output R...

Страница 7: ... that it is checking for any devices connected to the PC or laptop After a brief period the main programmer screen will appear If a device has been detected this will be shown at the bottom of the main programmer screen with a green square see below On this screen several programming options can be selected THE MAIN PROGRAMMER SCREEN The main programmer screen shows several menu options at the top...

Страница 8: ...e appearance and include additional programming options Three additional selectable tabs will also appear logo coded access and proximity access as shown below SETTINGS WINDOW In the top left corner of the settings window there are three editable text line fields Line 1 Text field will have ENTER FLAT set as the default text that will first appear on the 4212 digital panel when powered up The othe...

Страница 9: ... 30 255 seconds max Master Code Below the speech time is the master code field as shown on the right This is the code used to access the programming features when entering into the programming mode using the keypad on the front of the 4212 digital panel when progamming the panel manually It is also the code used when uploading or downloading data from the panel when using the PC programming softwa...

Страница 10: ...to set and update the trade start and end times that have been entered in the trade time fields refer to example above Pressing the set trade start button and pressing the set trade end button a confirmation window will appear shown below The get trade start and get trade end buttons allow the engineer to obtain the most recent trade times that were set when the set trade start and set trade end b...

Страница 11: ... to select and set the door number of the 4212 digital panel this feature is used on video systems where the camera recall function is required or on systems including a 2210 concierge and a panel recall is required Language Below the door number setting is the language selection with 6 languages available English default Italian Spanish Portugeuse French and German Use this menu to set the displa...

Страница 12: ...atibility mode Normal mode enables all the advanced features of the 4212 digital panel while compatibility mode restricts features to those found on older panels such as the 4202 SP30X and 8202 series Security Level Below the mode setting is the security level drop down menu This setting allows the onboard relay in the 4212 panel to be activated by using a door access code or a proximity key fob o...

Страница 13: ...or via the 4212 panel itself going through the onboard menu selections All the fob information is stored in the 4212 panel and there are no additional reader wiring connections to be made to an external controller When in reader only mode any key fob programming is done via an external proximity controller that supports the Wiegand format for example the Portal Plus proximity system or any other 3...

Страница 14: ...g button 2 will call phone ID 2 etc This check box will be unticked as default and can only be set using the PC programming software Home2 Present Below the direct call check box is the home2 present check box shown below If this box is ticked it will allow the 4212 panel to switch between the lines of text entered in Line 1 Line 2 and Line 3 text fields and logo screen refer to pages 8 and 18 20 ...

Страница 15: ...he 4212 digital panel It is already completed and grayed out Apt No The user s apartment number or flat number can be entered into this field The apartment number entered into this field will be shown at the bottom of the display flashing between calling and the user s apartment number when a call is made to that apartment as shown in Fig 3 and is the number used to make a call Fig 3 Phone ID The ...

Страница 16: ...ser can therefore have their own access code however if a single communal access code that all resisdents can share is required then it can be entered into the first access code field only in mem location 1 row shown below Name The name of the user the apartment or the office name can be entered into this field The name entered into this field will be displayed on the 4212 display once the call fr...

Страница 17: ...rogramming data is still held in the panel s memory and can be enabled again by either ticking the EN check Fig 6 box in the PC software or entering the programming manually using the panel s keypad and following the on screen menu options LOGO WINDOW The next tab on the main programmer screen is for the logo window as shown below this can be selected by clicking on the logo tab at the top of the ...

Страница 18: ...the import icon on the right will allow the engineer to import an image or logo to use Image file types that can be imported are jpeg png bmp gif and tiff Important Note It may be necessary to scale down the image size to 128x64 pixels before importing it into the logo editing window especially if it is a high resolution image The reason for this is that the detail in higher resolution images may ...

Страница 19: ...lar font is required then it may be necessary to import this using the import icon as mentioned on page 18 however consideration should be taken into account when doing this because if the font is quite intricate it may not display properly in the editing area and therefore will not show up properly on the 4212 main display Justify Image Icons Selecting and pressing on any of the justify image ico...

Страница 20: ...elect Click and hold down the left mouse button whilst moving the cursor left and the individual pixels will highlight in white along the bar as shown in Fig 8A To de select a pixel zone click and hold down the left mouse button whilst moving the cursor right and the individual pixels will gray out as the cursor is moved back along the bar as shown in Fig 8B Creating pixel zones along the vertical...

Страница 21: ... this is shown in Fig 10A the dashed lines indicate the pixel zone boundry where the image is fixed Pressing the right justify icon will move part of the image that is not within these boundaries across to the right of the editing area as shown in Fig 10B adjustable image area pixel zone where image is fixed Fig 10A adjustable image area pixel zone where image is fixed Fig 10B CODED ACCESS WINDOW ...

Страница 22: ...e setup refer to pages 9 and 10 then Trade can be selected from the drop down list An access code can then be entered in the Access Code field and then enabled by checking the EN enable check box refer to page 23 Apt No Next is the Apt No column and the apartment information in this field will appear once a name has been selected from the drop down menu in the name column as shown on the right The...

Страница 23: ...ad If an attempt is made to use the access code via the keypad on the 4212 panel then the display will show NOT ALLOWED as shown in Fig 11 The access code can be enabled again manually through the 4212 keypad following the onboard programming menu please also refer to technical programming document 66250203 EN for more information Fig 11 Clear The last column on the coded access window is the clea...

Страница 24: ...fer to page 12 Mem Like on the apartments window and coded access window this column is the memory location where the user s data is stored in the 4212 digital panel It is already completed and grayed out Name The name column for each memory location row has a drop down menu where an optional trade key fob or user s name can be selected as shown on the right The list of names shown in this drop do...

Страница 25: ...se details are entered into these fields the Wiegand 26 and card no fields will automatically be updated with the card s Wiegand number and card number respectively as shown below Understanding the Fob Format and Card Number It is important to understand the relationship between the fob format and the card number when entering the card s site code and user code into the appropriate fields If a pro...

Страница 26: ...used Follow the steps below to program a fob card When programming with a PROXE deskmount reader the PROXE icon column in the proximity access tab will be highlighted as shown below 1 First select the user name from the Name drop down list 2 Click on the deskmount reader icon next to the Apt No field as shown below At the bottom of the proximity access screen the following message will appear PRES...

Страница 27: ...ter an upload If a fob or card is presented to the onboard reader on the 4212 panel then the display will show NOT ALLOWED as shown in Fig 12 The fob or card can be enabled again manually through the 4212 keypad following the onboard programming menu please also refer to technical programming document 66250203 EN for more information Fig 12 Clear The last column on the proximity access window is t...

Страница 28: ...ode Fob Window Important Note It is important that when programming an access code to work in combination with a fob card that the access code entered in the code column in apartments window matches the same access code entered in the code column in the code fob window If they do not match then the 4212 panel will display NOT ALLOWED when the code is entered Also it is advised when uploading the d...

Страница 29: ...hat have been opened FILE New selecting this option from the drop down menu will allow a new database file to be created and saved Open selecting this option from the drop down menu will open an existing database file that has previously been saved The file path location and file name will be shown at the top of the programmer screen see below Open Recent u Select this option from the drop down me...

Страница 30: ... down menu to save the database file that is open Save As select this option from the drop down menu to save the database file in a specific file location a specified file path and location can be selected as shown below Print select this option from the drop down menu to print out the settings and the database file as shown below ...

Страница 31: ...he security level menu then the download drop down menu as shown below left will appear If the Code Fob option was set instead then the download drop down menu as shown below right will appear The menu options available Download All Download Apartments Settings Download Codes and Download Prox or Download Codes Prox and Download Logo Download All select this option from the drop down menu to downl...

Страница 32: ...tion is only applicable if the 4212 digital panel is set in main mode and 2206N bus exchange devices are being used also refer to Door Mode setting on page 11 and Block ID setting on page 16 Once selected an additional drop down menu will appear as shown below left with 3 options The first option is a further drop down list from 1 15 representing the Block ID s as shown below right Next is the Rem...

Страница 33: ...rom the top menu on the main programmer screen is the Language this is the language used for the PC programming software and is already default as english DOWNLOADING AND UPLOADING Whenever a download or an upload is performed the master code window will appear as shown below To download or upload enter the master code into the master code field and click on the start button otherwise click on the...

Страница 34: ...en numbers into the Apt No column Start when the parameters above have been set select this option to start the auto fill feature Phone ID select this option from the drop down menu as shown to the right to set the auto fill parameters From Mem To Mem First Phone ID and Start to input the phone ID programming in the Phone ID column From Mem is the first memory location where the phone ID informati...

Страница 35: ...re the name information will be stored Text is the common text that will be input into the name column Start when the parameters above have been set select this option to start the auto fill feature input before or after any text within the text field the auto fill feature will include the flat number when in completes the data in the Name column it will take the information provided in the Apt No...

Страница 36: ...tion can be selected from the Communication drop down list from the top menu and the status bar will confirm that the ports list has been updated this can be seen to the right of the progress bar as shown below COMMUNICATION Next from the top menu on the main programmer screen is the Communication drop down menu as shown on the right from which the following options are available Comm Port Refresh...

Страница 37: ...ll update to the right of the progress bar as shown below Saved File this status is shown when the programmer software has successfully saved an open file using the Save or Save As option from the File drop down list The status will update to the right of the progress bar as shown below Uploading Settings this status is shown when the programmer software uploads any of the current setting apartmen...

Страница 38: ...n Fig 13A After a few seconds it will then display the firmware version of the unit in the middle of the display as shown in Fig 13B then after a few more seconds the default panel display will be shown as shown in Fig 13C The 4212 digital panel will be ready to connect to the PC Fig 13A Fig 13B Fig 13C No Response this status is shown when the programmer software has tried to make 3 attempts to u...

Страница 39: ...39 PC or Laptop 4212 PC SOFTWARE PROGRAMMING GUIDE 4212 PC Software Programming Guide EN UK V 1 0 17 09 15 CONNECTION DIAGRAM ...

Страница 40: ...cable between the PC and the 4212 digital panel 6 Once the PC programmer software setup is complete double click on the 2X00PC desktop icon to launch the software PROXE SETUP GUIDE 1 Before launching the 2X00PC software plug the USB cable of the PROXE deskmount reader into a spare USB port on the PC 2 The drivers will automatically be installed by the PROXE reader 3 The PROXE will emit a single sh...

Страница 41: ...41 4212 PC SOFTWARE PROGRAMMING GUIDE 4212 PC Software Programming Guide EN UK V 1 0 17 09 15 ...

Страница 42: ...42 4212 PC SOFTWARE PROGRAMMING GUIDE EN UK V 1 0 17 09 15 4212 PC Software Programming Guide ...

Страница 43: ... Graphical Display 4212 programming 12 10 2015 7 0 0 14 Update PC software to include additional Logo editing features 19 10 2015 7 0 0 15 Update PC software to include floor auto fill feature SOFTWARE UPDATES FIRMWARE UPDATES Date Software Version Revision 25 07 2015 2 0 5 Update of Coded Access and Proximity protocols 16 10 2015 2 0 6 Update of Code Fob reading Trade button feature ...

Страница 44: ...ex Security Ltd Unit 4 7 Chillingham Industrial Estate Newcastle Upon Tyne NE6 2XX Southern Office Videx Security Ltd 1 Osprey Trinity Park Trinity Way London E4 8TD 4212 PC Software Programming Guide EN UK V 1 0 17 09 15 ...

Отзывы: