Vertiv
|
NetSure -48V DC Bulk Output Power System Installation and User Instructions (UM582127100)
|
Rev. E
48
NOTE!
When setting total rectifier current limit, the set point to each unit is the total set point divided
by the number of units. For example, if the system contains five rectifiers and the current limit is set to
150 amps then each rectifier has a current limit set point of 30 amps. If one or more rectifiers are
removed or fail it will take several seconds for the individual set points to the remaining rectifiers to be
reset. In the example given, if one rectifier is removed the current limit set point will drop to 120 amps
(30 amps times four remaining rectifiers) until the controller can send updated set points to the
remaining rectifiers. This takes a couple communication cycles (several seconds) after which each
rectifier would have a new set point of 37.5 amps for a total of 150 amps. The total current limit of the
rectifiers should not be set such that the loss of the redundant rectifiers will cause this temporary set
point to drop below the actual maximum expected load. If batteries are used on the rectifier output, the
batteries should support the load until the current limit set points can be re-established due to loss of a
rectifier.
NCU Start Wizard
For initial startup, you can perform the Start Wizard from the local keypad and display to enter basic
programmable parameters in one session. Refer to the “Start Wizard” section in the NCU Instructions
(UM1M830BNA).
Verifying the Configuration File
Your NCU was programmed with a configuration file that sets all adjustable parameters. The version number of
the configuration file can be found on the configuration drawing (C-drawing) that is supplied with your power
system documentation, and on a label located on the NCU. You can verify that the correct configuration file
has been loaded into your NCU by performing the following procedure.
Procedure
1.
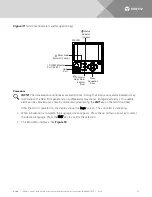
With the Main Menu displayed, press ESC. A screen displays the NCU name, serial number, IP number,
software version, hardware version, and configuration version number.
2.
Press the
DOWN key. A screen displays the NCU file system and MAC address.
3.
Press ESC to return to the Main Menu.
Checking Basic System Settings
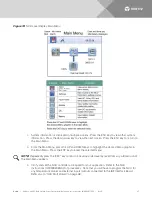
Navigate through the controller menus and submenus to check system settings. You can adjust any parameter
as required. Note that these settings can also be checked (and changed if required) via the WEB Interface.
Refer also to “NCU Start Wizard” on page 48.
NOTE!
Repeatedly press the “ESC” key to return in reverse order level by level from any submenu until
the Main Menu appears.
Procedure
1.
To Select a Sub-Menu:
Press the UP and DOWN keys to highlight the desired sub-menu. Press the ENT key to enter the
selected sub-menu.
2.
To Select a User:
To select a User, use the UP and DOWN keys to move the cursor to the Select User field. Press ENT.
Use the UP and DOWN keys to select a User previously programmed into the NCU. Press ENT to select
the User. Note that only Users programmed into the NCU are shown. Users are programmed via the
Web Interface. The default User is admin.

