Vencon UBA 5 Скачать руководство пользователя страница 6

1.2. Connecting the UBA to a Computer

The UBA connects to any unused serial port the PC.  You can use a USB port with a USB to serial port converter -
contact us for purchase information.  Connect one end of the supplied serial cable to the UBA (the connector marked
“RS232 from Computer or other UBA”) and the other end to the PC serial port or USB converter.

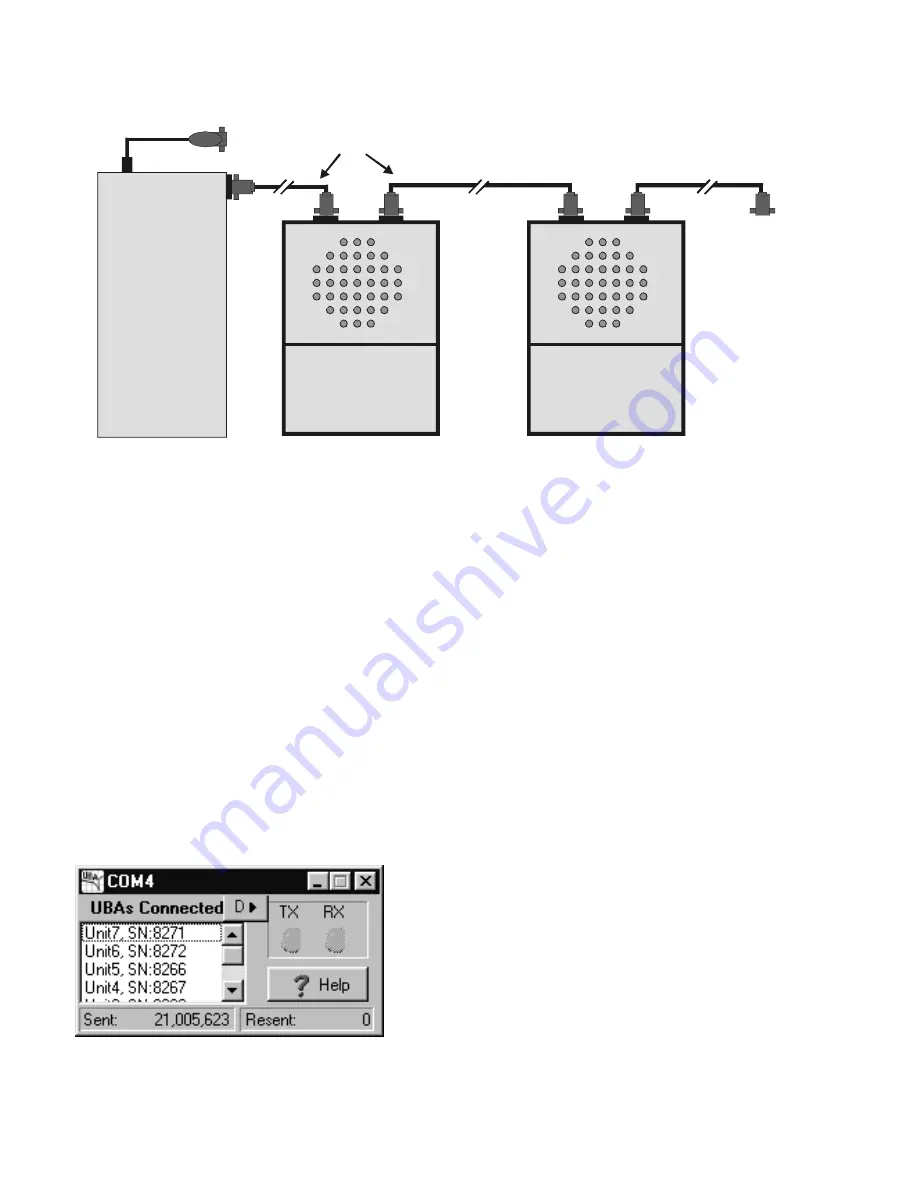
1.3. Connecting More than One UBA to a Computer

If you are using more than one UBA, then connect the first one to the PC as described above and the second UBA to
the first UBA.  No adapters or gender changers are required.  Repeat this for any additional UBAs (the maximum is
253 UBAs per serial port, but performance and memory limits are reached before that).  Each UBA requires its own
power supply or they can share a single power supply with enough current to power them all.  You can connect the
UBAs while they are on, but you will have to re-initialize the UBA network for any new UBAs to be recognized.

1.4. Extending the Serial Cable

You can extend the UBA's serial cable with a shielded extension cable.  We have successfully run the UBA with a 30m
(100ft) cable.  Check for resent commands in the communication port display (accessible from the UBA Network
window by right clicking on the comm port).  You really shouldn't have any, but if you do, don't worry as the UBA uses
advanced error correction so that any corrupted transmissions are resent.

Figure 2:  Communication port display showing UBAs connected and the number of commands sent and resent
(commands are resent if there is a communication error).  Here 21 million commands were sent without error.
This is an actual image from our burn-in station where  UBAs are run for at least 12 hours.

Page 2

The UBA Let's Get Started Guide

Figure 1: UBA serial port connections for one or more UBAs.

UBA

UBA

Vencon

Vencon

PC

Serial

Port

Second UBA

Serial cable

 (1 per UBA)

To Additional 

UBAs

First UBA

USB

Port

USB Converter

Содержание UBA 5

Страница 1: ...re to learn more We recommend that you read these first three chapters before you run your first battery analysis it won t take that long Notes The latest version of software and online help is availa...

Страница 2: ...ge non rechargeable batteries such as alkaline carbon zinc or non rechargeable lithium batteries Attempting to charge them may result in explosion Do not short the positive and negative battery termin...

Страница 3: ...Battery Analysis 7 3 3 Starting the Battery Analysis 10 3 4 Monitoring the Battery Analysis 11 3 5 Interpreting the Results Is My Battery Any Good 11 4 Creating a Battery Analysis Routine 13 4 1 Advan...

Страница 4: ...turning the equipment off and on the user is encouraged to try to correct the interference by one or more of the following measures Reorient or relocate the receiving antenna Increase the separation...

Страница 5: ...e from 15 to 24V see section 5 1 Choosing and Setting Up a Power Supply for more information Connect the power supply output cable to the back of the UBA and plug the power supply s AC cable into a wa...

Страница 6: ...they are on but you will have to re initialize the UBA network for any new UBAs to be recognized 1 4 Extending the Serial Cable You can extend the UBA s serial cable with a shielded extension cable W...

Страница 7: ...comes with two sets of battery cables with alligator clips Additional plugs or cables are available from us Plug the cables into the front of the UBA and connect the red clip to the positive terminal...

Страница 8: ...tant Data Location During the installation you will be asked where to locate the application s database This folder called VenconUBA is where the files containing battery analysis routines are stored...

Страница 9: ...oftware which comm port s to use on the Serial Port tab in the Options dialog box File menu Only free comm ports are displayed You can choose more then one comm port UBA Console will check them all fo...

Страница 10: ...copy If you ve made it so far you should see this Figure 8 UBA Console with the UBA network initialized icons are enabled UBA Console has now established communications with the UBA s and you can sta...

Страница 11: ...u can t run the load and the charger at the same time Besides applying a load or charge current the Multitester can also do a constant voltage charge a quick test measures battery internal resistance...

Страница 12: ...need to be filled in before you can start the analysis Battery Parameters Number of Cells and Capacity Enter the number of cells in series and rated capacity of the battery For battery packs the rated...

Страница 13: ...hat you enter is the number of cells in the battery pack and the capacity is the capacity of each cell not the sum of the capacity of all the cells i e the cell capacity is the same as the pack s capa...

Страница 14: ...Filename In the Analysis Results Filename edit field enter a filename to store the analysis results I suggest that you use a filename that contains information describing the battery you re testing F...

Страница 15: ...f and the charging starts sometimes after an optional rest Click the View Results icon on the tool bar to get a graphical view and summary of the progress so far The battery analysis is finished when...

Страница 16: ...arge section you can see that the battery with a rated capacity of 600mAh was discharged 580mAh This battery tested at 97 of rated capacity 580mAh 600mAh x 100 A battery with a capacity of over 90 of...

Страница 17: ...tle click on Title Edit menu Congratulations You ve completed a battery analysis You now know how to setup and initialize the UBA start a battery analysis and interpret the results The next stage is t...

Страница 18: ...cycle by right clicking and choosing NiCd NiMH Add Cycle Standard Charge Cycle Finally add a cycle that will discharge the battery and measure its capacity Right click again and choose NiCd NiMH Add...

Страница 19: ...ion Entering the finished parameters The UBA Let s Get Started Guide Page 15 Enter 10 for the Sample Time The battery voltage and charge current will be saved every 10 seconds to the results file Ente...

Страница 20: ...ds as show below Figure 24 Discharge Action Entering the discharge current parameters Click the Finished tab Page 16 The UBA Let s Get Started Guide Load Select Relative Enter 0 2 for the Discharge Cu...

Страница 21: ...Using BAR Routines In order to keep the BAR layout uncluttered and easy to maintain you can use subroutines called routines to group actions For example to add a battery analysis routine a discharge c...

Страница 22: ...stems The use of relative currents allow you to design BARs that work independently of battery capacity If you prefer you can still specify absolute values Page 18 The UBA Let s Get Started Guide Figu...

Страница 23: ...nes already populated with some actions They are accessible from NiCd NiMH Add Routine Goto This branches either forward or backwards You can specify the number of times to branch i e run a charge dis...

Страница 24: ...ines in Calibration File Each UBA has its own calibration file xxxx uba where xxxx is the serial number of the UBA In the calibration file there s three lines that describe the power supply that s pow...

Страница 25: ...r supply current by checking the Evenly divide between channels radio button on the Charger tab in the Options dialog box File menu This evenly divides the power supply current among both channels so...

Страница 26: ...will be looked into in the future If you are using the UBA exclusively for testing primary batteries then set the maximum power supply current to 0 001 1mA not 0 The UBA will then never turn on the c...

Страница 27: ...and 28W internal dissipation The UBA can charge at up to 2A per channel power supply permitting It uses a low noise linear constant current charger that drops the voltage from the power supply to your...

Страница 28: ...oftware installed Install it by running the hhupd exe file See above for location of files The DLL with the name SHLWAPI DLL is not found for Win95 and NT only If you receive this error message you wi...

Страница 29: ...e the battery pack s nominal voltage usually printed on the pack by 3 6V for li ion cells 1 2V for NiCd NiMH cells or by 2V for SLA cells My battery pack has four 1000mAh cells in series What s the pa...

Страница 30: ...tery load setting and respond to the analog input signals simulate temperature We sell a connector to bring the accessory port to the back of the UBA and also an optical isolated output connector More...

Страница 31: ...while charging then you should use the NiCd Test with Timed Charge or NiMH Test with Timed Charge routine NiCd Test with Timed Charge NiCd NiMH Test with Timed Charge NiMH Cycling a battery to determ...

Страница 32: ...battery can be damaged or explode SLA Charge SLA gel cell or lead acid Charging a sealed lead acid SLA or wet lead acid battery It uses a two step charge algorithm consisting of a current limited cha...

Страница 33: ...nector then they will match the description in the calibration file If you wish you can change the probe names in the calibration file Figure 32 Temperature Probe connections on back of UBA chassis Ch...

Страница 34: ...y temperature then you ll need to set this in the BAR For NiCd NiMH charging open the BAR in the BAR designer and click the charging action Select the Finished tab and check Temperature Probe On the T...

Страница 35: ...re curves one for the battery temperature and the other for the rate of battery temperature change The temperature peaks at line B which is when the charger was turned off A temperature cut off works...

Страница 36: ...ed Guide Figure 35 Test results from deliberately over charging a battery pack 1 25 1 30 1 35 1 40 1 45 1 50 1 55 1 60 0 0 0 5 1 0 1 5 Charging Capacity 1 0 100 Voltage per Cell 20 10 0 10 20 30 40 50...

Страница 37: ...one and to the banana input on the channel combiner See diagram below Figure 36 Using the UBA Channel Combiner Two or More UBAs Combine the channels of two or more UBAs the same as you combine the cha...

Страница 38: ...g on the Channel menu 3 Then start a battery test on the virtual UBA by clicking on the Instrument menu Page 34 The UBA Let s Get Started Guide Figure 37 Software instructions for combining channels a...

Страница 39: ...s Approvals CE and FCC Size Weight 130mm x 170mm x 75mm WxLxH 820g Warranty Two year parts and labour Software UBA Console included for Win9X NT4 2000 XP Vista Linux Wine Two Year Limited Warranty War...

Отзывы: