background image

40

.

w w w . v e l o d y n e . c o m

Digital Drive User’s Manual

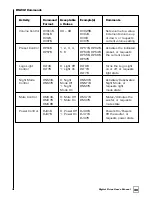
RS232 Commands

Activity

Command Acceptable  Example(s)

Comments

Format

n Values

Volume Control

#VOnn$,

00 – 99

#VO25$,

Sets volume to a value,

#VO+$, 

#VO+$,

increments volume up

#VO-$, 

#VO-$,

or down, or requests

#VO?$

#VO?$

current volume setting

Preset Control

#PSn$, 

1, 2, 3, 4,

#PS1$, #PS2$,

Activates the indicated

#PS?$

5, 6

#PS3$, #PS4$, 

preset, or requests

#PS5$, #PS6$, 

the current preset

#PS?$

Logo Light 

#LTn$, 

0: Light Off

#LT0$

Turns the Logo Light 

Control

#LT?$

1: Light On

#LT1$

on or off, or requests 

#LT?$

light state

Night Mode 

#NMn$, 

0: Night

#NM0$

Activates/Deactivates 

Control

#NM?$

Mode Off

#NM1$

Night Mode, or 

1: Night 

#NM?$

requests light

Mode On

mode state

Mute Control

#MUn$, 

0: Mute Off

#MU1$

Mutes/Unmutes the

#MU?$

1: Mute On

#MU?$

woofer, or requests

#MU0$

mute state

Power Control

#JUn$,

0: Power Off  #JU0$

Powers On/Powers

#JU?$

1: Power On

#JU1$

Off the woofer, or

#JU?$

requests power state 

Содержание SMSTM -1

Страница 1: ...Digital Drive SMS 1 Subwoofer Management System U S E R S M A N U A L Featuring Software Version 2 1...

Страница 2: ...Caution i w w w v e l o d y n e c o m Digital Drive User s Manual...

Страница 3: ...Attention ii w w w v e l o d y n e c o m Digital Drive User s Manual...

Страница 4: ...Vorsicht iii w w w v e l o d y n e c o m Digital Drive User s Manual...

Страница 5: ...Attenzione iv w w w v e l o d y n e c o m Digital Drive User s Manual...

Страница 6: ...tion Step by Step 9 SMS 1 Cable Connections 9 A Word About SMS 1 Outputs 9 A Word About Interconnect Cables 10 A Word About Connecting more than one SMS 1 10 SMS 1 Setup OVERVIEW 12 Quick Setup Using...

Страница 7: ...Please observe all warnings on the equipment itself There are no user serviceable parts inside Please refer all service questions to your authorized Velodyne dealer Prior to installation Please unpac...

Страница 8: ...Fixed 80Hz high pass crossover RCA output Variable volume control Detachable 6 foot power supply Included rack mount ears On screen controls Auto EQ Graphic or Parametric Equalizer controls for room E...

Страница 9: ...3 w w w v e l o d y n e c o m Digital Drive User s Manual Remote Contr ol...

Страница 10: ...r lowers the volume of your SMS 1 as indicated on the LCD display MUTE Mutes and unmutes the SMS 1 TEST Used to toggle between the SYSTEM SETTINGS screen and the SYSTEM RESPONSE screen during setup EX...

Страница 11: ...tion information below in order to determine which installation option is best for your system Remember to perform all installation procedures with SMS 1 unplugged until instructed to activate it SMS...

Страница 12: ...n 4 MIC INPUT This XLR input jack is for the XLR microphone cable 5 VOLUME UP DOWN Press the black UP pushbutton to incrementally raise your SMS 1 s system volume press the black DOWN pushbutton to in...

Страница 13: ...the conditioned subwoofer audio signal to up to three subwoofers 14 EQ OUTPUT LEFT RIGHT Connect the audio cable from your accessory kit to these jacks white plug to LEFT and red plug to RIGHT 15 THRU...

Страница 14: ...e and set its volume to one quarter up to one half setting 5 Power up the unit and ensure that it is receiving and processing signal from your receiver i e your subwoofer is playing bass 6 Connect the...

Страница 15: ...eaker wire into the correct terminals of the terminal block 3 Establish the return line level connection optional Connect to a pre amplifier s main outputs and return them to your amplifier inputs Whe...

Страница 16: ...Insert the XLR microphone cable s 3 pin male plug into the MIC INPUT jack location 7 on Figure 2 on the front or back panel of the SMS 1 8 Slide the microphone male connector end first down through t...

Страница 17: ...RS 232 cable and power cycle the unit Note that the daisy chain connection ONLY allows the woofers to communicate basic run time commands such as volume and preset We recommend the following sequence...

Страница 18: ...have adjusted the SMS 1 EQs manually as described below ON SCREEN Setup This section describes adjusting the onscreen settings of your SMS 1 You will be performing all the setup functions using the b...

Страница 19: ...S 1 Figure 3 Introductory Screen See Figure 3 This the Introductory screen Notice that as you change settings such as preset volume etc they are shown on this screen You enter setup mode by pressing M...

Страница 20: ...includes a SYSTEM RESPONSE sweep window and a graphic equalizer You use these settings to equalize your room The graphic equalizer features 8 bands each of which can be used at its current frequency o...

Страница 21: ...can be set as well as specifics for each preset if desired Your SMS 1 comes with 6 presets four of which are preprogrammed at the factory The Setup setting is used to initially set the crossovers slop...

Страница 22: ...m the master volume shown in the setup column When the master volume changes the preset volume changes in lock step Contour Frequency This allows you to set a frequency to boost or cut the signal to y...

Страница 23: ...to this level it is an ideal setting However some satellite speakers are only flat to 120 Hz or even higher Remember that the higher the SMS 1 is crossed over to match the satellite crossover settings...

Страница 24: ...18 w w w v e l o d y n e c o m Digital Drive User s Manual 6 Press MENU and enter 12345 to enter the EQ setup screen as follows...

Страница 25: ...19 w w w v e l o d y n e c o m Digital Drive User s Manual Upon pressing 5 you should see the following screen 7 Use the remote control to MUTE the SMS 1...

Страница 26: ...dB or a comfortable listening level This is shown below 9 Now use the DD remote control to unmute the SMS 1 then use the volume up and down keys to match the level of the SMS 1 to your full range spea...

Страница 27: ...21 w w w v e l o d y n e c o m Digital Drive User s Manual The screen should now look something like this...

Страница 28: ...to the overall amount of bass the subwoofer produces but that bass may not necessarily be as low in distortion compared to a position away from the corner The worst location for a subwoofer is typica...

Страница 29: ...nt gives you lots of flexibility to make the most out of any subwoofer placement position 11 Now that the room location has been chosen turn off the SMS 1 and the rest of your system permanently route...

Страница 30: ...e low pass crossover begin by setting the frequency and slope to the same values as the crossover settings on your receiver processor for example many units have a large small satellite setting Again...

Страница 31: ...ssover point the point at which the subwoofer meets the main speakers in terms of frequency as smooth as possible Another big factor in smoothing this point in the curve is phase discussed in step 17...

Страница 32: ...tween your subwoofer and main speakers Rather than correcting this dip with an EQ try adjusting the phase and polarity settings It is very common for the main speakers to interact with the subwoofer t...

Страница 33: ...e this process until the SYSTEM RESPONSE graph shows a 3 dB response across the bass frequencies that is up to about 120 Hz Note that this does not necessarily mean a ruler flat response 3dB is typica...

Страница 34: ...ttings but retains any level changes you may have made The AUTO EQ proceeds until you either save settings press SELECT to return to manual EQ move the cursor off the AUTO EQ field in which case the f...

Страница 35: ...Digital Drive User s Manual 21 To use the parametric EQ feature position the cursor over the EQ and press the SELECT button The values for that particular EQ appear on the right hand side of the scree...

Страница 36: ...t the lowest frequencies such as 15 20 Hz thus increasing the bass output of the subwoofer The SMS 1 will deliver this signal directly to the subwoofer and without adequate overdrive protection this c...

Страница 37: ...were selected for listening If the system volume is changed using the VOL or VOL keys on the remote the preset volume is adjusted in lock step with the system volume Crossover subsonic filter phase a...

Страница 38: ...preset is invoked at system startup by selecting it as shown 24 As a final thought on matching your subwoofer to your room don t forget the objective listening test That is make sure the subwoofer sou...

Страница 39: ...SAVE EXIT field on the screen and press select The system responds with the following screen By pressing the SELECT button you tell the system to save your settings and return to the introduction scre...

Страница 40: ...in the SMS 1 that allows you to restore the factory defaults On the main screen simply press the 8 9 and 0 buttons in sequence After the sequence has been entered the unit will flicker the video and...

Страница 41: ...wer the SMS 1 s volume use the light and night buttons to control the light and night mode respectively and use the mute button to mute the SMS 1 These settings are shown on the introductory screen as...

Страница 42: ...v e l o d y n e c o m Digital Drive User s Manual 12 VOLT TRIGGER MODE The following screens show the use of the 12 volt trigger mode The following screen denotes how to activate the 12 volt trigger...

Страница 43: ...37 w w w v e l o d y n e c o m Digital Drive User s Manual The following screen is shown when the unit is waiting for a 12 volt trigger to activate...

Страница 44: ...lease check all of the following before seeking service Following is a simple troubleshooting guide to assist you 1 Verify unit is plugged in and power outlet used is active 2 Is the unit receiving an...

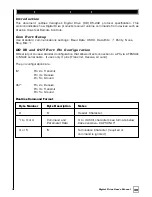
Страница 45: ...d OUT Por t Pin Configuration DD serial ports use a standard configuration that allows direct connection to a PC via a FEMALE to MALE serial cable It uses only 3 pins Transmit Receive Ground The pin c...

Страница 46: ...ated PS 5 6 PS3 PS4 preset or requests PS5 PS6 the current preset PS Logo Light LTn 0 Light Off LT0 Turns the Logo Light Control LT 1 Light On LT1 on or off or requests LT light state Night Mode NMn 0...

Страница 47: ...ET to cancel prematurely After 25 sweeps the unit saves and resets Restore defaults 8 9 0 Restores defaults and resets the SMS 1 Switch to DOWN ARROW The unit restarts in PAL SECAM 4 times followed PA...

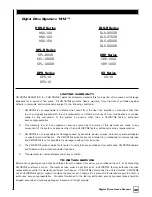
Страница 48: ...e made to any component of the system by anyone other than a VELODYNE factory authorized service representative 3 VELODYNE is not responsible for damage caused by accidents abuse misuse natural or per...

Страница 49: ...dyne Acoustics Inc 345 Digital Drive Morgan Hill CA 95037 408 465 2800 voice 408 779 9227 fax 408 779 9208 service fax www velodyne com Service E mail service velodyne com Product E mail help velodyne...

Отзывы: