26
.
w w w . v e l o d y n e . c o m
Digital Drive User’s Manual
16. You should normally not need to adjust the subsonic filter. Do so only if there are anomalies
in the very lowest frequencies that you cannot address using the normal EQ process as
described below.
17. Next adjust the phase and polarity settings. Phase is in effect a short delay in the
reproduction of the audio signal. The polarity reverses the phase (i.e. 180o shift).
Adjusting phase can change the dynamics of standing waves and frequency cancellations
in the room. Sometimes it may be useful to adjust the phase if there is a particularly
difficult peak or valley to eliminate, and/or your room placement options are limited. Phase
and polarity are also important tools to match your subwoofer to your main speakers. You
will often see a dip or peak in the crossover frequency between your subwoofer and main
speakers. Rather than correcting this dip with an EQ, try adjusting the phase and polarity
settings. It is very common for the main speakers to interact with the subwoofer to
diminish or accent frequencies near the crossover point (since this is the point where both
the subwoofer and the speakers are playing the same audio information). Don’t be afraid
to experiment to find the perfect match between your subwoofer and main speakers!
NOTE: The following step shows using the graphic equalizer (using fixed frequencies and Q) to
equalize the room.
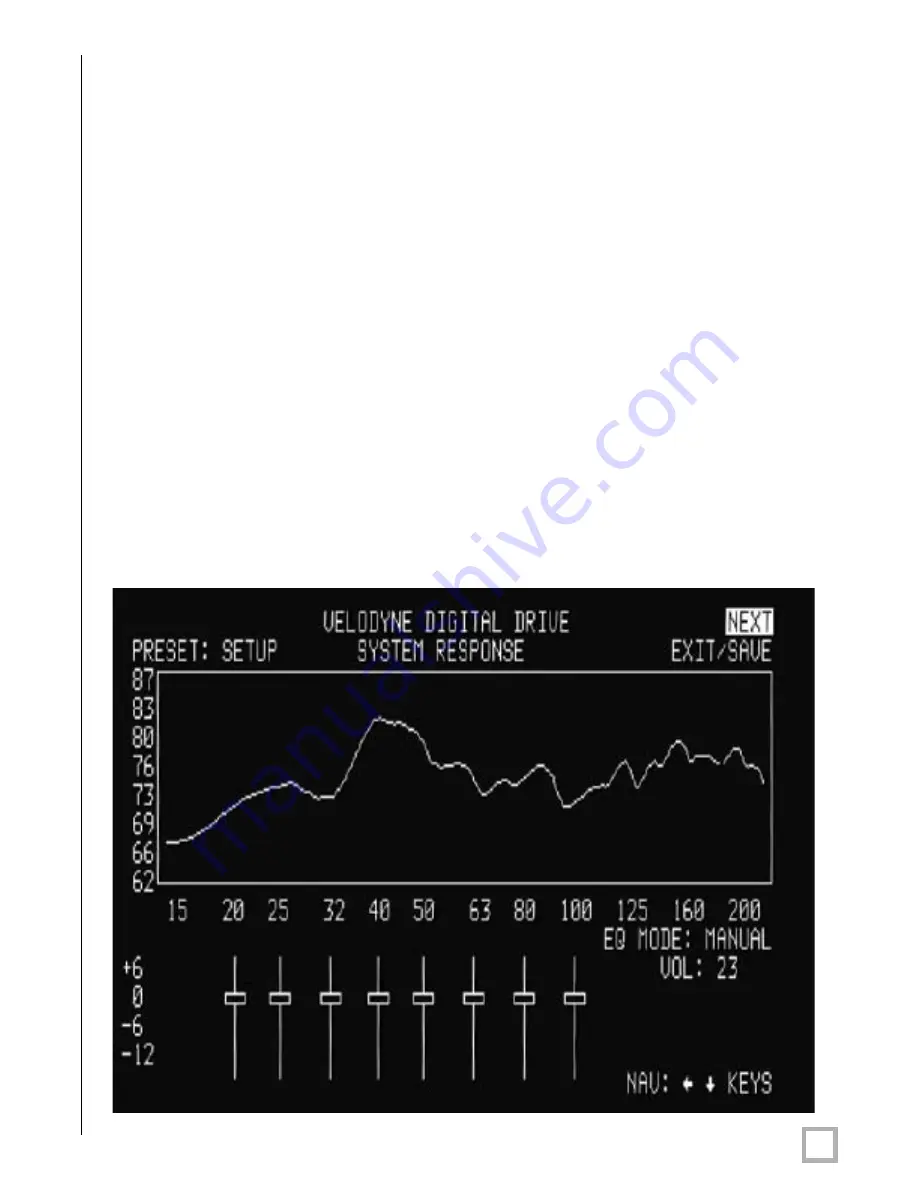
18. Next, return to the EQ setup screen and adjust the graphical EQs to eliminate peaks and
valleys from the room response. Use the right and left arrow keys to position the cursor
over the EQ you wish to adjust. If you see a peak in the response at, say, 25 Hz (this would
be evident in the “SYSTEM RESPONSE” graph), simply navigate the cursor to the EQ that
corresponds to 25Hz and use the up or down arrow keys to “slide” the EQ up or down. An
example of this is shown below:
Содержание SMSTM -1
Страница 1: ...Digital Drive SMS 1 Subwoofer Management System U S E R S M A N U A L Featuring Software Version 2 1...
Страница 2: ...Caution i w w w v e l o d y n e c o m Digital Drive User s Manual...
Страница 3: ...Attention ii w w w v e l o d y n e c o m Digital Drive User s Manual...
Страница 4: ...Vorsicht iii w w w v e l o d y n e c o m Digital Drive User s Manual...
Страница 5: ...Attenzione iv w w w v e l o d y n e c o m Digital Drive User s Manual...
Страница 9: ...3 w w w v e l o d y n e c o m Digital Drive User s Manual Remote Contr ol...
Страница 27: ...21 w w w v e l o d y n e c o m Digital Drive User s Manual The screen should now look something like this...


