Velleman CAMSET24 Скачать руководство пользователя страница 5

CAMSET24 

05/05/2010 

© 2008 

Velleman Components nv 

5

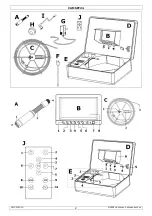
Make sure the power switch 

[E3]

 is in the off position and connect the 12VDC power plug 

[E1] 

to the 12VDC power input 

[D1] 

of the case. 

Important: 

the battery pack must be charged 

prior

 to use. It is 

not possible

 to use the battery 

pack during charging. 

Do not 

overcharge the battery pack; unplug it from the mains 

once the green LED is on. 


When using the battery pack, switch it on 

[E3]

. Verify the status by looking at the status LEDs 

[E2]

. If the battery runs empty, switch the battery pack off 

[E3]

, plug the 12VDC power plug 

[E1] 

out of the case jack 

[D1]

. Plug the AC power cord 

[F]

 into the AC input connector 

[E4]


and plug the other end into the mains. Switch the battery pack on 

[E3]

. During charging the 

charge status LED (

[E2]

, right) is red. Once fully charged, this LED turns green and all battery 

level LEDs are lit (red). 


To increase display readability under bright light conditions, fold the sunscreen 

[D6]


down/left/right and press the hook-and-loop fasteners together. 

7.


Basic operation 


Press the power button 

[B7] 

to switch the monitor on.  


Slide the protective cap 

[H]

 over the camera 

[A]

 and make sure the lens 

[A2]

 is clean. 


Gently insert the camera into the pipe, duct, cavity … that needs inspection. 

Important: 

avoid kinking the fibreglass cable as this will cause irreversible damage. 

Do not bend 

under sharp angles and do not twist the cable. 


NEVER use the camera and/or cable as an unclogging tool.


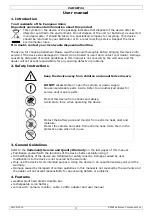
Push the LED on/off button 

[B6]

 to switch on the white LEDs 

[A1]

 in front of the camera. The 

brightness can be set by going into the monitors’ menu. 


Press the menu button 

[B2]

 to enter the setup of the monitor. Move through the setup page 

using the select button 

[B5]

 and adjust the values with the up 

[B3]

 and down 

[B4]

 buttons. 

Press and hold the up 

[B3]

 and down 

[B4]

 buttons to increase setting speed. Following values 

can be set between 0 and 100: 

CONTRAST – BRIGHTNESS – COLOUR – SHARPNESS – LED BRIGHTNESS 


To view the images on another screen (not incl.) connect that screen with a video cable (not 
incl.) to the video output 

[D2]

.  

Note: 

the video input channel button 

[B1]

 has no function in combination with this system. 


After use, switch the monitor power


off 

[B7]

. Switch the battery pack off 

[E3]

 or unplug the DC 

adaptor from the mains. 


Gently retract the camera from the inspection area. Clean the cable and wind it back on the reel.  


Disconnect all cables and place the protective caps back on the connectors. 


Make sure the camera and cables are clean and dry before storing them back in the case. Use a 
clean, soft and dry cloth. 

8.


Recording and reviewing files 
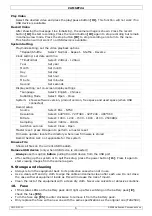
 

To make a recording of the camera images, a USB device is required (not included). Plug the 
USB device into the USB port 

[D4]

.  

Important: 

the manufacturer or dealer can not be held responsible for problems that might occur 
with or on the connected USB device, including loss of data or other malfunctions. 
Back up your USB device prior to connecting it to the pipe inspector.  


Press the power button 

[B7] 

to switch the monitor on and press the power switch on the remote 

control 

[J1]

.  


The software menu opens, refer to the table below for the software menu overview.  
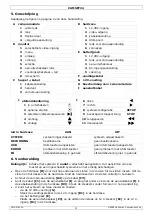
remote control  


Scroll through the menu using the up 

[J4]

 and down 

[J5]

 buttons, press the select button 

[J3]


to enter the selection (one level down), press the return button 

[J9]

 to return (one level up). 

Change values using the left 

[J6]

 or right 

[J7] 

buttons. Press the stop button 

[J9]

 to confirm, 

and when the ‘Save Changes & Exit’-window pops up, press the select button 

[J3]

 to save. 


When in playback mode, use the fast reverse 

[J10]

 or fast forward 

[J11]

 buttons to move 

through the video. Always press the play button 

[J3]

 to return to normal play-back. 
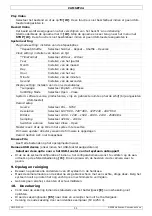
Note: 

videos are recoded in AVI-format. At resolution 640*480 data recording volume is ±500MB 

per hour. Decrease resolution to decrease data recording volume. 

Содержание CAMSET24

Страница 1: ...CAM RA D INSPECTION DE CANALISATION AVEC CONNEXION USB C MARA DE INSPECCI N DE TUBER A CON CONEXI N USB ROHRINSPEKTIONSKAMERA MIT USB ANSCHLUSS SET VIDEO PER ISPEZIONE CONDOTTE USER MANUAL 3 GEBRUIKER...

Страница 2: ...CAMSET24 05 05 2010 2008 Velleman Components nv 2 Figure 1...

Страница 3: ...vice away from children and unauthorized users DO NOT disassemble or open the camera or power supply No user serviceable parts inside Refer to an authorized dealer for service and or spare parts Prote...

Страница 4: ...own 11 fast forward case LED ON OFF SYSTEM system power on no power RECORDING images are currently being recorded no recording USB USB device connected no USB device recognized ERROR problem detected...

Страница 5: ...e setting speed Following values can be set between 0 and 100 CONTRAST BRIGHTNESS COLOUR SHARPNESS LED BRIGHTNESS To view the images on another screen not incl connect that screen with a video cable n...

Страница 6: ...320 240 480 360 Bitrate Select 1000 1200 1500 1800 2100 2500KB s Sampling Select 32KHz 24KHz Switchon autorun Select Close Open Master reset press OK again to perform a master reset Firmware update l...

Страница 7: ...C 45 C cable stainless reel with special gold point touch connector to camera fibreglass cable cable length 20m monitor 7 TFT LCD monitor OSD display video output 1Vpp PAL 75 Ohms USB recording format...

Страница 8: ...ra en de voeding mogen niet geopend of uit elkaar genomen worden U mag geen onderdelen vervangen Bestel eventuele reserveonderdelen bij uw dealer Bescherm dit toestel tegen schokken Vermijd brute krac...

Страница 9: ...case AAN UIT SYSTEM systeem ingeschakeld systeem uitgeschakeld RECORDING beeldopname geen beeldopname USB USB toestel aangesloten geen USB toestel aangesloten ERROR probleem met USB toestel geen probl...

Страница 10: ...en 100 CONTRAST BRIGHTNESS COLOUR SHARPNESS LED BRIGHTNESS U kunt de beelden ook op een andere monitor bekijken Sluit hiervoor de externe monitor niet meegeleverd met behulp van een videokabel niet m...

Страница 11: ...teer PAL NTSC Resolution Selecteer 640 480 720 480 320 240 480 360 Bitrate Selecteer 1000 1200 1500 1800 2100 2500KB s Sampling Selecteer 32KHz 24KHz Switchon autorun Selecteer Close Open Master reset...

Страница 12: ...abel kabellengte 20 m monitor 7 TFT LCD on screendisplay video uitgang 1 Vpp 75 PAL USB opnameformaat AVI opslagmedium USB toestel niet meegelev IR afstandsbediening voeding 12 VDC 1800 mA voeding mee...

Страница 13: ...s es Ne pas ouvrir le module de cam ra ou l alimentation Il n y a aucune pi ce maintenable par l utilisateur Commander des pi ces de rechange ventuelles chez votre revendeur Prot ger contre les chocs...

Страница 14: ...bas 11 avance rapide DEL dans le coffre ALLUM E TEINTE SYSTEM syst me actif syst me teint RECORDING Enregistrement en cours enregistrement d sactiv USB support USB connect support USB non connect ERRO...

Страница 15: ...NESS LED BRIGHTNESS Les images capt es par la cam ra peuvent galement tre visionn es sur un moniteur externe Connecter le moniteur externe non inclus la sortie vid o D2 l aide d un c ble vid o non inc...

Страница 16: ...nner PAL NTSC Resolution S lectionner 640 480 720 480 320 240 480 360 Bitrate S lectionner 1000 1200 1500 1800 2100 2500KB s Sampling S lectionner 32KHz 24KHz Switchon autorun S lectionner Close Open...

Страница 17: ...u menu l cran sortie vid o 1 Vpp 75 PAL USB format d enregistrement AVI support de stockage support USB non incl t l commande IR alimentation 12 VCC 1800 mA incl pile Li ion 6 x BIT18650F 220 mAh incl...

Страница 18: ...ara ni la alimentaci n El usuario no habr de efectuar el mantenimiento de ninguna pieza Contacte con su distribuidor si necesita piezas de recambio No agite el aparato Evite usar excesiva fuerza duran...

Страница 19: ...vanzar de forma r pida LED del malet n ACTIVADO DESACTIVADO SYSTEM sistema activado sistema desactivado RECORDING grabaci n activada grabaci n desactivada USB el aparato USB est conectado el aparato U...

Страница 20: ...s posible modificar los siguientes par metros de 0 a 100 CONTRAST BRIGHTNESS COLOUR SHARPNESS LED BRIGHTNESS Tambi n es posible visualizar las im genes captadas en un monitor externo Conecte el monito...

Страница 21: ...NTSC Resolution Seleccione 640 480 720 480 320 240 480 360 Bitrate Seleccione 1000 1200 1500 1800 2100 2500KB s Sampling Seleccione 32KHz 24KHz Switchon autorun Seleccione Close Open Master reset pul...

Страница 22: ...tor TFT LCD 7 visualizaci n del men en la pantalla salida de v deo 1 Vpp 75 PAL USB formato de grabaci n AVI dispositivo de almacenamiento aparato USB no incl mando a distancia IR alimentaci n 12 VCC...

Страница 23: ...vom Ger t fern ffnen oder demontieren Sie weder die Kamera noch das Netzteil nie Es gibt keine zu wartenden Teile Bestellen Sie eventuelle Ersatzteile bei Ihrem Fachh ndler Vermeiden Sie Ersch tterung...

Страница 24: ...en 5 nach unten 11 vorspulen led in hardcase AAN UIT SYSTEM System eingeschaltet System ausgeschaltet RECORDING Aufnahme keine Aufnahme USB USB Ger t angeschlossen kein USB Ger t angeschlossen ERROR P...

Страница 25: ...en Wert schneller zu ndern Konfigurieren Sie nachfolgende Einstellungen zwischen 0 und 100 CONTRAST BRIGHTNESS COLOUR SHARPNESS LED BRIGHTNESS Sie k nnen sich die Bilder auch auf einem anderen Monitor...

Страница 26: ...urce W hlen Sie PAL NTSC aus Resolution W hlen Sie 640 480 720 480 320 240 480 360 aus Bitrate W hlen Sie 1000 1200 1500 1800 2100 2500KB s aus Sampling W hlen Sie 32KHz 24KHz aus Switchon autorun W h...

Страница 27: ...0 C 45 Kabel rostfreie Kabeltrommel mit speziell vergoldetem Kamera Anschluss Glasfaserkabel Kabell nge 20 m Monitor 7 TFT LCD Bildschirmanzeige On Screen Display Video Ausgang 1 Vpp 75 PAL USB Aufnah...

Страница 28: ...ntano dalla portata dei bambini e delle persone non qualificate Non smontare n aprire la telecamera o l alimentatore Il dispositivo non contiene parti riparabili dall utente Contattare il rivenditore...

Страница 29: ...pause 9 conferma stop ritorno STOP 4 up su 10 riavvolgimento veloce 5 down gi 11 avanzamento veloce LED di stato ON OFF SYSTEM sistema attivato sistema disattivato RECORDING il sistema in fase di reg...

Страница 30: ...di condotti e tubature Agire sul tasto LED ON OFF B6 per accendere i LED bianchi A1 alloggiati nella parte frontale della telecamera La loro luminosit pu essere regolata tramite l apposita voce del me...

Страница 31: ...ione Premere nuovamente il tasto record J2 per sospendere la registrazione Premere il tasto stop J9 per arrestare l operazione e tornare al menu Questa funzione non operativa se non vi alcuna pen driv...

Страница 32: ...ando utilizza una batteria al litio da 3V tipo CR2025 inclusa Il portabatteria situato nella parte inferiore del telecomando Per sostituire la batteria premere sul lato del coperchio 1 quindi tirare 2...

Страница 33: ...resulting from improper handling negligent maintenance abusive use or use contrary to the manufacturer s instructions damage caused by a commercial professional or collective use of the article the wa...

Страница 34: ...ne utilisation commerciale professionnelle ou collective de l appareil la p riode de garantie sera r duite 6 mois lors d une utilisation professionnelle tout dommage l appareil qui r sulte d une utili...

Страница 35: ...ung wird die Garantieperiode auf 6 Monate zur ckgef hrt Sch den verursacht durch eine unsachgem e Verpackung und unsachgem en Transport des Ger tes alle Sch den verursacht durch unautorisierte nderung...

Отзывы: