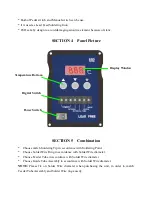
until the solder wire is sent out. Turn off power switch.
5.Install Soldering Iron
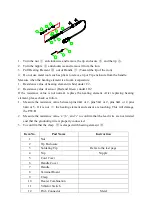
Screw off Nut
②
on the bracket assembly and remove Handle clamping element
③
. Place
soldering iron in the other Handle clamping element and install the previous one (Make the
Handle in the middle of them), and then screw on Nut
②
.
Connect plug of soldering iron handle to pin 6 receptacle in front of unit and tighten it.
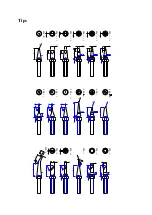
6.Adjust the position of Guide tube and Soldering tip
Turn the Connector to change combination location of Guide tube
and Soldering tip. Unscrew
Locking Screw
⑭
of Guide tube and turn around Guide tube
⑬
can also change
combination location of Guide tube and soldering tip.
7.Adjust direction of soldering iron
When adjust direction, first unscrew the Nut of corresponding direction, and then adjust.
Unscrew the Nut
at the bottom end of Bracket assembly and turn around or rotate Bracket
assembly can all adjust direction of Soldering Iron. Finally, tighten Nut after adjusting.
Unscrew two Nuts
①
and
②
on top end of Bracket simultaneously and turn around Handle
clamping element can also adjust direction of Soldering Iron.
NOTE:
* Please be careful not to break heating element when screw off black nipple to install
connector.
* If step on Pedal Switch or press down the red Touch Switch, the solder wire can’t be sent
out automatically, it needs to adjust feeding pressure
―
Pressure adjusting screw
⑥
. Refer
to parameter setting.
* The Feeder tube can’t be bended overly, so that the Solder Wire will not be blocked.
* When turn on the power Switch, the soldering Iron begin to heat up (Temperature lamp is
light). In order not to be scalded, please be careful when installing.
* Make sure the power voltage in accord with working voltage of unit.
SECTION 8 Set Parameter
1. Feeding Speed setting
Feeding speed is set with digital switch. Press “+” button on the digital switch and the match
digit will increase by one step. Similarly, press “-” button, and the match digit will decrease
by one step.
Feeding speed is designed with one digit. 0~9 denotes the feeding speed is about
2.7m/s~27m/s (Angle: 36
º
/s~360
º
/s).The resolution is 2.7mm/s, namely, each digit denotes
feeding speed is 2.7m/s. (36
º
/s)
Example:
When the digit is set as 0, the speed is slowest with 2.7mm/s. When it is set as 1,
the speed is 5.4mm/s. When it is set as 9, the speed is fastest with 27mm/s.
Press the Speed Switch to set the suitable digit in accordance with working demand. The


