1.
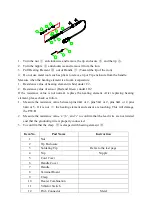
Turn the nut
①
anticlockwise and remove the tip enclosure
②
and the tip
③.
2.
Turn the nipple
④
anticlockwise and remove it from the iron.
3.
Pull Heating Element
⑩
out of Handle
⑦
. (Toward the tip of the iron).
4.
Do not use metal tools such as pliers to remove tip or Tip enclosure from the handle.
Measure when the heating element is at room temperature:
1.
Resistance value of heating element (white) under 1
Ω.
2.
Resistance value of sensor (Red and Green ) under 10
Ω.
If the resistance value is not normal, replace the heating element. After replacing heating
element, please check as follow.
1.
Measure the resistance value between pins 4&1 or 2, pins 5&1 or 2, pins 6&1 or 2, pins
6&4 or 5. If it is not
∞
, the heating element and sensor are touching. This will damage
the P.W.B.
2.
Measure the resistance value ‘a’,’b’, and ‘c’ to confirm that the lead wire are not twisted
and that the grounding wire is properly connected.
3.
To confirm that the clasp
⑨
is clasped with heating element
⑩
.
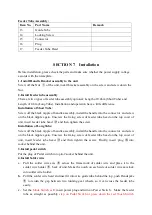
Item No.
Part Name
Instruction
1
Nut
2
Tip Enclosure
3
Soldering Tip
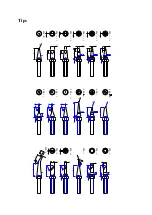
Refer to the last page
4
Nip
Nipple
5
Cord Cover
6
Handle Cover
7
Handle
8
Terminal Board
9
Clasp
10
Heater Combination
11
Vibrator Switch
12
Pin 6 Connector
Metal

