background image

Page 

23

 of 

32

PROBA 5

Doc.nr: 170366

Version: 1.1

3.2 Operating the Proba using a touchscreen.

You can use a touchscreen to configure and operate the Proba 5 Compact.
The touchscreen is connected to the same VASP network as the Proba 5 Compact. Before the 
touchscreen can communicate with the Proba, you first need to configure it. 

3.2.1 Configuring the IP addresses

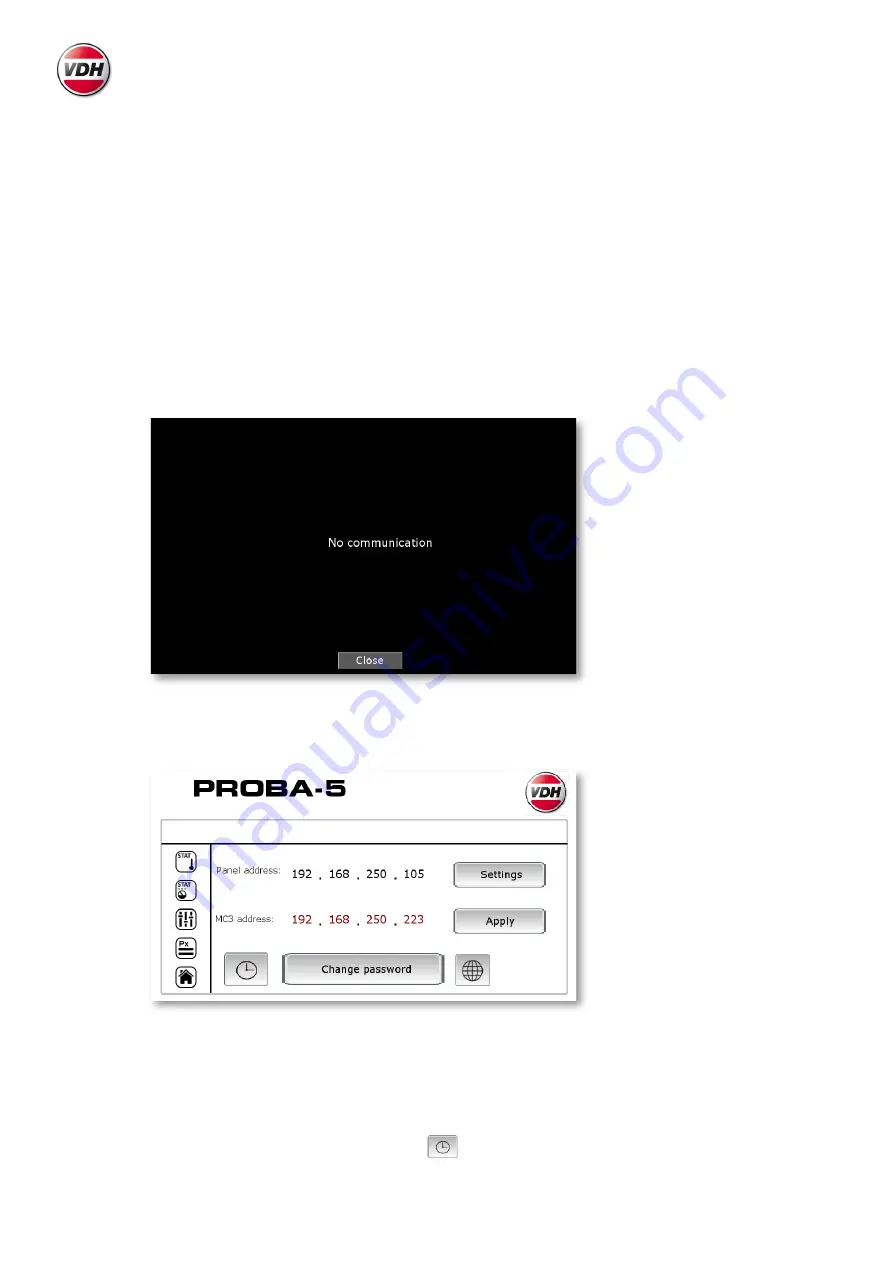
When you switch on the touchscreen, the Proba control screen is first displayed. After a few moments, 
the ‘No communication’ message is displayed on the screen.

Fig. 36 

Control panel - No communication

Press ‘No Communication’ for 10 seconds and then press ‘Close’.
The screen on which you can configure the IP addresses is now displayed.

Fig. 37 

Control panel - Configuring IP addresses

Now press the numbers to configure the IP addresses.
Configure the IP address for the control panel at ‘Panel Address’ and the IP address of the Proba with 
which it must communicate at ‘MC3 Address’.

The internal clocks must be set correctly to ensure that the Proba and the registration process are 
working properly. To set the clock, press the 

 symbol. The following screen is displayed:

Содержание PROBA 5 Compact

Страница 1: ...Description PROBA 5 Pages 32 Doc nr 170366 Type Manual By HN Version 1 1 File PROBA5_EN indd Signature Date 07 12 2018 VDH Products BV Manual PROBA 5 ...

Страница 2: ...gistered trademarks of their respective holders Disclaimer VDH Products BV provides this manual as is makes no representations or warranties with respect to its contents or use and specifically disclaims any expressed or implied warranties of merchantability or fitness for any particular purpose VDH Products BV reserves the right to make changes to the content of this manual at any time without ob...

Страница 3: ... only describes the PROBA specific part of the VASP software Always consult your supplier in case of maintenance or repairs Used notations Manual change notes Release Date Remarks 1 1 07 12 2018 First release References Reference to other documents like drawings and descriptions of components Important Important information which is assumed as being known with this user manual Extra info Backgroun...

Страница 4: ... the installation only as described in this manual Other use van lead to dangerous situations and or damage to installation or products Be sure to remove all tools from the machine after any maintenance Read this first Before the installation is going to be used the instructions mentioned below have to be considered The guarantee of the installation expires if any damage failure or shortcoming is ...

Страница 5: ... 1 4 7 1 General measurements 16 2 1 4 7 2 Specific measurements 17 2 2 Subtab Programs 18 2 2 1 Selected series Temperature 19 2 2 2 Selected series Gas Concentration 19 2 2 3 Selected series Gas Time 19 2 2 4 Selected series Ventilation 20 2 2 5 Selected series Humidity 20 2 2 6 Selected series Pressure 20 2 2 7 Selected series Pressure Reverse 20 2 2 8 Selected series Fan speed 20 3 1 Simple co...

Страница 6: ... be selected what will lead to multiple tabs see next chapter Fig 1 Overview location Tab list Use tab List to get an overall view of all cells with corresponding general measurements Visibility of current phase Current phase is only presented if it is active Back ground colour is also used for status Ripening Gassing ULO Failure Greyed out not active No communication Humidity Selection of a group...

Страница 7: ...the required action Fig 2 Modify room appearance 1 1 1 Product image Use this selection to choose the desired graphic presentation of the fruit Consult your supplier in case another picture is needed Fig 3 Product selection 1 1 2 Show sensor Use this selection to select the control sensors that are shown as text at right side of cell The unit which is entered will also be used for the view at the ...

Страница 8: ... sensors and zones individually in each cell De activated items are shown as greyed out 1 Select item with right mouse button 2 Select or de select Activate Fig 6 De activated items Modify programs See 2 2 Subtab Programs on page 18 for modifying program templates Cell see page 14 Fan see page 14 Evaporator see page 14 Air bag see page 15 Door see page 15 Measurements see page 16 General zone meas...

Страница 9: ...d This depends on the cell status Visual items depend on current cell status Hold status Manual regime for ventilation and manual setting for relative humidity fan speed and temperature Manual operation for ventilator and heating are enabled Ripe status Ripening is done according ripening program Manual operation for ventilator heating and gassing are enabled Standby status Manual regime for gassi...

Страница 10: ...tilator heating and gassing manually Enter batch first To activate any mode it is necessary to enter batch information first Update display Use left mouse button to update the current progress of an activated process Select available program template It is possible to edit current program template temporarily in the same way as during configuration See 2 2 Subtab Programs on page 18 for details Pr...

Страница 11: ...ilation A manual ventilation can be set This ventilation will on be executed once This can be used if you want to be sure that it s safe to enter the room Depending on the parameter settings a gassing period can be stopped if a manual ventilation has been executed If there is gas in the room gas should be set to off and the manual ventilation should be confirmed before it will take place This to a...

Страница 12: ...tion with gas in the room 2 1 2 6 Operation mode ULO By closing a digital input the Proba can be set in ULO mode In this mode the door will be locked and the ventilation is blocked A fix setpoint and the choice if the running program should be stopped can be set in the parameters Fig 15 Room view in ULO mode ...

Страница 13: ...ller cell This makes it possible to continue ripening in another cell Select another available cell Enter here your batch details Contents depends on settings Don t change batch details and close window Don t change batch details and close window Accept new batch details Move batch details to another cell Batch details are erased from current cell Open the other cell to see the batch details again...

Страница 14: ...ans is shown in percentage of full speed Full speed is 100 Fig 17 Fan status 2 1 4 3 Evaporator Fig 18 Evaporator status De activate sensors zones Use right mouse button to de activate sensors and zones individually De activated items are greyed out activated de activated Gassing phase active Humidifying phase active Ventilation phase active Fan off Fan on Fan on reverse Evaporator cooling Evapora...

Страница 15: ... 4 4 Airbag Fig 19 Airbag status 2 1 4 5 Door Fig 20 Door status 2 1 4 6 Gas cylinder Fig 21 Gas cylinder Airbag failure Airbag filled Airbag suction Airbag blowing Airbag empty Failure Closed and locked Closed and unlocked Open Failure empty No failure ...

Страница 16: ...sured temperature and setpoint During automatic ripening this setpoint changes according the program settings However it is possible to change the setpoint temporarily until the next setting in the program Click with left mouse button at value and enter new setpoint for available zones Fig 23 Change setpoint temporarily Measured value Setpoint value ...

Страница 17: ...ntains two limit values to limit the temperature of the cell Click with left mouse button at value and enter new limit values Fig 25 Change limit values for temperature De activate sensors zones Use right mouse button to de activate sensors and zones individually De activated items are greyed out activated de activated Product control sensor Sensor number Graphical presentation Measured value Air ...

Страница 18: ...the line of the corresponding series Change Change corresponding point of selected series in graph Delete Delete corresponding point of selected series in graph Parameters Parameters that are shown here depends on the selected series See next pages Set Set the parameters that are used during Standby mode Select here the signal from witch a point in the graph is added changed or deleted Only the se...

Страница 19: ...t change will result in a jump Set Store Standby mode parameters Setpoint temperature in graph Setpoint temperature that is used during Standby mode No Yes Gas selection It is not possible to select both Gas Concentration and Gas Time in the same program End date and time of gassing period Set Store parameters Setpoint gas concentration in graph Date and time in graph for gassing setpoint Yes Line...

Страница 20: ...2 2 8 Selected series Fan speed Fig 32 Selected series Fan speed Start date and time in graph for ventilation Ventilation duration Start date and time in graph for rel humidity Setpoint relative humidity Start date and time in graph for pressure Setpoint pressure Yes Line between two setpoints is scaled Therefore setpoint will gradually change No Line between two setpoints is not scaled Therefore ...

Страница 21: ...ee simple control panels available The funcionality is the same for all three displays For more functionality a larger touch screen is available 1 2 3 4 6 Fig 33 LCD Control panel 1 2 3 4 6 Fig 34 LED control panel 1 2 3 4 6 Fig 35 Touch screen Default display Default the display shows the average temperature of the cell ...

Страница 22: ...Gas time the time the gas valve is open GAS P Gas period the time that the gas is in the room VEN T Ventilation time the time the ventilation will be on VEN I Ventilation interval the interval time for the ventilation RH Humidity set point the required humidity SETP Temperature set point the requested temperature SEND Start the standby mode sending the adjustments to the PROBA b Push the SET key t...

Страница 23: ...ments the No communication message is displayed on the screen Fig 36 Control panel No communication Press No Communication for 10 seconds and then press Close The screen on which you can configure the IP addresses is now displayed Fig 37 Control panel Configuring IP addresses Now press the numbers to configure the IP addresses Configure the IP address for the control panel at Panel Address and the...

Страница 24: ...configured everything correctly press Apply to activate the settings Press to return to the main screen 3 2 2 The main screen The main screen displays the status of the Proba Besides the average control temperature the status of the outputs are also displayed From the main screen you can move to sub screens on which you can display extra information and define a number of parameters 3 2 2 1 Regist...

Страница 25: ...verage control temp Parameter settings Status Back to main screen Aeration possible yes no Cooling active yes no Heating possible yes no Heating active yes no Gas flushing possible yes no Gas flushing active yes no For the status of the outputs the colour of the symbol shows whether it is active or not A grey symbol means that the relevant output is inactive and a coloured symbol means that the ou...

Страница 26: ...ons beside the measured values Press the key to return to the main screen 3 2 2 4 Reading other sensors The previous screen displays an overview of the temperature sensors Press key to display the other sensors These include the gas sensor the humidity sensor and the CO2 sensor Fig 42 Control panel Reading other sensors In this screen you can also use the buttons beside the measured values to swit...

Страница 27: ...tton This screen is also used to stop an active programme and or activate Hold or Standby mode Ripening programs can only be launched through VASP Fig 43 Control panel Programme settings You can press a setpoint value to adjust it Fig 44 Control panel Adapt Setpoint Fig 45 Control panel Stop programme Fig 46 Control panel Start Hold and Standby ...

Страница 28: ...age using VASP Press the parameter key to configure the parameters Fig 47 Control panel Parameter settings Use the arrow keys to scroll through the parameters To go directly to a particular parameter enter the parameter number If a parameter can be configured from the control panel the configured value will be displayed in the Value field That means that this value can be adapted The values of par...

Страница 29: ...ion mark appears regardless of the screen that is being displayed at that moment Press the blinking exclamation mark to open the alarm screen All the active alarms are displayed on this screen Fig 48 Control panel Alarm list Press the button with the clock to display the alarm history Unconfirmed alarms can still be confirmed using the Confirm button ...

Страница 30: ...Room view in ULO mode 12 Fig 16 Cell status 14 Fig 17 Fan status 14 Fig 18 Evaporator status 14 Fig 19 Airbag status 15 Fig 20 Door status 15 Fig 21 Gas cylinder 15 Fig 22 General measurement 16 Fig 23 Change setpoint temporarily 16 Fig 24 Specific measurement status 17 Fig 25 Change limit values for temperature 17 Fig 26 Programs configuration 18 Fig 27 Selected series Gas Concentration 19 Fig 28...

Страница 31: ...Page 31 of 32 PROBA 5 Doc nr 170366 Version 1 1 ...

Страница 32: ...VDH Products BV Produktieweg 1 9301 ZS Roden PO Box 205 9300 AE Roden The Netherlands T 31 0 50 302 89 00 F 31 0 50 302 89 80 info vdhproducts nl www vdhproducts nl ...

Отзывы: