5. FITTING THE FASCIA
Fitting the Classica fascia.
1.
Remove the fascia from its
packaging.
2.
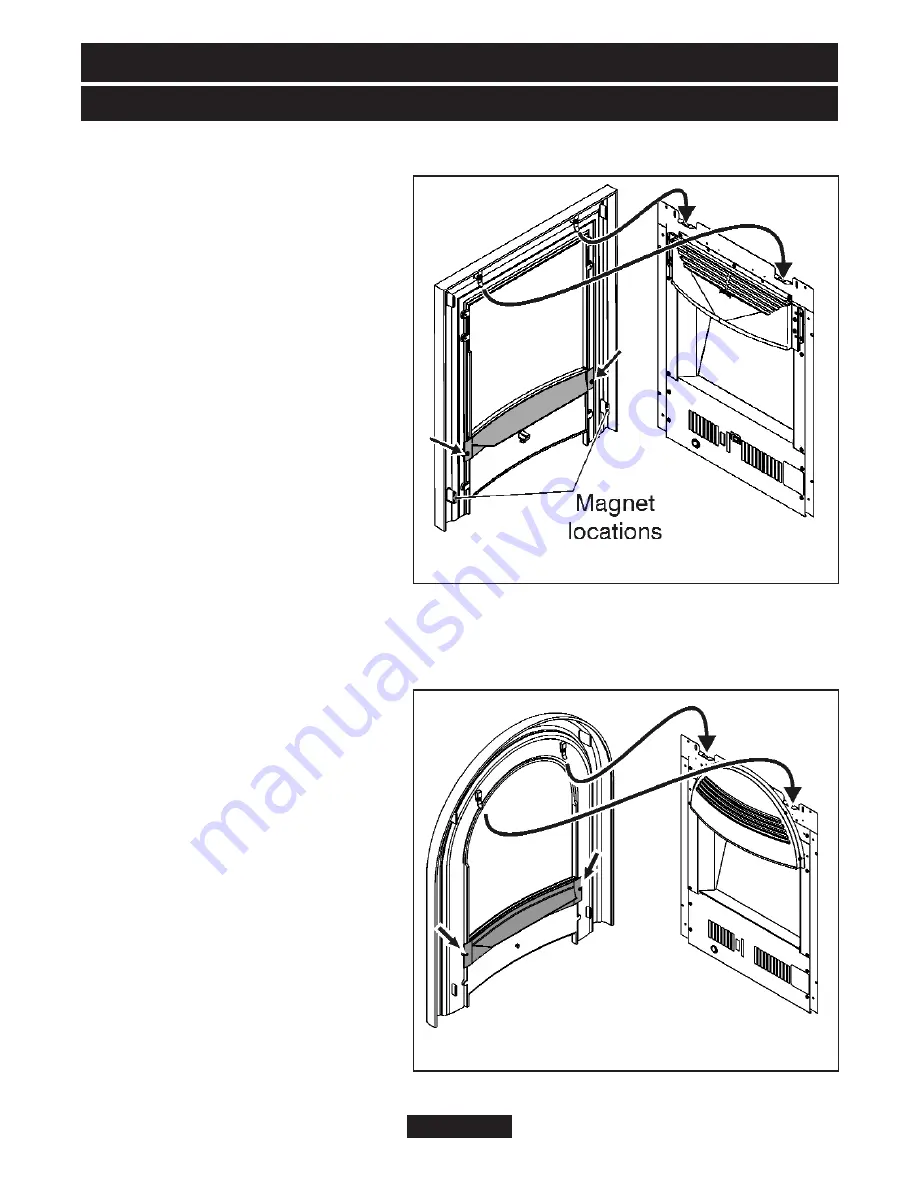
There are two magnets on the
lower raised areas of the fascia (See
figure 13).
Ensure that they are
located correctly before fitting the
fascia.
3.
Supplied with the heater is a black
decorative moulding. Remove the
two screws from the rear of the
fascia (See figure 13), locate the
moulding and secure using the two
screws removed previously.
4.
Hold the fascia firmly and lift into
place
.
Keeping the magnets away
from the body of the heater, locate
the fascia hanging brackets into
those on top of the heater (See
figure 13). Lower the fascia into place and swing the bottom of the fascia towards the
heater to engage the magnets.
Fitting the Regalia fascia.
1.
Remove the fascia from its
packaging.
2.
Supplied with the fascia is a black
decorative moulding. Remove the
two screws from the rear of the
fascia (See figure 14), locate the
moulding and secure using the two
screws removed previously.
3.
Hold the fascia firmly and lift into
place
.
Locate the fascia hanging
brackets into those on top of the
heater (See figure 14). Lower the
fascia into place and swing the
bottom of the fascia towards the
heater.
Page 16
INSTALLER AND OWNER GUIDE
©
Baxi Heating U.K. Limited 2009.
Figure 13. Fitting the Classica fascia
Figure 14. Fitting the Regalia fascia
Содержание 844
Страница 1: ...5132354 01...
Страница 24: ...Page 24 INSTALLER AND OWNER GUIDE Baxi Heating U K Limited 2009...
Страница 25: ...Page 25 INSTALLER AND OWNER GUIDE Baxi Heating U K Limited 2009...
Страница 26: ...Page 26 INSTALLER AND OWNER GUIDE Baxi Heating U K Limited 2009...
Страница 28: ......


