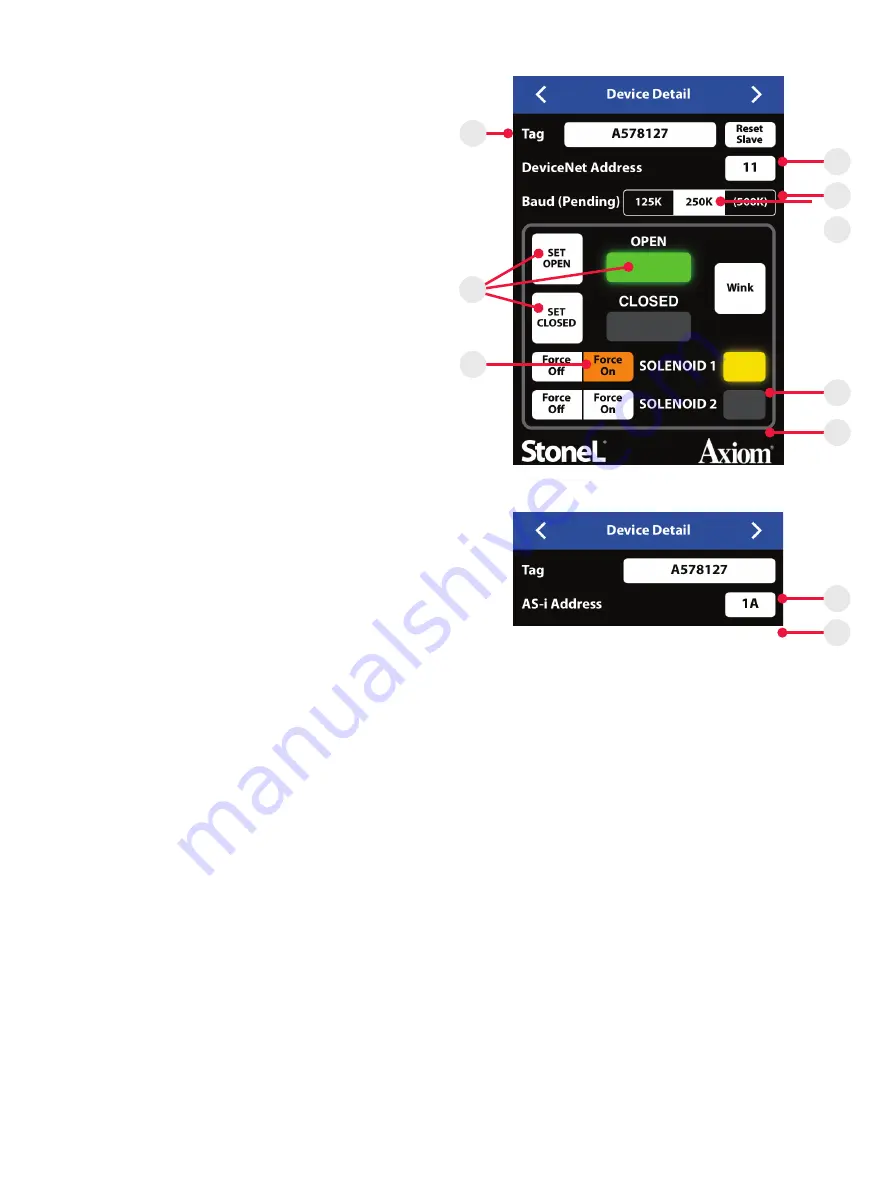
5.4 DEVICE DETAIL SCREEN
You can customize the tag for a device, change the address, change
the baud rate (if applicable), force the solenoids on or off, cause the
device to wink, and set the open/closed limits from the device detail
screen (Image 4a or 4b).
Image 4a - DeviceNet detail
Image 4b - ASi detail
E
M
K
L
J
I
G
F
N
H
Changing the device tag or address on a DeviceNet unit
1. To change the tag, edit the existing tag in the associated text field
(Item E). The tag can be up to sixteen characters long.
2. To change the DeviceNet address, edit the existing address in the
associated text field (Item G). The DeviceNet address for the 92W
can be 1 to 63
a.
When changing the address, a warning screen will appear
indicating this action could disrupt the process. Select cancel
or continue.
b.
Select continue and alter the address via number pad and
select done. A warning screen will appear indicating the
choice to reset now or reset later. Resetting the device could
disrupt the process.
c.
Selecting reset now will implement the address change of
the device.
d.
Selecting reset later will not implement device address
change until selecting reset slave (Item F) and will cause the
device address to indicate pending status.
3. To change the device baud rate (Item H), select the desired rate
from the choices. The device default baud rate is 125K.
a.
When changing the baud rate, a warning screen will appear
indicating this action could disrupt the process. Select reset
now or reset later.
b.
Selecting reset now will implement the change to the baud
rate of the device.
c.
Selecting reset later will not implement the change to the
baud rate of the device until selecting reset slave.
4. Selecting reset slave will cause a warning screen to appear
indicating resetting the device could disrupt the process. Select
continue to implement changes made to the device address and/
or device baud rate.
Changing the device tag or address on an ASi unit
1. To change the tag, edit the existing tag in the associated text field
(Item M). The tag can be up to sixteen characters long.
2. To change the AS-i address, edit the existing address in the
associated text field (Item N). The AS-i address for the 97W can
be 0A to 31A or 0B to 31B.
a.
When changing the address, a warning screen will appear
indicating this action could disrupt the process. Select cancel
or continue.
b.
Select continue and alter the address via number pad and
select done.
Forcing the solenoids on/off
Forcing a solenoid on or off will override master control if wireless link
overrides are enabled.
1. The solenoid control state is forced on or forced off when it is
highlighted in orange (Item J).
2. a. Warning screen will appear indicating this action could
disrupt the process. Select cancel or continue.
b.
Select continue and when a solenoid is on, a yellow light will
illuminate next to the solenoid (Item K).
c.
Select continue and when a solenoid is off, no light will
illuminate next to the solenoid (Item L).
Setting the valve position
Forcing the solenoid on and off is one way of actuating the valve when
setting the open and closed positions.
1. To set a valve to the closed position:
a.
Actuate the valve to the CLOSED position. This can be done
by forcing the solenoid(s) on or off.
b.
Select set closed. A warning screen will appear indicating
this action could disrupt the process. Select cancel or
continue.
c.
Select continue and the red closed light will illuminate (Item I).
d.
The valve now remembers the current position as the closed
position.
2. To set a valve to the open position:
a.
Actuate the valve to the OPEN position. This can be done by
forcing the solenoid(s) on or off.
b.
Select set open. A warning screen will appear indicating this
action could disrupt the process. Select cancel or continue.
c.
Select continue and the green open light will illuminate
(Item I).
d.
The valve now remembers the current position as the open
position.
23
EC70EN - 6/2022 | Stonel product publication 105509revA


