Adjustments & Maintenance
Note:
Before performing maintenance, ensure all mo‐
on has stopped and that the Power Unit is powered
down with igni on key removed. Before working on
or underneath the mower, place blocks on both sides
of the Power Unit’s res and underneath both ends of
the mower to prevent accidental lowering of the ma‐
chine.
Cut Height Adjustments
1) The cu ng height of the mower can be adjusted
from 0‐4”. Adjus ng is done by shortening or
lengthening the top‐link. Under no circumstances
should the knives contact the ground!
2) The en re weight of the mower should be on the
back gauge roller. The skid shoes should be adjust‐
ed so there is 1/2”‐3” clearance between them
and the ground. The shoes are for added protec‐
on against tree roots, ridges or borders and are
not designed to slide on the ground. Adjust the
back gauge roller by removing the bolts from both
sides and rese ng It to the correct height.
Wear Components
Wear components such as knives, belts and bear‐
ings may wear at different rates and so
each should be inspected for wear independently.
1) Knives should be replaced when they are dull.
A)
When individual knives, bolts or spacers
become worn or damaged they must be re‐
placed with hardware saved from your previ‐
ous knife replacement. Replacing an individ‐
ual sta on with new hardware could cause
the cu er drum to run out of bal‐
ance. When replacing hardware at all the
sta ons, some old hardware should be saved
to replace future broken hardware.
B) Replacing the complete knife assembly is
done by removing the 3/8” carriage bolts
from the hole cover, removing the hole cov‐
er as well. Remove the hanger rod and re‐
move old knife assembly as you remove
hanger rod. When you re‐insert hanging rod
insert new knife assembly in its sta on. Re‐
a ach the hole cover and carriage bolts, re‐
peat this process un l completed.
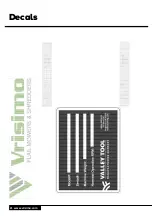
2) Decals that are no longer visible, damaged, or lost
should also be replaced.
3) Skid shoes should be replaced as needed.
4) Belt adjustment is done by adjus ng the tension
rod.
Cleaning Your Mower
1) Check for excessive grease in bearing areas on the
pulley side of the mower. Make sure that grease is
not allowed to get into the belt areas.
2) Clean any clippings from the gearbox areas, pulley
areas and anywhere else that is prone to excessive
heat where fire can start.
3) Clean the inside of the mower with a pressure
washer. Make sure the inside of the mower is kept
free from mud and compact grass. Keep in mind
that mud built up on the cu er drum can cause
imbalance.
4) Preserve damaged decals or replace them if they
are unreadable. Decal kits can be obtained from
your local Vrisimo dealer.
7
www.vrisimo.com
Содержание Vrisimo Sanitizer
Страница 2: ......
Страница 4: ......
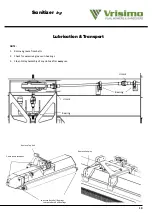
Страница 13: ...Sanitizer by 8 Skid Shoe Back Roll Adjustment Keep Undercarriage Clean...
Страница 18: ...13 www vrisimo com...
Страница 19: ...Parts Catalog Sanitizer by Parts Catalog 120 Inch 144 Inch 14...
Страница 24: ...Decals 19 www vrisimo com...
Страница 25: ...20...
Страница 26: ...Decals 21 www vrisimo com...
Страница 27: ...22 General...
Страница 28: ...23 www vrisimo com Torque Specifications...
Страница 29: ...24 Notes...
Страница 30: ...25 www vrisimo com Notes...
Страница 31: ......


