18
3.4 Applying Power
Before applying power, please refer to chapter 1 section 3.
Turn on the ohmmeter by placing the front panel power switch in the ON position. If the
ohmmeter does not to turn on, verify that the instrument is connected to the power line. If
line power is not the problem, remove the power cord and check the line power fuse and
the line voltage selection switch settings.
3.4.1 Power-On Default Settings
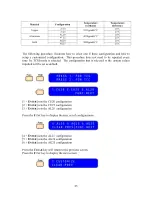
Once you turned on the ohmmeter its power-on routine. On the display you should see
the following messages:
Figure 11 - Power-On Display Messages
When the power-on routine is finished, the ohmmeter will beep twice.
By design the standard measurement mode the auto range function will be selected
automatically to avoid an overload condition if any load is applied to the ohmmeter.
The power-on routine will default the ohmmeter’s functions as described in the following
table.
Table 8 – Power-On default settings
Functions
Setting
Standard Measurement Mode
ON
Range
20k
Ω
Auto-Range (Automatic Range Selection)
ON
TCM (Temperature Compensation Mode)
OFF
HLC (Hi-Lo Comparator Mode)
OFF
BCD (Binary Coded Decimal Output Mode)
OFF
PIM (Printer/Log Mode)
OFF


