5 Installation
12
Installation instructions 0020230738 0020230756_00
4.2
Required accessories
For connecting to the Energy Manager via LAN:
–
1 x network cable, CAT 5e, RJ45
For the RS485 connection between the PV electrical immer-
sion heater and the Energy Manager:
–
Cable cross-section: 0.25 to 1.5 mm
²
–
Cable type: Four-core, rigid or flexible, twisted in pairs,
shielded
–
Max. length 10 m
–
Alternative: CAT 5e cable
–
Nominal voltage/conductor insulation: 300 V RMS
5
Installation
Caution.
Risk of material damage caused by corro-
sion and short circuit caused by incorrect
earthing
If you insert an electrical immersion heater
into the cylinder, the existing external voltage
may build up electrical potential in the water,
which may result in the electromechanical
corrosion of the electrical immersion heater.
▶
Ensure that both the domestic hot water
and cold water pipes are directly connec-
ted to the cylinder via an earth cable to the
main earth rail.
▶
You must also ensure that the electrical
immersion heater is also connected to the
main earth rail via the earthing terminal.
Only qualified electricians may carry out the electrical install-
ation.
The PV electrical immersion heater must only be installed
horizontally. Vertical installation is not permitted.
Use a power supply cable that is permitted for a temperature
of 80 °C for the electrical connection of the PV electrical im-
mersion heater.
Ensure that the domestic hot water cylinder is filled before
you start up the PV electrical immersion heater.
To ensure that the PV electrical immersion heater can work
for many years, the following minimum quality is recommen-
ded for the fresh water: Chloride content < 120 mg/l, water
hardness < 2.4965 mmol/l (< 14°dH;< 24.987°fH; < 140 mg
CaCO/l; < 249.87 mg CaCO
₃
/l; < 249.87 ppm (mg CaCO
₃
/l)).
If the water hardness is higher, we recommend using a water
softener.
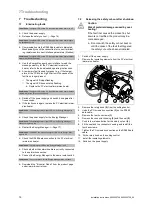
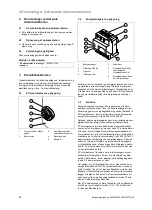
5.1
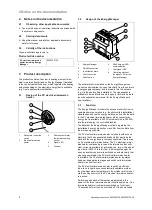
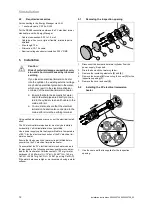
Removing the inspection opening
1
2
3
4
5
6
1.
Disconnect the domestic hot water cylinder from the
power supply, if required.
2.
Drain the domestic hot water cylinder.
3.
Remove the insulating elements
(5)
and
(6)
.
4.
Remove the screws
(4)
for securing the cover
(3)
for the
inspection opening
(1)
.
5.
Remove the cover and seal
(2)
.
5.2
Installing the PV electrical immersion
heater
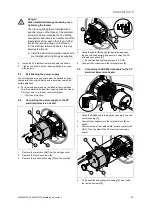
1.
Use the new seal that is supplied for the inspection
opening.

