4 Set-up
8
Installation and maintenance instructions auroCOMPACT 0020233500_01
3.5
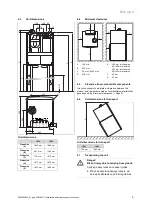
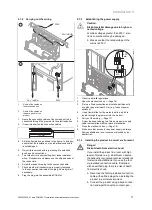
Functional elements
1
21
20
2
19
3
18
17
4
16
5
14
13
6
12
11
10
9
15
7
8
1
Safety fuse
2
Fan
3
Purging valve for the
domestic hot water
circuit
4
Automatic air vent for
the heating circuit
5
Heating pump
6
Domestic hot water
pump
7
Solar fluid collecting
vessel
8
Hot water drain cock
9
Solar circuit pump
10
Solar circuit valve
11
Solar electronics PCB
12
3-port valve
13
Siphon
14
Thermostatic valve
domestic hot water
outlet
15
Solar fluid fill level
indicator
16
Draining the heating
circuit
17
Filling with solar fluid or
purging
18
Heating circuit pressure
sensor
19
Plate heat exchanger
20
Heating expansion
vessel
21
Electronics PCB for the
gas generator control
process
4
Set-up
4.1
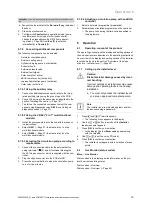
Unpacking the product
A
B
A
B
1.
Remove the packaging surrounding the unit.
2.
Remove the front casing. (
→
Page 11)
3.
Unscrew the four fixing tabs at the front and rear of the
pallet and remove them.
4.2
Checking the scope of delivery
▶
Check that the scope of delivery is complete and intact.
4.2.1
Scope of delivery
Num-
ber
Designation
1
Heat generator
1
Enclosed documentation
1
Bag with seals
1
proKlima set
1
Retainer for the optional radio re 1 screw
1
Bag for solar connection:
–
Pipe fittings for the connection to the solar pipe
–
Temperature sensor for the solar collector


