9 Inspection and maintenance
36
Installation and maintenance instructions auroCOMPACT 0020181589_04
9.9
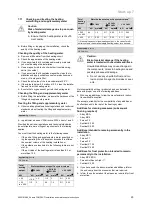
Cleaning the condensate siphon
1
1.
Remove the lower section of the siphon
(1)
by turning
the bayonet fitting anti-clockwise.
2.
Flush the lower section of the condensate siphon with
water.
3.
Fill the lower section with water up to about 10 mm be-
low the upper edge.
4.
Screw the lower section back onto the condensate si-
phon.
9.10
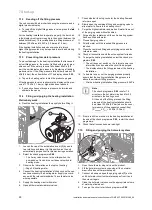
Installing the compact thermal module
1
2
3
4
5
6
8
7
1.
Attach the compact thermal module
(5)
to the heat ex-
changer .
2.
Tighten the four nuts
(1)
in a cross-wise pattern until the
burner door
(2)
sits tightly against the bearing surfaces.
–
Tightening torque: 6 Nm
3.
Reconnect the plugs
(3)
,
(4)
,
(6)
,
(7)
and
(8)
.
4.
Connect the gas line with a new seal.
5.
Open the gas isolator cock.
6.
Make sure that there are no leaks.
7.
Check whether the air intake pipe's sealing ring has
been fitting correctly.
8.
Reconnect the air intake pipe to the intake nozzle.
9.
Secure the air intake pipe with the retaining screw.
10. Check the gas connection pressure (gas flow pres-
sure). (
→
Page 27)
9.11
Draining
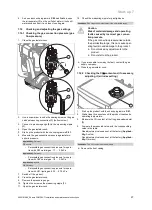
9.11.1 Draining the unit's heating circuit
1
2
1.
Close the service valves in the heating flow and in the
heating return.
2.
Remove the front casing. (
→
Page 11)
3.
Move the electronics box into the upper position
(
→
Page 11).
4.
Connect a hose to the drain cock
(1)
and guide the free
end of the hose to a suitable outflow location.
5.
Open the drain cock to fully drain the unit's heating cir-
cuit.
6.
Open the purging valve
(2)
.
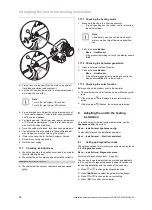
9.11.2 Draining the unit's process water circuit
1
5
7
3
1
2
1.
Close the drinking water valves.
2.
Remove the front casing. (
→
Page 11)
3.
Connect a hose to the connection on the drain cock
(2)
and route the free end of the hose to a suitable outflow
location.
4.
Open the drain cock
(1)
to fully drain the unit's process
water circuit.
5.
Open the purging valve on the hot water circuit.
9.11.3 Draining the system
1.
Connect a hose to the draining point of the system.
2.
Route the free end of the hose to a suitable outflow
location.
3.
Ensure that the system's service valves are open.
4.
Open the drain cock.


