


Start-up 7
0020181589_04 auroCOMPACT Installation and maintenance instructions
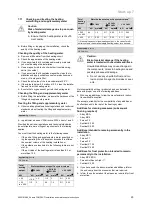
21
7.4
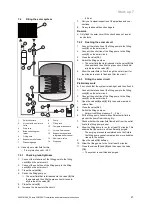
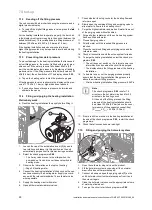
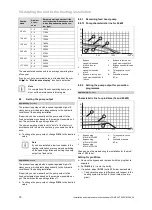
Filling the solar system
11
2
1
3
4
5
8
7
6
14
9
10
13
12
1
Solar collectors
2
Air vent with non-return
valve
3
Stop cock
4
Brine collecting con-
tainer
5
Filling cock
6
Expansion relief valve
7
Pressure gauge
8
Pump
9
Filling cock
10
Temperature sensors
11
Volume flow sensor
12
Expansion vessel and
integrated buffer vessel
13
Non-return valve
14
Stop cock
▶
Use only our solar fluid for this.
–
Frost protection until:
−
28 C
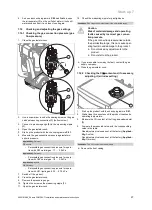
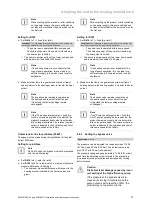
7.4.1
Checking leak-tightness
1.
Connect the intake line of the filling pump to the filling
cock
(9)
on the solar circuit.
2.
Connect the outlet line of the filling pump to the filling
cock
(5)
on the solar circuit.
3.
Close the valve
(14)
.
4.
Switch the filling pump on.
◁
The solar fluid that is introduced via the valve
(5)
fills
the panels and then fills the pipe coil until it eventu-
ally drains at the valve
(9)
.
5.
Close the valve
(9)
.
6.
Increase the pressure in the circuit.
–
4.5 bar
7.
Carry out a visual inspection of the pipelines and con-
nections.
8.
Fix any leaks and then check again.
Re-work
▶
Only flush the solar circuit if the check does not reveal
any defects.
7.4.2
Flushing the solar circuit
1.
Connect the intake line of the filling pump to the filling
cock
(9)
on the solar circuit.
2.
Connect the outlet line of the filling pump to the filling
cock
(5)
on the solar circuit.
3.
Close the valve
(14)
.
4.
Switch the filling pump on.
◁
The solar fluid that is introduced via the valve
(5)
fills
the panels and then fills the pipe coil until it eventu-
ally drains at the valve
(9)
.
5.
Allow the solar fluid to flow through the solar circuit for
ten minutes in order to flush and filter the circuit.
7.4.3
Filling the solar circuit
Preliminary work
▶
First, check that the system is leak-tight, and then flush it.
1.
Connect the intake line of the filling pump to the filling
cock
(9)
on the solar circuit.
2.
Connect the outlet line of the filling pump to the filling
cock
(5)
on the solar circuit.
3.
Open the valves
(9)
and
(5)
fully to ensure maximum
volume flow.
4.
Close the valve
(14)
.
5.
Switch the filling pump on.
–
Solar circuit filling pressure: 2 … 3 bar
6.
Fill the filling pump vessel with sufficient solar fluid to
prevent the pump from running dry.
7.
Check whether the solar fluid flows back from the outlet
line to the filling pump vessel.
8.
Allow the filling pump to run for at least 15 minutes. This
ensures that the solar circuit is sufficiently purged.
–
The purging process is completed once the fluid in
the filling pump vessel is clear and no more bubbles
rise up to the surface.
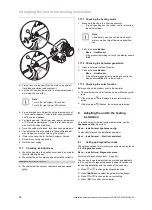
9.
Open the valve
(14)
halfway.
10. Allow the filling pump to run for at least 5 minutes.
11. Close the valves
(5)
and
(9)
and then open the valve
(14)
.
◁
The system is now filled and purged.


