background image

ControlVIEW 
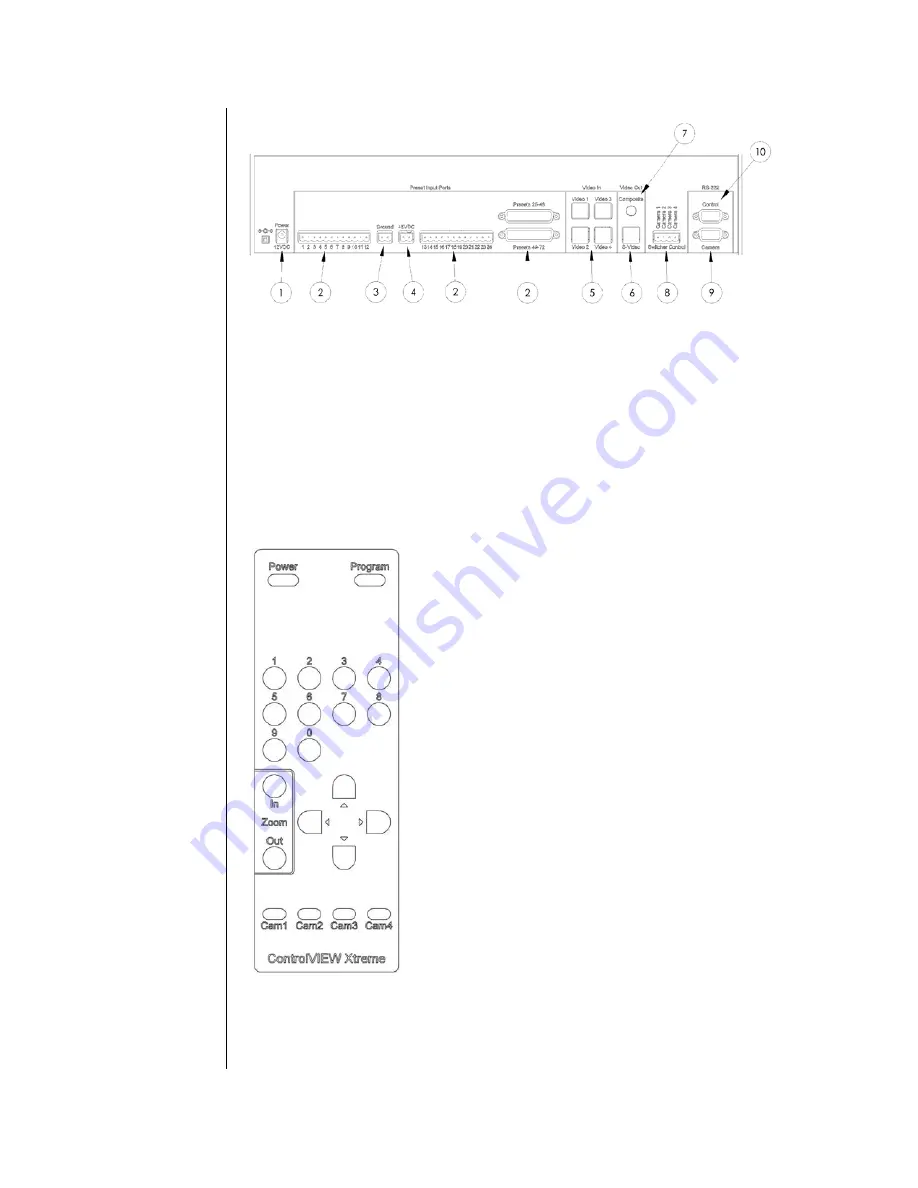
Back Panel 


(1) Power Port 

Connection for Power 

(2) Preset input ports 

Connection to triggering device(s). 

(3) Ground 

Ground for connecting triggering device(s). 

(4) +5VDC 

Output with 5VDC 

(5) S-video inputs 

Video Inputs from Cameras(s). 

(6) S-video output 

Video Output to display/distribution system. 

(7) Composite video out 

Video Output to display/distribution system 

(8) Switcher Control 

Output for Controlling External Video Switcher 

(9) RS-232 output 

Serial Connection to Camera(s). 

(10) RS-232 input 

Serial Connection from Control System. 

IR Remote 
Control 


Power 
 
 
Program 
 
0-9 


Zoom In 
Zoom Out 
 
 
Up 
Down 
Left  
Right 
 
 
Cam1 
Cam2 
Cam3 
Cam4 


Toggle Power for All Cameras 
and ControlVIEW Xtreme 
 
Toggle Program Mode 
 
Used for Recalling Presets, or 
Storing Presets when in Program 
Mode 
 
Zooms Active Camera In/Out 


Move Active Camera 


Select between connected 
cameras.  


Содержание ControlVIEW Xtreme

Страница 1: ...ers Unpacking the ControlVIEW Xtreme Carefully remove the device and part of the packing material Set the unit on a flat solid surface unpack and identify the following parts One Power Supply One Powe...

Страница 2: ...deo Output to display distribution system 8 Switcher Control Output for Controlling External Video Switcher 9 RS 232 output Serial Connection to Camera s 10 RS 232 input Serial Connection from Control...

Страница 3: ...Appendix B for Pinout diagram for ControlVIEW Xtreme 5 Using an S video cable connect the video output from camera one to the video input for camera one on the ControlVIEW Xtreme Repeat this step for...

Страница 4: ...t moving it The Camera default setting is also a separate option to choose which camera will be selected It is recommended to set the Default Timer when setting the Default Preset Default Timer This s...

Страница 5: ...the arrow points to Tilt Speed 2 Press Select 3 Press Up or Down arrow to point to the speed desired Higher numbers are faster 4 Press Select Note The Tilt Speed only affects the speed of moving from...

Страница 6: ...be connected to the Joystick and the DB25 port for presets 49 72 1 Using the Menu Control buttons Press UP or DOWN until the arrow points to Jstik Priority 2 Press Select 3 Press Up or Down arrow to p...

Страница 7: ...s even when the system and cameras are off The system may be safely powered down using the enclosed remote or by simply disconnecting power Control system users For users with an external control syst...

Страница 8: ...me Confirm this serial port on the control device is set to 9600 bps 8N1 no parity and no flow control Check all serial connections to the camera Confirm that serial port on the ControlVIEW Xtreme is...

Страница 9: ...is between 1 and 72 KEYPAD XX Allows the Control System to activate or reactivate the keyboard on the front panel of the ControlVIEW Xtreme XX ON or OFF RESET Resets the ControlVIEW Xtreme while remem...

Страница 10: ...set information Directs the ControlVIEW Xtreme to send the menu shown above to host PASS Sending the PASS instruction followed by a CR then followed by a camera instruction passes the camera instructi...

Страница 11: ...Appendix B ControlVIEW Xtreme Port Pin Configuration Rear view of ControlVIEW Xtreme Presets 25 48 Preset 25 Preset 37 GND Preset 38 Preset 48 Preset 49 Preset 61 GND Preset 62 Preset 72 Presets 49 72...

Страница 12: ...inside Keep this device away from food and liquid To clean the exterior wipe with a damp cloth Do not use abrasive chemicals Operating in storage conditions Do not store or operate this device under...

Страница 13: ...a product for repair or replacement request an RMA from Vaddio s technical support Provide a technician with a return phone number e mail address shipping address and product serial numbers Describe...

Отзывы: