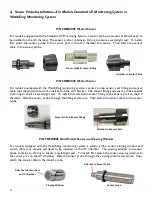
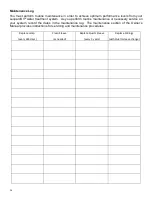
UV Superstore LEOPARD UV Series Скачать руководство пользователя страница 30


Ϯϰ


8) Maintenance 


Always disconnect power before servicing the system. 
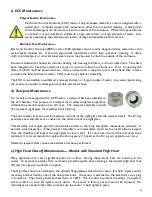
 

a) Lamp Maintenance 


Most ultraviolet lamps are rated to provide 10,000 hours of continuous use.  After 10,000 hours, the lamp 
may no longer provide the sufficient amount of 254nm or 185nm that is required for UV output.  Therefore, 
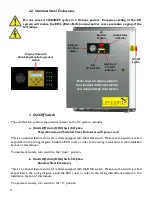
the lamps need to be replaced on a yearly basis.  Lamp status should also be checked on a periodic basis by 
inspecting the LEDs on the ECC. 
 
It is best to always keep spare lamps available in case of emergency needs. 
 
If it becomes necessary to clean the lamp due to dust or fingerprints, the lamps can be cleaned with either   

denatured alcohol or a non-abrasive cleaner.  Use cotton gloves and a clean cloth when cleaning the lamps.  
Wait for lamps to cool before cleaning.   


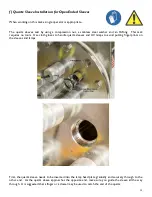
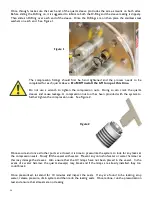
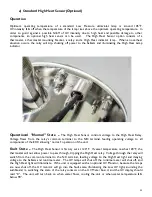
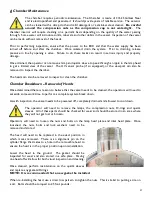
b)  Quartz  Sleeve  Maintenance 

(

FRAGILE: 

Be careful when handling quartz sleeves! Always use  

cotton gloves when handling.)


In order to ensure proper disinfection, the quartz sleeves need to be inspected, monitored and maintained.  
The UV lamps produce heat and UVC output, which may cause certain water characteristics to adhere to 
and bond on the sleeve preventing the UVC from reaching the targeted pathogens.  This can cause the quartz 

sleeves to foul.  To a great extent, your frequency of cleaning will depend upon the water quality (i.e. amount 
of minerals present in the liquid).  The more minerals present in the water, the more frequently the quartz 
will require cleaning.   


Manual Cleaning 


Significant film or debris deposits formed on the quartz sleeves will impair the ability of the ultraviolet rays to 
penetrate through the quartz and into the water.   
 

A periodic visual inspection of the quartz will be necessary to determine the frequency of cleaning.  Initial  
inspection should take place after thirty (30) days of operation.  If the quartz are dirty, shorten the cleaning 
intervals.  If the quartz are clean, lengthen the cleaning intervals. 
 
To clean quartz sleeves, depressurize the unit by first turning off the valves on the inlet and then the outlet of 
the vessel.  Turn off the power to the UV system.  Drain the vessel.  Disconnect the lamps, allow to cool and 
slowly and carefully remove the lamps using clean cotton gloves.  Back off the compression quartz gland nuts 
and remove the O-rings.  The quartz sleeves may be cleaned with denatured alcohol.  If this is not adequate, 
a mild non-abrasive cleaner can be used.  It is important to use cleaners that leave no residue.  

FRAGILE:


Be  careful  when  handling  quartz.

    Whenever  the  quartz  are  cleaned,  the  quartz  O-rings  should  be  

replaced.  Install the quartz sleeves with clean cotton gloves.  


Содержание LEOPARD UV Series

Страница 1: ...Ultraviolet WaterTreatment System Installation Operation and Maintenance Manual One Source for All Your UV Needs W d D Eh KE E DWKZd Ed...

Страница 2: ......

Страница 3: ...d hs d hs t h h d dK K z hs hs t hs W K D hs d hs z z hs hs W hs t hs W d hs d One Source for All Your UV Needs...

Страница 4: ...dard or WatchDog Monitoring System 12 f Quartz Sleeve Installation 13 g Lamp Lamp Harness Bracket Installation 15 6 Operation and Monitoring 17 a Electronic Control Center ECC 17 1 On Off Switch and H...

Страница 5: ...Procedure 28 FDA Statement 30 Heat Sanitization 31 Replacement Parts List 32 Maintenance Log 36 Troubleshooting 38 Warranty Information 39 Wiring Diagram Pullout Refer to the Options Manual for Operat...

Страница 6: ......

Страница 7: ...icates that eye protection must be worn to protect from UV light as well as debris HAND PROTECTION This symbol signifies that hand protection must be worn to protect the lamps from skin oils as well a...

Страница 8: ...The UV light source that they used resided in the UVC range of the light spectrum Specifically they discovered that light in the 254 nanometer NM range was the most effective wavelength for this proce...

Страница 9: ...ssivated to protect against aggressive high purity water The chamber has an inlet outlet connection drain sampling with flange models only and monitoring ports b Lamp and Quartz Sleeve Inspection Use...

Страница 10: ...play operation status such as individual Lamp Indicator Elapsed Runtime Meter ERTM optional UV Monitor Intensity optional Low UV Indicator and optional High Heat indicator For models equipped with the...

Страница 11: ...icator Elapsed Runtime Meter ERTM optional UV Monitor Intensity optional Low UV Indicator and optional High Heat indicator For models equipped with the optional WatchDog Monitoring System the ECC will...

Страница 12: ...Important Safety Information UV lamps and their quartz sleeves can become razor sharp if broken Take care when installing and removing the quartz sleeves Only hand tighten compression fittings Do not...

Страница 13: ...sposal location please contact manufacturer s representative e Receiving UV Equipment and Spare Parts Inspection of the UV equipment must be made immediately upon receipt for damage and verification o...

Страница 14: ...ord Make sure power to the equipment matches the voltage requirements of the system Make sure the system is properly grounded Plug the power cord into the appropriate outlet a 2 Stainless Steel Enclos...

Страница 15: ...t cover to install incoming power wires 2 Locate the power connection point and install your incoming 120V hot wire to the breaker 3 Install the neutral wire to 3 on the switch 4 Connect ground wire t...

Страница 16: ...the strain relief to the A1 and A2 on the HOA relay 4 Re assemble display cover plate 5 Turn switch on enclosure to Auto b 2 Stainless Steel Enclosures To wire the HOA Switch for remote access 1 Remov...

Страница 17: ...may not exceed 32V AC 50V DC 50mA current d Chamber Minimum Clearance Ensure that you have adequate space on the lamp side of the treatment chamber to insert and remove the quartz sleeve and UV lamp s...

Страница 18: ...need to be installed on the UV chamber The sensor fitting and sensor probe contains an O ring to ensure a watertight seal To install first attach the sensor fitting to the sensor port on the UV chambe...

Страница 19: ...no tools Use cloth gloves to handle quartz sleeves and UV lamps to avoid putting fingerprints on the sleeves and lamps First the quartz sleeve needs to be inserted into the lamp head plate gradually a...

Страница 20: ...use leakage A compression nut tool has been provided with the system to further tighten the compression nuts See Figure 2 Once secure and once all other ports are closed it is time to pressurize the s...

Страница 21: ...amp harness is numbered and each lamp nipple is numbered on the lamp head plate Match the corresponding numbered lamp lead to the corresponding numbered lamp nipple You must first install the lamp har...

Страница 22: ...ector is firmly pushed onto the lamp base leaving no space between the connector and base Failure to push the lamp connector all the way onto the base may allow electrical arcing to occur between the...

Страница 23: ...r system Operation and Monitoring a 1 Polycarbonate Enclosures Do not exceed 3 ON OFF cycles in a 24 hour period Excessive cycling of the UV system will reduce the EOL End of Life output and or cause...

Страница 24: ...r to the wiring instructions in the Installation Section of this manual To operate remotely turn switch to the Auto position b Hands Off Auto HOA Switch Option Stainless Steel Enclosures This is an op...

Страница 25: ...ithout the potential exposure to UV rays The viewport assembly consists of a viewport sight glass foam washer and an O ring c Lamp Out Alert Optional Lamp out alert ballast s are used to connect an ex...

Страница 26: ...hen the power switch is in the ON position and lamps are op erational Lamps must warm up for three minutes prior to any calibrations Re calibrate after the lamps have been operational for 100 hours wh...

Страница 27: ...n calibrating the UV Monitor Board the alarm will sound during the warm up period To disable the alarm remove jumper JP13 located at the right edge of the board below the alarm Take caution when remov...

Страница 28: ...ill go into the fault state The UV unit is designed to provide proper UV dosage at 85 of original UV intensity With modern technology UV lamps this should occur at about 10 000 hours of continuous use...

Страница 29: ...ay s common terminal to the NO terminal feeding operating voltage to all components of the ECC allowing normal operation of the unit Fault State The High Heat Sensor is factory set at 120 F If vessel...

Страница 30: ...sleeves to foul To a great extent your frequency of cleaning will depend upon the water quality i e amount of minerals present in the liquid The more minerals present in the water the more frequently...

Страница 31: ...n the UV chamber The purpose of a viewport is to safely verify lamp operation without the potential exposure to UV rays The viewport assembly consists of a viewport sight glass foam washer and an O ri...

Страница 32: ...ut down the system and depressurize the chamber before performing any maintenance Detach the sensor cable from sensor probe and unscrew the probe from the sensor port Inspect and clean as needed A bui...

Страница 33: ...clean the chamber Chamber Breakdown Removal of Heads Once determined there is reason to believe that the vessel needs to be cleaned the operators will need to set aside some work time to perform a com...

Страница 34: ...count water samplers pre sterilized plastic bottles within pre sterilized plastic bags from a water testing laboratory 2 With the ultraviolet system operating open the sample valve fully and flush fo...

Страница 35: ......

Страница 36: ...Code Of Federal Regulations Title 21 Sub Section 177 Stainless Steel and quartz material are acceptable in FDA applications All O ring and gasket materials are in compliance with Title 21 Sub Section...

Страница 37: ...most critical part is that the system is not heated or cooled too quickly as with anything made with like materials if this is heated or cooled too quickly there is a good chance of very fast expansi...

Страница 38: ...bered Systems hs D E K W K W K W K W K W K W K W W W W W W W W W E W E Y Z K K E E E E t KZE K Z W D z s s hs K ED hs K ED hs ED hs ED Y Y K d d D K sWD hs s K Z s D D K KZE E Z E Z t KZE hs W K Z W D...

Страница 39: ...mbered Systems hs D E K W K W K W K W K W K W W W W W E W E Y Z K E E E t KZE K Z W D z s s hs K ED hs K ED hs ED hs ED Y Y K d d d y y D K sWD hs s K Z hs s D hs D KZE E Z E Z t KZE hs K Z D K hs D h...

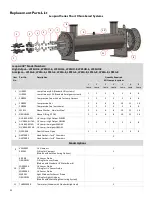
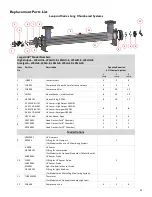
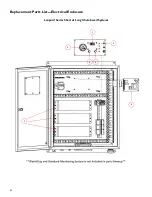
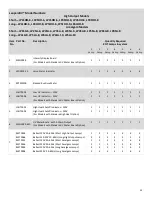
Страница 40: ...Replacement Parts List Electrical Enclosure Leopard Series Short Long Chambered Systems...

Страница 41: ...K W K W K W K W K W K W K W K W K W K W K D W W W W W W W W W W W W W W E W E Y Z K E D hs D K ZdD Z D d d hs s hs s D hs D K d d s s D K E hs D K D hs D K d d d d d d s K s K s s s s y y y y y y y y...

Страница 42: ...UPDQFH OHYHOV IURP RXU HRSDUG89 ZDWHU WUHDWPHQW V VWHP V RX SHUIRUP URXWLQH PDLQWHQDQFH RU QHFHVVDU VHUYLFH RQ RXU V VWHP UHFRUG WKH GDWHV LQ WKH PDLQWHQDQFH ORJ 7KH PDLQWHQDQFH VHFWLRQ RI WKH 2ZQHU V...

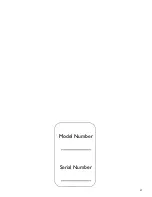
Страница 43: ...Model Number __________ Serial Number __________...

Страница 44: ...d Z s K D s s hs Y W K K Z K Z K t W W Z s s hs D Z s Z hs hs...

Страница 45: ...advise whether the defective item needs to be returned for failure analysis None of the above warranties cover damage caused by improper use or maintenance accidents acts of God or minor scratches or...

Страница 46: ...EKd...

Страница 47: ......

Страница 48: ...820 Tucker Court Winder GA 30680 Phone 770 307 3882 Fax 770 307 3872 sales uvsuperstore com www uvsuperstore com...

Отзывы: