


Page 60
16.
Apply an external pink noise source to left, center, or right channels of a JSD-‐60 input. This
may be an AES/EBU generator such as the USL DAT-‐100, an analog pink noise generator, or
test content that has pink noise.
17.
Set the rear panel DIP switches according to the following table:
18.
Turn off the main power to put the JSD-‐60 into bypass operation. Note that the bypass
power supply is required for bypass operation.
19.
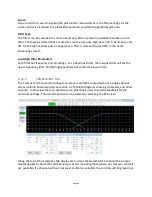
Use the rear panel trim pots to adjust the low and high band gains as required for a
relatively flat response as shown on an external RTA. Remember that the front panel fader
also adjusts the overall output level, so it may be necessary to adjust that control.
20.
Take the system out of bypass by turning the main power switch on.
8.11.2
AUDITORIUM EQUALIZATION
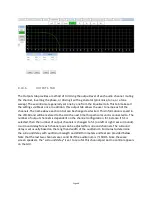
The JSD-‐60 allows auditorium equalization to be completed automatically or manually using its
precision internal RTA. Prior to executing equalization, set the channel output trims in the
outputs tab to -‐20 for each output channel.
8.11.3
AUTOMATIC EQUALIZATION
1.
Connect four microphones to a microphone multiplexer such as the USL MMP-‐10. Position
the microphones as specified in SMPTE 202-‐2010 sections 5.2 and 5.3.
2.
Connect the microphone multiplexer output to the microphone input of the JSD-‐60.
3.
On the Equalizer tab, press the Curve File button and select the appropriate curve file (such
as x-‐curve 150 seats.ini). This sets the limit lines on the RTA display.
4.
Press Mic File to load a previously generated microphone calibration file, or calibrate the
microphones as described below:
a.
On the equalizer tab, select the center channel.
b.
Set the gain control at the far left of the equalizer to minimum.
c.
Set the main fader to 0.0.
d.
Press the Flatten button.
e.
Press Pink and Generator to drive the center channel with pink noise.
f.
Adjust the main fader towards 7.0 without exceeding 85dB SPL in the auditorium.
g.
Adjust the gain control at the far left of the equalizer tab to yield 85dB SPL in the
auditorium as measured with a reference SPL meter.
h.
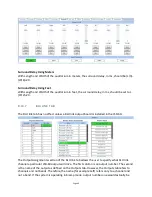
Press the Mic Cal button to bring up the microphone calibration dialog box.
i.
Adjust the Microphone Gain control in the microphone calibration dialog box until the
JSD SPL measurement agrees with the reference SPL meter reading.
j.
If desired, press the Save button to save this microphone calibration in a file. The use of
the microphone model number and serial number(s) as a filename is suggested.
Speaker Configuration SW1 SW2 SW3 SW4
Biamp 330Hz crossover ON
ON
OFF OFF
Biamp 1kHz Crossover OFF OFF ON
ON
Full Range
OFF OFF OFF OFF
Содержание JSD-60
Страница 2: ... Page 2 ...
Страница 10: ... Page 10 3 1 DECLARATION OF CONFORMITY ...
Страница 96: ... Page 96 JSD 60L and JSD 60D rear view JSD 60LX and JSD 60DX rear view V150219 ...


