


Page 43
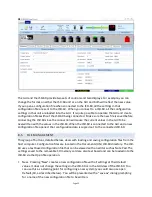
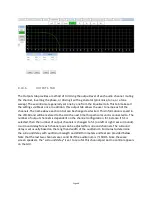
RTA Channel Select Buttons
Channel select buttons are along the top of the RTA
window. These select which speaker the generator is
driving and which channel the equalizer controls are
adjusting. If an external pink noise generator is to be
used with the internal RTA, enable the internal pink
noise generator, then disable it. Enabling the internal
pink noise generator configures the internal RTA for
proper operation.
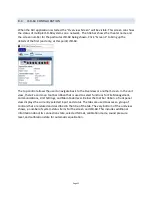
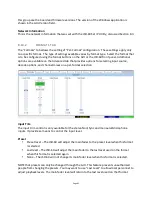
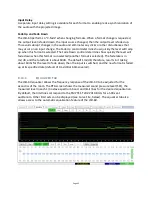
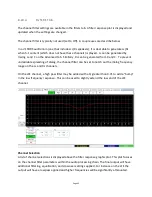
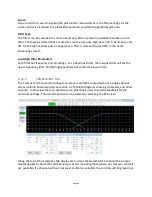
RTA View Controls
To preserve screen real estate, the working area for the RTA data displayed is maximized. When
the equalizer tab is selected, the size of the tab is increased by collapsing the input format
buttons view. As the mouse is hovered over the RTA graphical plot area, a set of controls is
revealed. The controls are zoom, dB step size, decay rate, plotting data offset, and x-‐curve
offset. Use the Zoom buttons to enlarge or reduce the text within the RTA display area. Use the
dB/step selector to adjust the vertical resolution as required view all bands on screen while
providing the best vertical resolution. Make initial adjustments with a fast decay time. The fast
decay time provides a faster update, but a less stable display. As you close in on the final
adjustment of the equalizer, increase the decay time towards maximum to provide a stable
display and precise indication of the equalization. Use the Data Offset control to slide the RTA
data up and down as required to place it within the X-‐curve limits. Similarly, the X-‐Curve control
can be used to move the limit curves up and down to best fit the RTA data.
SPL Meter
The auditorium SPL is visible along the bottom of the GUI window, no matter which tab is
selected. The display will show "SPL Uncalibrated" until the SPL meter is calibrated by reading in
an existing microphone calibration file or adjusting the SPL calibration with a reference pink
noise level. The SPL meter uses a C-‐weighted filter as per ANSI S1.4-‐1983.
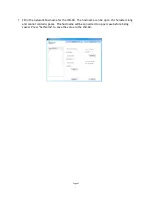
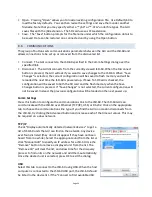
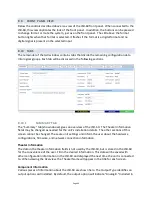
Microphone Calibration
Press this button to calibrate the microphone driving the RTA. Turn on pink noise in the
auditorium. Adjust the Microphone Gain control until the indicated SPL matches the SPL
indicated on a reference meter. Press Save to save this
calibration to a file. The file name might consist of the
manufacturer's model number and microphone serial number.
The RTA gain setting required for the proper SPL indication is
saved. See Appendix E for information on the microphone
calibration file format.
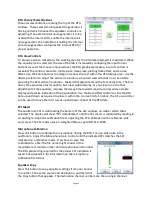
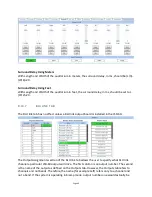
Equalizer Copy
Press this button to copy equalizer settings from one channel
to another. Choose the source and destination, and then click
the Copy button that appears. The destination channel can be more than a single channel.
Содержание JSD-60
Страница 2: ... Page 2 ...
Страница 10: ... Page 10 3 1 DECLARATION OF CONFORMITY ...
Страница 96: ... Page 96 JSD 60L and JSD 60D rear view JSD 60LX and JSD 60DX rear view V150219 ...


