background image

Chapter 12: Recording 

94 

TruVision DVR 45HD User Manual 

Note

: You can schedule up to eight time periods in a day. 

6.  Click 

Apply 

to save the settings and 

Exit

 to return live view. 

Define a schedule from the Edit menu 

To set up a daily recording schedule: 

1.  From the menu toolbar, click 

Recording

 > 

Recording Schedule

2.  Select a camera. 

3.  Check the 

Enable Recording

 box. 

4.  Click 

Edit

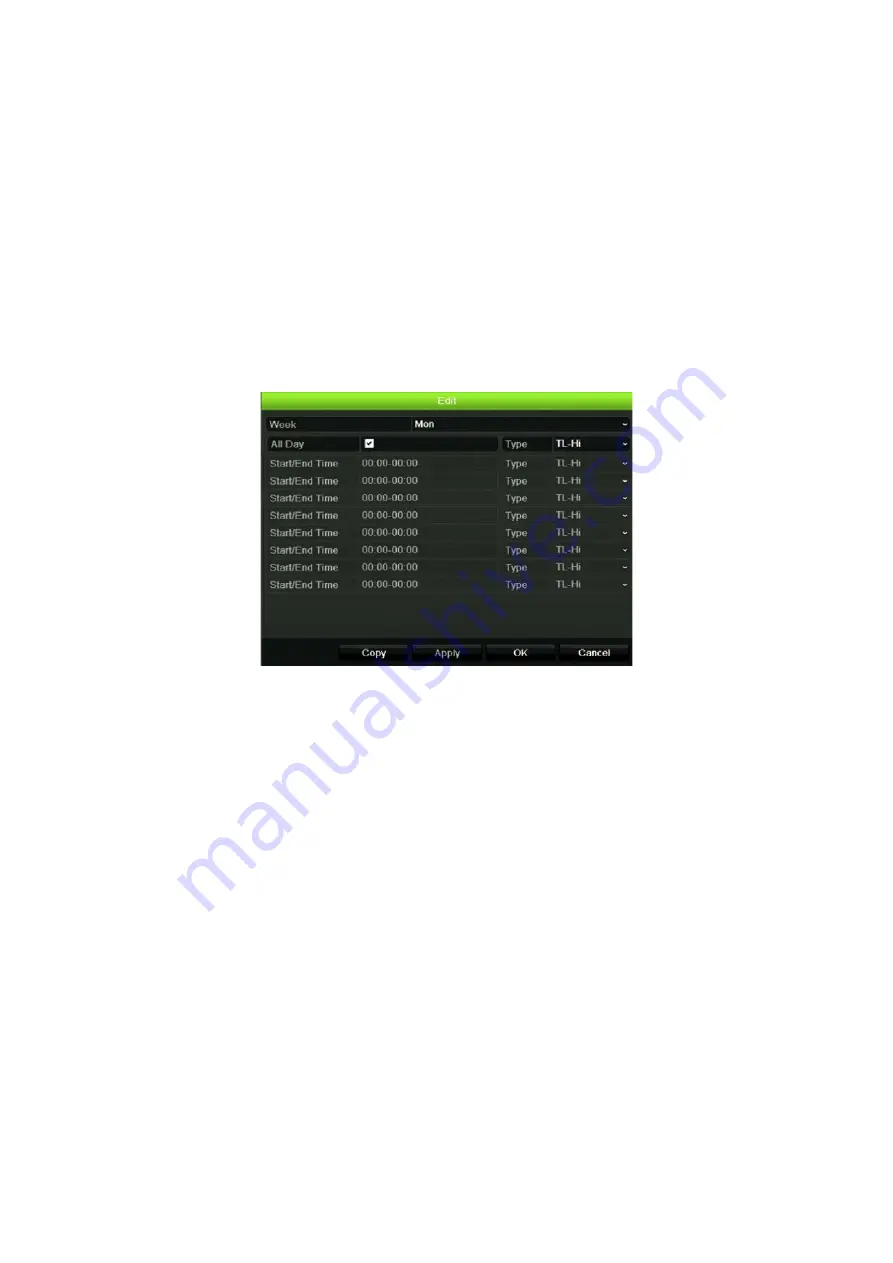
. The following window is displayed: 


5.  Select the day of the week for which you want to set up the schedule. 

You can define a different schedule for each day of the week. 

6.  Set the start and end time for recording. 

Define a time period by entering a start (left column) and end (right column) time. 
You can schedule up to eight time periods. Click All Day to record all day. 

Note

: Time periods defined cannot overlap. 

7.  Select a recording type. 

The recording type can be based on time and triggered by motion detection and/or 
an alarm. If set to TimeLapse (TL-Hi or TL-Lo), the recorder records continuously. 

8.  Click 

Apply

 to save settings. 

9.  Repeat steps 4 to 8 for other days of the week or to copy the schedule settings to 

another day.  

To copy the current schedule settings to another day of the week, click 

Copy

. Select 

the number of the day of the week to which to copy the schedule. Click 

OK

 to save 

changes and return to the Edit window. 

10. Repeat steps 4 to 9 for the other cameras. 

Содержание Interlogix TruVision DVR 45HD

Страница 1: ...TruVision DVR 45HD User Manual P N 1073291 EN REV B ISS 29MAR17...

Страница 2: ...ice must accept any interference received including interference that may cause undesired operation Canada This Class A digital apparatus complies with Canadian ICES 003 Cet appareil mum rique de la c...

Страница 3: ...tructions 15 Recorder control 15 The front panel description 15 The mouse 19 The IR remote control 19 Menu overview 22 Chapter 5 Live view 25 Description of live view 25 Video output 26 Live view mous...

Страница 4: ...settings 59 Layout 61 Chapter 10 Camera setup 62 Supported cameras 62 Configure the signal input channel 62 IP camera status 63 Camera recording settings 66 Snapshots 68 Camera OSD 69 Image settings 7...

Страница 5: ...12 Configuration files 113 Upgrade system firmware 114 Holiday schedules 114 Using a network storage system 116 Chapter 15 Storage management 117 HDD status information 117 Manage eSATA 118 Storage mo...

Страница 6: ...the web browser 138 Play back recorded video 139 Search for event logs 141 Configure the recorder via the browser 142 Appendix A Specifications 146 Appendix B PTZ protocols 148 Appendix C Port forward...

Страница 7: ...hazards that could result in injury or loss of life They tell you which actions to take or to avoid in order to prevent the injury or loss of life Caution Caution messages advise you of possible equi...

Страница 8: ...b browser mobile applications TruVision Navigator software or third party software using the TruVision SDK The recorder can be fully managed by the TruVision Navigator software which is ideal for most...

Страница 9: ...ase sensitive so use a mixture of upper and lower case letters The password must have between 8 and 16 characters Do not use personal information or common words as a password Note If you should forge...

Страница 10: ...fications 10 to 90 before choosing an installation location Extremes of heat or cold beyond the specified operating temperature limits may reduce the life expectancy of the recorder Do not install the...

Страница 11: ...sing please contact your local supplier Back panel The figures below show the back panel connections and describe each connector on a typical TVR 45HD digital video recorder Details may vary for speci...

Страница 12: ...an optional USB device such as a mouse CD DVD burner or HDD 12 Connect to a HDTV The HDMI connection supports both digital audio and video 13 Connect to a VGA monitor 14 Connect to a network 15 Conne...

Страница 13: ...on TruVision DVR 45HD User Manual 11 Figure 3 Rack mount installation To install the rack ears 1 Attach the two small front rack mount ears A to the recorder supplied 2 Attach the recorder to the fron...

Страница 14: ...n the recorder Turn on the recorder using the power switch on the back panel Once it is powered up the status LEDs on the front panel will light up To turn off the recorder 1 In live view mode right c...

Страница 15: ...lick Next 4 In each setup configuration page enter the desired information and then click Next to move to the next page The setup configuration pages are Wizard setup pages Description User configurat...

Страница 16: ...ameras connected to the recorder Check the Constant Recording checkbox for the recorder to record continuously all day If left unchecked the recorder will not record Check the desired time lapse check...

Страница 17: ...135 for more information on using the web browser Please refer to the TruVision Navigator and TVRmobile user manuals for more information You can use your preferred control method for any procedure b...

Страница 18: ...In PTZ mode stop all ongoing operations Select or deselect an item Enter a selected folder of the external storage device such as a USB flash drive used for archiving A In live view mode select the ma...

Страница 19: ...playback of the current camera upper left video tile if in multiview mode In playback mode play back a camera in the forward direction In search mode play back a selected video or view a snapshot In...

Страница 20: ...s Enter Press the button to pause the video Press again to restart the video In single frame Playback mode press to advance the video by a single frame Reverse Press to play back a camera in reverse d...

Страница 21: ...button Single Click Live view Select a camera to display the live view toolbar Menu Select a component of a menu such as a button or an input field This is similar to pressing the Enter button on the...

Страница 22: ...rt number TVR REMOTE 1 Figure 5 IR remote control Item Description 1 Alarm Acknowledge an alarm 2 Device Enable disable the IR remote control to control the recorder 3 Numeric buttons Select a camera...

Страница 23: ...right click the mouse and select the Menu button The default display menu window appears 2 Click Device Management General Settings 3 Check the remote control ID value The default value is 255 This de...

Страница 24: ...See Table 4 below for a description of the icons 2 Submenu panel Submenus for the selected menu function are displayed Click an item to select it 3 Setup menu All the details for the selected submenu...

Страница 25: ...agement Configures HDD information storage mode S M A R T settings and bad sector detection See Chapter 15 Storage management on page 117 User Management Configures users passwords and access privileg...

Страница 26: ...ick a key to input that character Figure 7 The soft keyboard Description of the keys in the soft keyboard Switch to lowercase uppercase Space Exit the soft keyboard Alphanumeric characters Backspace P...

Страница 27: ...amera status icons are shown for each camera Each icon represents information on a specific item These icons include Table 5 Description of the on screen status icons Icon Description Indicates an ala...

Страница 28: ...event monitor BNC is used to display detected events such as motion Only one monitor can be controlled at a time Live view mouse menu Many features of live view can be quickly accessed by placing the...

Страница 29: ...ayback the recorded video of the selected day from the selected camera The current day is selected by default See 24 hour playback on page 42 for more information 8 Monitor B Switch between monitors A...

Страница 30: ...advancing to the next camera in the sequence list Sequencing can only be done in single view display mode The default sequence displays each camera in numerical order However each camera on the main a...

Страница 31: ...er digital zoom See Digital zoom on page 30 for further information Image Settings Enter the image settings menu to modify the image lighting levels There are two options Preset Mode These are preconf...

Страница 32: ...click the mouse on the desired camera The live view toolbar appears 2 Click the digital zoom icon The digital view window appears 3 Left click the mouse and drag the red square to the area of interes...

Страница 33: ...control panel Figure 10 PTZ control panel Table 9 Description of the PTZ control panel Name Description 1 Directional pad auto scan buttons Controls the movements and directions of the PTZ The center...

Страница 34: ...oolbar The PTZ control panel appears Select the desired camera from the toolbar Or On the front panel select the desired camera and press Enter to call up the PTZ control panel 2 Scroll the toolbar to...

Страница 35: ...and snapshots Recordings from both analog and IP cameras can be searched Figure 11 The Advanced Search menu The Search window has four submenus that allow you to carry out different searches by theme...

Страница 36: ...the time and date of the desired file to play back and do a 24 hour playback for that day You can then locate the desired recording using the playback toolbar timeline see Figure 13 on page 40 A recor...

Страница 37: ...ve view right click the mouse on the desired video pane and select Advanced Search The Video Search menu appears Or Click the Search icon on the front panel 2 In the Search menu click the Event tab 3...

Страница 38: ...ame Or Click the Delete button to delete a bookmark Or Click the Play button to play back a bookmark By snapshots You can search for snapshots of recorded video See Live view mouse menu on page 26 on...

Страница 39: ...slideshow of all the snapshots found click the or buttons on the snapshot toolbar to sequence forwards or backwards through the shots Log search You can open video footage from the results of a log s...

Страница 40: ...ee Customize a user s access privileges on page 126 for more information Instant playback Use the live view toolbar to perform instant replay of a predefined period default time is five minutes This c...

Страница 41: ...mmed time of this instant playback go to Recording General Select one of the times from the drop down list 5 10 20 or 30 minutes and click Apply Default is 5 minutes Overview of the 24 hour playback v...

Страница 42: ...6 Camera panel Select the cameras for playback Move the mouse over the area to display the list of cameras available 7 Calendar panel White No recordings Green Yellow Red Pale green Magenta Recordings...

Страница 43: ...Add customized bookmark File management Click to see the list of video clips snapshots locked files bookmarks and their times The video clips playback captures and locked files can be archived Bookma...

Страница 44: ...is in full screen mode 2 To select more than one camera for synchronous playback or to select playback from a different day move the mouse to the right edge of the screen The camera list and calendar...

Страница 45: ...elect the Bookmark tab Note You can only search for a bookmark by file name in the 24 hour playback mode Smart This feature lets you selectively playback the parts of a recording with VCA and motion e...

Страница 46: ...Alarm Intrusion Alarm_KA Technical alarm High temperature Arming Panel Alarm Intrusion Alarm_MA Medical alarm Disarming Panel Alarm Intrusion Alarm_PA Panic alarm Intrusion Alarm_BA Burglary alarm In...

Страница 47: ...ideo that does not have such events The Smart Playback mode analyses the video for VCA and motion events and marks them See Figure 15 below Figure 15 Example of a smart playback recording Smart event...

Страница 48: ...n This is used to detect motion in a selected area Click the icon and then drag the mouse to draw the motion detection area Note It is not necessary to have motion detection enabled to use this featur...

Страница 49: ...ist on the upper left corner of the window 2 Select a camera and date from the calendar on the right hand side of the window 3 In the Split screen drop down list box select the desired number of split...

Страница 50: ...me between 10 and 300 seconds for forward and backward skip times The default skip time is 30 seconds Click OK To skip forwards or backwards during playback From the front panel Press the up and down...

Страница 51: ...backup device and the desired file type to play back 3 Position the mouse over a file to see the file name The name includes the recording date and time For example the recording A0_TVR15HD_2016111716...

Страница 52: ...file during playback When an intruder for example crosses in front of several cameras you can save the video clip of the intruder s path across these cameras in a single file Note This feature is only...

Страница 53: ...of bookmarks saved The name of a bookmark can be edited A bookmark can also be deleted To archive locked files see Archive video clips and locked files on page 56 4 Click Cancel to return to the 24 ho...

Страница 54: ...Chapter 7 Playback functionality 52 TruVision DVR 45HD User Manual 2 Click the lock symbol of the desired file to unlock The file is no longer protected...

Страница 55: ...you archive recorded files quickly by using the Archive button on the front panel The recorder then downloads all the recorded files on the unit to fill the available memory space on the media This op...

Страница 56: ...onfirm when the download is complete Archive files from search results You can insert a mini USB hub to the USB port to attach a mouse for navigation or a USB drive for archiving However the unit may...

Страница 57: ...f files on the backup device 5 Free Space Free space available on the backup device 6 Finalize Disc Select to prevent other files being recorded onto the disc 7 Include Player Select to automatically...

Страница 58: ...ort 6 Click Archive The Archive window appears 7 Select the storage medium to export to from the drop down list 8 Click Archive to begin the backup process of the selected files Or Click Archive All t...

Страница 59: ...Start button When the first file finishes the next file will automatically start To add exported video files to TruVision Player 1 In TruVision Player click the menu icon and select Tool Merge 2 The M...

Страница 60: ...d Note The selected time frame can apply to multiple cameras 3 Click the Video button to move the selected video segment to the Collector 4 In the Collector select the desired video thumbnails to expo...

Страница 61: ...Display settings Use the Display Settings menu to adjust the settings related to the local monitor output of the recorder such as selecting the main and event monitors multiview layout display the mon...

Страница 62: ...to enable disable Default is Disabled 8 Enable Time bar Select whether the monitor output time bar appears on screen Check the box to enable disable Default is Enabled 9 Time Bar Size Select the size...

Страница 63: ...l 2 is the first camera shown in the single camera view then it will also be the top left camera of the 4 channel view You can switch the tile of a camera with that of another camera in the system Thi...

Страница 64: ...re encoded as H 264 streams Standard analog cameras TruVision IP cameras up to 4MPX The recorder accepts H 264 and H 265 TruVison IP cameras The analog video inputs on the recorder can automatically d...

Страница 65: ...error message appears Please select at least one signal type 3 Click Apply to save the changes 4 A pop up message will appear asking if you want to reboot the system Click Yes 5 Click Exit to return t...

Страница 66: ...s in xls MS Excel 2003 3 IP Camera Lets you see the live view from the selected IP camera as well as change the IP camera information Click the Live View icon to see live view from the selected IP cam...

Страница 67: ...up window should appear showing the camera s live view Note If cameras still have default settings they might have the same IP addresses This creates an IP conflict Use the Edit button to assign a dif...

Страница 68: ...t 3 Select the archive device and click Export A pop up message appears to say that the file has been successfully exported to the archive device and the exported file is listed on screen To import IP...

Страница 69: ...1920 1080 1080P 1280 720 HD720P 960 576 WD1 704 576 4CIF 640 480 VGA or 352 288 CIF Bitrate Type Select Variable default or Constant If Variable is selected the bandwidth can vary depending on video...

Страница 70: ...udio Enable to record sound with the images Default is Disabled 4 Click Apply to save the settings 5 If you want to save these parameters to another camera click Copy and select the camera in the pop...

Страница 71: ...s 1 From the menu toolbar click Camera Setup Camera OSD 2 Under Camera select the desired camera 3 Under Camera Name enter a name for the camera if required The name can have up to 32 alphanumeric cha...

Страница 72: ...nd digital noise reduction values You can modify the digital noise reduction DNR value to improve image quality This function removes image noise from a video signal which can be more pronounced in lo...

Страница 73: ...Detection If this is not enabled motion will not be recorded 4 For IP cameras only Check Enable Dynamic Analysis This allows you to see on screen motion being detected while setting up the feature Are...

Страница 74: ...tion In the Actions window click the Actions tab to define the method by which you want the recorder to notify you of the alarm see Alarm and event notification on page 99 for the list of alarm notifi...

Страница 75: ...ing the camera Tampering detection only applies when the whole image is covered and all light is blocked You cannot select a specific area of the camera screen to detect tampering for analog HD TVI ca...

Страница 76: ...e from the recorder via the OSD only There are several types of VCA events to select A series of linkage methods can be triggered if a VCA event is detected See Table 12 below Note VCA events trigger...

Страница 77: ...p Click Apply to save the settings Click Copy to copy these settings to other days of the week Click OK to return to the VCA window 8 Select the response method to a VCA event In the Actions window cl...

Страница 78: ...ensure that the settings correspond with those used in the PTZ camera 3 Click Copy to copy the settings to another camera if required and select the cameras 4 Click Apply to save the settings and the...

Страница 79: ...tour Deletes the selected shadow tour 4 Preset Tour toolbar Adds a step to a selected preset tour Starts the selected preset tour Stops the selected preset tour Deletes all the preset tour steps Scrol...

Страница 80: ...Setup PTZ Presets Tours 2 From the preset list select a preset number and click to delete the selected the preset 3 Click Exit to return to live view To call up a preset tour 1 From the menu toolbar...

Страница 81: ...menu toolbar click Camera Setup PTZ Presets Tours 2 Select the shadow tour from the drop down list 3 To record a new shadow tour click and use the directional buttons on the PTZ control panel to move...

Страница 82: ...ect the desired sequence order of the cameras 6 Click Apply to save the settings and Exit to return to live view Call up the TruVision HD TVI camera OSD menu TruVision HD TVI cameras with dual video o...

Страница 83: ...uVision DVR 45HD User Manual 81 example to change the language use the left right arrows to select Language and then the up down arrows to select the desired language 5 Click EXIT in the camera OSD me...

Страница 84: ...rk You must correctly configure your recorder s network settings before using it over the network in order to Connect IP cameras to it Connect to the recorder over the LAN Connect to the recorder over...

Страница 85: ...type used from the drop down list The default value is 10 100 1000M self adaptive 4 Main NIC This is displayed if Net Fault Tolerance has been selected Select the desired LAN from the drop down list...

Страница 86: ...3 IPv6 Address 1 Enter the IPv6 address for the recorder This is the IP address of the local network to which the recorder is connected Default value is fe80 240 3dff fe7e 926f 64 14 IPv6 Address 2 Wh...

Страница 87: ...the internet you may need to change it to another value See Appendix C Port forwarding information on page 137 for more information See Port forwarding information in the appendix for more information...

Страница 88: ...nate DNS server addresses as well as the default gateway address 5 Click Apply to save the settings and click Exit to return to live view NTP server settings A Network Time Protocol NTP server can als...

Страница 89: ...le TLS and encrypt emails If the destination server does not support TLS the recorder will default to SSL If disabled emails will not be encrypted and will be sent in clear text Sender Enter the name...

Страница 90: ...l the SNMP software To configure SNMP protocol settings 1 From the menu toolbar click Network Settings SNMP 2 Check the Enable SNMP box 3 Enter the required settings 4 Click Apply to save the settings...

Страница 91: ...rk traffic in order to obtain information about the recorder such as its linking status MAC address MTU sending receiving rate and NIC type The Network Detection window shows the network traffic betwe...

Страница 92: ...en the recorder is connected to a network you can export the captured data packet to a USB flash drive SATA eSATA CD RW and other local backup devices To export network packet data 1 From the menu too...

Страница 93: ...l 91 Port forwarding When using an internet connection ensure that the ports are open or forwarded as follows When using TruNav Port 8000 and 554 When using a web browser Port 80 and 554 See Internet...

Страница 94: ...e The schedules are visually presented on a map for easy reference See Figure 24 below for a description of the recording schedule window Figure 24 Description of the recording schedule window 1 Camer...

Страница 95: ...larms VCA or motion detection can or cannot be recorded you also need to plan their arming schedules See Motion detection on page 71 VCA setup on page 74 and Set up alarm inputs on page 96 For example...

Страница 96: ...for recording Define a time period by entering a start left column and end right column time You can schedule up to eight time periods Click All Day to record all day Note Time periods defined cannot...

Страница 97: ...recording If a scheduled recording is already in progress when a manual recording is started it continues to record as scheduled You can check to see if a camera is recording manually by looking at t...

Страница 98: ...al alarm device for example PIR detector dry contacts They are the physical inputs on the cameras and recorder To set up external alarms 1 From the menu toolbar click Alarm Event Setup Alarm Input 2 S...

Страница 99: ...b to define the method by which you want the recorder to notify you of the alarm Select one or more of the five notification types See Alarm response actions below for a description of these alarm not...

Страница 100: ...up alarm outputs below for information on configuring an alarm output Set up alarm outputs You can connect the recorder to an alarm system such as a siren or intrusion system which is then activated w...

Страница 101: ...larm button on the front panel or remote control The alarm is silenced Buzzer settings When an alarm is triggered by the system or a camera the recorder can be set up to respond with a warning buzzer...

Страница 102: ...ny more files This could be due to the overwrite option being disabled so recorded files are locked and cannot be deleted IP Camera Conflicted Conflict in IP address setting Video Quality Exception Is...

Страница 103: ...Actions button From the drop down list select the desired event notifications to be listed in the alarm center in live view and click OK See Alarm and event notification on page 99 for the complete l...

Страница 104: ...ing schedule for detecting video loss Click the Actions tab and select the schedule of when you want video loss detection to be enabled The schedule can be set for all week or any day of the week with...

Страница 105: ...ts to be reported to the recorder from Interlogix intrusion panels via IP and to be linked to recorder actions The following Interlogix panels are supported ATS Master EMEA only Advisor Advanced EMEA...

Страница 106: ...rt Enter the port that is used to report the events Default is 9999 This port number must match the port number set up in the intrusion panel Set up the heartbeat alarm parameters 7 Enable Panel Heart...

Страница 107: ...alarm event is received The cameras will record following the main stream alarm parameters The recordings will be 10 seconds for each assigned camera Arming Schedule Define the alarm schedule for the...

Страница 108: ...ecord when an alarm event is received The cameras will record following the main stream alarm parameters The recordings will be 10 seconds for each assigned camera Arming Schedule Define the alarm sch...

Страница 109: ...pporting push notifications TVN 10 FW 2 1 TVN 21 FW 3 1 TVN 22 FW 1 0 TVR 12HD FW 1 2 TVR 44HD FW 1 2 TVR 45HD FW 1 0 Set up push notifications To set up push notifications in the recorder 1 In the br...

Страница 110: ...option Alarm select Alarm Push Notification The events will be listed in the Alarm Information window 3 Slide the button to the right to enable the push notification function for the recorder As soon...

Страница 111: ...vent To display push notifications on TVRMobileHD 1 When motion detection is detected a red dot appears on the alarm icon with the number of triggers that have been detected 2 Select the Alarm icon Th...

Страница 112: ...out period and enable disable password requirement Import export configuration files Upgrade the firmware Set up holiday periods Configure RS 232 settings Time and date settings You can set up the dat...

Страница 113: ...heck the box to enable disable Default is Disabled 5 System Date Enter the system date Default date is the current date 6 System Time Enter the system time Default time is the current time 7 Auto DST...

Страница 114: ...ately Default is English 2 Device Name Define the recorder name Click the edit box and enter the new name from the soft keyboard 3 Remote Control ID The device number to use for the recorder when link...

Страница 115: ...ecorder or if you want to make a backup of the settings You cannot import a configuration file if the firmware version of the recorder has in the meantime changed Import and export files Insert an ext...

Страница 116: ...er Using TruVision Navigator For further information refer to the TruVision Navigator user manual The firmware upgrade file is labeled TVR45HD dav To update the system firmware using a USB device 1 Do...

Страница 117: ...periods 7 Click Exit to return to live view RS 232 settings Use the Device Management menu to configure the RS 232 parameters such as baud rate data bit stop bit parity flow control and interface Fig...

Страница 118: ...omega StorCenter ix2 dl NETGEAR ReadyNAS Pro 2 QNAP TS 219 II Turbo NAS Note This storage option is only available via the browser To set up a network storage system 1 Click the Configuration tab in t...

Страница 119: ...sted as Abnormal and has already been initialized the HDD needs to be replaced If the HDD is Uninitialized you need to initialize it before it can be used in the recorder Refer to Initializing HDDs ab...

Страница 120: ...to return to live view Add a HDD You can add additional network attached hard drives to setup a NAS or SAN system To add a HDD 1 From the menu toolbar click Storage Management HDD Information 2 Click...

Страница 121: ...capacities for both recordings and snapshots to each camera Note If the overwrite function is enabled the maximum capacity for both recordings and snapshots is set to zero by default To set the HDD q...

Страница 122: ...e more than one HDD installed you can change the behavior of a HDD by changing its property It can be set to read only or read write R W The storage mode must be set to Group before setting the HDD pr...

Страница 123: ...is Enabled 3 Click Apply to save the settings 4 Continue to configure the recorder or click Exit to return to live view S M A R T settings S M A R T Self Monitoring Analysis and Reporting Technology r...

Страница 124: ...ectors can slow down an HDD when reading or writing data for example Figure 28 Bad sector detection window To detect bad sectors 1 From the menu toolbar click Storage Management Bad Sector Detection 2...

Страница 125: ...ent icon in the menu toolbar and select RAID 2 Click the Enable RAID checkbox 3 Click Apply and then Yes to reboot the system 4 Click the Storage Management icon in the menu toolbar and select RAID 5...

Страница 126: ...choose RAID 5 at least 3 HDDs must be installed If you choose RAID 10 4 6 8 HDDs need to be configured for RAID 10 To verify the RAID 1 Click Storage Management HDD Information To rebuild a damaged RA...

Страница 127: ...l Operator or Guest Default is Guest 5 Enter the user s MAC address to let the user access the recorder from a remote computer with this MAC address 6 Click OK to save the settings and return to the p...

Страница 128: ...cal Camera Management Locally add delete and edit IP cameras Local Advanced Operation Access HDD management including the initialization and modification of disk properties Update system firmware as w...

Страница 129: ...lly control PTZ dome cameras Local Video Export Locally back up recorded files from any of the channels Remote Live View Remotely select and view live video over the network Remote Playback Remotely p...

Страница 130: ...dow 2 Click the Edit button for the user whose details need to be changed The Edit User pop up window appears 3 Edit the user information and click OK to save the settings and return to the previous w...

Страница 131: ...version and encoding version The QR code for the recorder is also displayed You can quickly enter the recorder parameters into TVRMobile by scanning the QR code Note The TVRMobile app must first be in...

Страница 132: ...ion shows you the IP addresses that are currently connected to this channel 4 To view record information click Record You can view the camera number recording status stream type frame rate bit rate Kb...

Страница 133: ...puts You can view the alarm output number alarm name and alarm status 7 To view network information click Network You can view the IPv4 address IPv4 subnet mask IPv4 default gateway IPv6 address 1 IPv...

Страница 134: ...view Search the system log Many events of the recorder such as operation alarm information and notification are logged into the system logs They can be viewed and exported at any time Up to 2000 log...

Страница 135: ...ording Resolution Mismatch Operation All Power Up Local Shutdown Abnormal Shutdown Watchdog Reboot Local Restart Local Operaton Activation Local Login Local Logout Local Configure Parameters Local Upg...

Страница 136: ...ing Delete Expired Video File Network Storage Information System Running Status 5 Click the Search button A list of results appears 6 Select a file and click Details Displays information on the log or...

Страница 137: ...you can install ActiveX controls to connect and view video using Internet Explorer To have complete functionality of the web browser interface and the recorder player with Internet Explorer do the fol...

Страница 138: ...arding see Appendix C Port forwarding information on page 149 HTTPS settings Using HTTPS Hypertext Transfer Protocol Secure is a secure protocol that provides authenticated and encrypted communication...

Страница 139: ...p 1 and upload your csr file to get a trusted certificate For larger companies a corporate certificate might be available from the IT department Web browser live view The recorder web browser lets you...

Страница 140: ...reaming from selected cameras Start recording from selected cameras Digital zoom Take a video snapshot View previous and next camera respectively If viewing in multiview format live view moves to the...

Страница 141: ...otorized lens such as PTZ or IP cameras This function helps to maintain lens focus accuracy over prolong periods of time 6 Start or stop camera wiper if available on the camera 7 Auxiliary focus Autom...

Страница 142: ...us day Speed down Click to scroll through the different speeds available single frame 1 8 speed speed speed normal X2 speed X4 speed X8 speed maximum speed Current speed is displayed under the camera...

Страница 143: ...and drag the marker across the timeline on where you want video playback to begin and then click Play on the playback control toolbar You can capture a snapshot of a video image save the video playba...

Страница 144: ...ings You can also specify the directory locations for saving recorded and playback video captured images and downloaded files Remote configuration See Figure 33 on page 143 for an example of the Confi...

Страница 145: ...tings on page 66 for more information Snapshots Define the image quality of snapshots See Snapshots on page 68 for further information Camera OSD Define which information is displayed on screen Only a...

Страница 146: ...information HTTPS Define self signed server certificates as well as request certified server certificates to ensure your network security See HTTPS settings on page 136 for further information Networ...

Страница 147: ...S 232 Settings Define the RS 232 parameters See RS 232 settings on page 115 for more information Storage Management HDD Information Define the HDD basic settings and initialize the HDD See HDD status...

Страница 148: ...input 4 ch RCA 2 0 Vp p 1 k Video audio output BNC output Supported Only for Aux Output HDMI VGA output VGA 1 ch 1920 1080 60Hz 1280 1024 60Hz 1280 720 60Hz 1024 768 60 Hz HDMI with audio 2 ch HDMI1...

Страница 149: ...ity per disk External interface Bi directional audio input 1 ch RCA 2 0 Vp p 1 K Network interface 1 RJ45 10M 100M 1000M self adaptive Ethernet interface Serial interface 1 RS 485 Half duplex 1 standa...

Страница 150: ...ion DVR 45HD User Manual Appendix B PTZ protocols Interlogix 485 Interlogix 422 TruVision Coax HD TVI PTZ KALATEL Pelco D Pelco P Many other third party protocols are also supported See the list in th...

Страница 151: ...00 Client Software Port Used to connect to video streams Port 554 RTSP Port Real time streaming protocol Used to record video remotely Port 1024 RTSP Port for 3G 4G Use with mobile apps Used for 3G 4G...

Страница 152: ...t forwarding information 150 TruVision DVR 45HD User Manual If you cannot find any information for your particular router please contact your router manufacturer or internet service provider for furth...

Страница 153: ...KVISION Y Y Y Y Y Y Y Y Y Y Y Y Y Honeywell Y Y Y Y N N N N N Y Y Y Y INFINOVA Y Y Y Y N N N N N Y Y Y Y KTD 348 Y Y Y Y N N N N N Y Y Y Y LG MULTIX Y Y Y Y N N N N N Y Y Y Y LILIN Y Y Y Y N N N N N Y...

Страница 154: ...Y N Y Interlogix 422 Y Y N N N N N Y N Y KALATEL Y Y N N N N N Y N Y DSCP Y Y N N N N N Y N Y HIKVISION Y Y N N Y Y Y Y Y Y Honeywell Y Y N N N N N N N N INFINOVA Y Y N N N N N Y N Y KTD 348 Y Y N N...

Страница 155: ...Appendix D Supported PTZ commands TruVision DVR 45HD User Manual 153 Aux 1...

Страница 156: ...Transparent Enabled Enable Timebar Enabled Video Output Interface VGA HDMI Default View 1 1 2 2 1 5 1 7 3 3 for 8 ch models and 4 4 16 ch models Sequence Dwell Time No Switch Enable Audio Output Disab...

Страница 157: ...d Mode Main Stream TL Hi Stream Type Video Resolution Null Bitrate Type Variable Video Quality Medium Frame Rate 15 fps Max Bitrate Mode General Max Bitrate Kbps Null Pre Event 5 s Post Event 5 s Auto...

Страница 158: ...alysis Null Actions Trigger Channel A1 Arming Schedule All day for whole week Actions Null Sensitivity 2 Target size 1 Privacy Mask Privacy Mask Settings Camera A1 Camera 01 Enable Privacy Mask Disabl...

Страница 159: ...a 01 V stream Encoding V stream Encoding Enable V stream Encoding Yes Frame Rate 12 fps Max Bitrate Kbps 1024 People Counting People Counting Statistics Camera D1 IPCamera 01 Report Type Daily Report...

Страница 160: ...rver Port 554 Total Bandwidth Limit Kbps Null PPPoE PPPoE Enable PPPoE Disabled User Name Null Password Null Confirm Null DDNS DDNS Enable DDNS Disabled DDNS Type DynDNS Server Address Device Domain N...

Страница 161: ...MP Version SNMP Port 161 Read Community public Write Community private Trap Address Null Trap Port 162 UPnP UPnP Enable UPnP Disabled Mapped Type Auto Port Type HTTP Port RTSP Port Server Port HTTPS P...

Страница 162: ...rm Input Alarm Input Alarm Input No A 1 Alarm Input Name Null Type NO Enable Alarm Input Disabled Actions Trigger channel Disabled Alarm Schedule All day for whole week Actions Disabled PTZ link Disab...

Страница 163: ...arm Host 1 Port 5001 Alarm Host 2 IP Null Alarm Host 2 Port 5002 Alarm Host 3 IP Null Alarm Host 3 Port 5003 Intrusion Panel Setup Intrusion Panel Setup Enable Intrusion Panel Connection Disabled Sele...

Страница 164: ...24 hour Display Day Disabled System Date Current System Date System Time Current System Time Auto DST Adjustment Disabled Enable DST Disabled From Apr 1st Sun 2 00 To Oct last Sun 2 00 DST Bias 60 min...

Страница 165: ...None Interface Technical Support Storage Management HDD Information Label Disabled Total Capacity Free Space Overwrite Enabled Storage Mode Storage Mode Mode Quota Camera A1 Camera 01 Used Record Capa...

Страница 166: ...l Status Null Error Count Null RAID Enable RAID Disabled User Management Users User Management admin 1234 operator 4321 guest Null System Information Device Info Device Info Device Name TVR 45HD Model...

Страница 167: ...puts No Alarm Name Alarm Status Network Network NIC IPv4 Address IPv4 Subnet Mask IPv4 Default Gateway IPv6 Address 1 IPv6 Address 2 IPv6 Default Gateway MAC Address Preferred DNS Server Alternate DNS...

Страница 168: ...0 C Cameras configure PTZ dome cameras 75 image settings 70 on screen layout 61 privacy mask 72 supported 62 Configuration settngs export 113 import 113 D Daily schedules recording 94 Date format 110...

Страница 169: ...ayout 59 N NAS 116 Network packet data export 90 Network settings general set up 82 Network status 89 Network storage system set up 116 Network traffic check 89 NTP server 86 O OSD settings 69 P Passw...

Страница 170: ...88 Soft keyboard 24 Startup wizard enable disable 112 Startup wizard 13 Status icons description 25 display 59 System date display 110 System information view 129 System logs playback 132 search 132...

Страница 171: ...uVision DVR 45HD User Manual 169 digital zoom 140 live view 137 network settings 136 remote configuration of recorder 142 search and play back recorded video 139 search event logs 141 video snapshot 1...

Страница 172: ......

Отзывы: