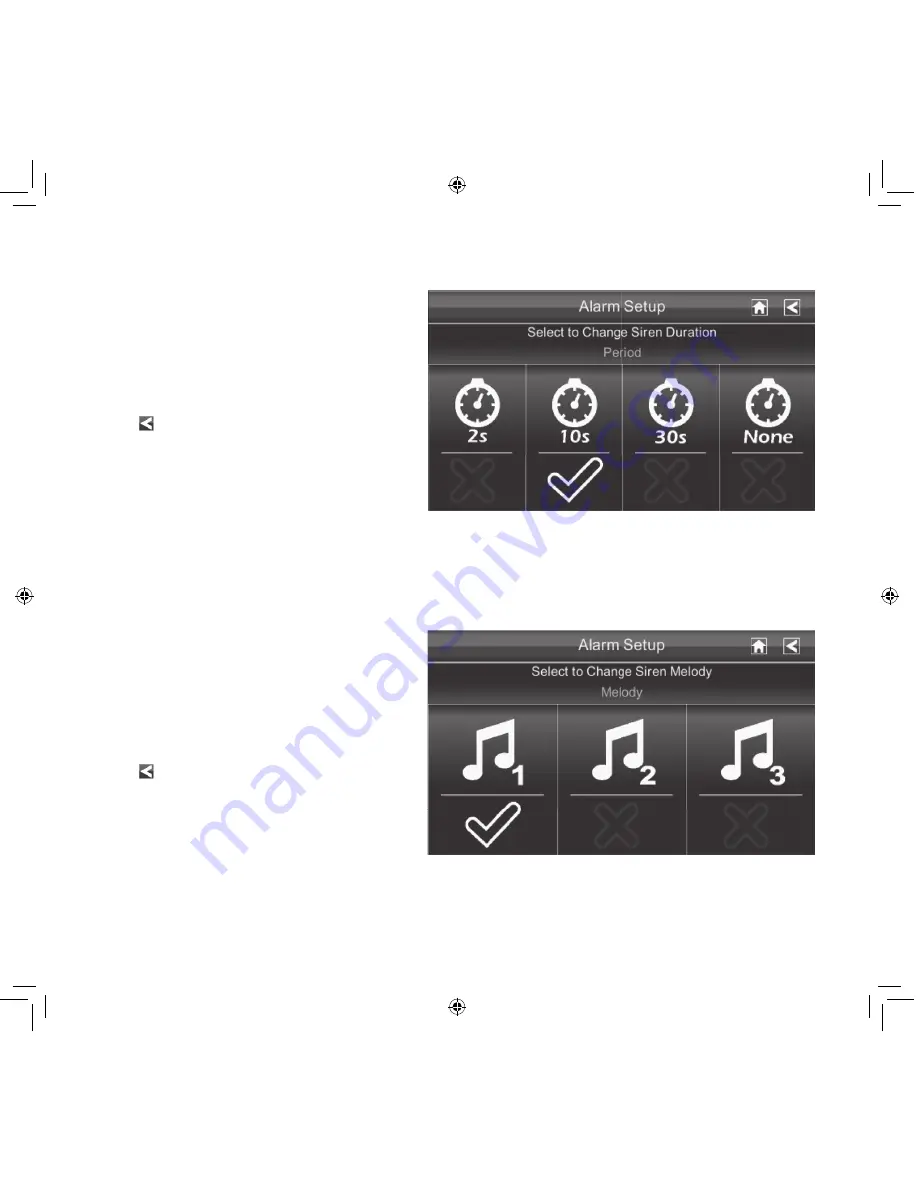
background image

34

PERIOD SCREEN 

This selection allows you to select the length of time the alarm will sound for the alarm clock. 

1.  Tap Period. The Set Siren Duration 

screen displays.   

2.  Tap the duration you want the siren to 

last (2, 10, or 30 seconds) or tap None 
to turn sirens off.

3.  Tap   to return to the previous screen.

MELODY 

This selection allows you to select a melody for the siren. 

1.  Tap Melody. The Change Siren Melody 

screen displays.   

2.  A check mark appears on the melody 

you tap and the Monitor briefly plays 
a sample of the selected melody.

3.  Tap   to return to the previous 

screen.

Содержание G24 Series

Страница 1: ...1 G24 27 Series VIDEO SURVEILLANCE SYSTEM For more exciting new products please visit our website Australia www uniden com au New Zealand www uniden co nz ...

Страница 2: ...y risk of electric shock from lightning avoid handling any electronic devices except battery powered ones during an electrical storm Use only the power cord and or batteries indicated in this manual Never dispose of any batteries in a fire they may explode Check with local codes for possible special disposal instructions Never tug or pull on any power cord be sure to leave some slack in the cord w...

Страница 3: ... location which would muffle the sound or interfere with the normal flow of air SAVE THESE INSTRUCTIONS For best results To avoid damage to your equipment follow these simple precautions Do not drop puncture or disassemble any part of the equipment There are no user serviceable parts inside Do not expose the equipment to high temperatures and avoid leaving the equipment in direct sunlight for more...

Страница 4: ... Cameras 19 G Series Screen Descriptions 21 OVERVIEW 21 G Series SETTINGS SCREEN 21 Main Screen 22 Sub Screens 22 What it does 22 CAMERA SETUP SCREEN 23 Pairing 23 Camera On 24 Recorder Setup Screen 25 Email Alert 26 For Gmail 28 Network Setup Screen 30 Alarm Setup Screen 33 SYSTEM SETUP SCREEN 35 Quick Tips 41 Remote Access 42 Overview 42 System Requirements 42 Connecting to the Internet 42 Conne...

Страница 5: ... model 7 Monitor 4 3 Monitor Outdoor Camera Indoor Camera 1x Monitor 1x Cradle 1x AC adaptor 1x Ethernet Cable 1x SD Card 1x Monitor 1x Cradle 1x AC adaptor 1x Ethernet Cable 1x SD Card 1x Camera 1x Antenna 1x AC adaptor 1x Stand 4x Mounting Screws 4x Expansion Anchors 1x Camera 1x AC adaptor 1x Stand MODEL Quantities Of Each G2701 1 0 1 G2710 1 1 0 G2711 1 1 1 G2720 1 2 0 G2401 1 0 1 G2410 1 1 0 ...

Страница 6: ...sensor Front View Back View OUTDOOR CAMERA Monitor Power Dock Ethernet Cable Connection AC Power Connection Power On Off SD slot AC Power Connection Monitor back side Cradle Pull Out Stand Reset Antenna Back view Antenna connector Power pigtail Microphone Pair button Power jack ...

Страница 7: ...n The camera is connected to the Monitor Off The camera is in standby Charge Status On Green The battery is charging Off The battery has charged what the lights Mean INDOOR CAMERA LINK POWER Camera lens Light sensor Antenna flip up Antenna flip up Swivel stand receiver AC adaptor power jack LINK POWER LED LINK LED CHARGE LED Microphone ...

Страница 8: ...EDs used for night vision thus lowering the quality of the video The G Series indoor camera is not weatherproof General Guidelines Mount the Camera Stand The screen remains dark until the cameras are powered up SETTING UP THE EQUIPMENT Set Up the Monitor 1 If you are using the Monitor as a stand alone unit flip out the stand on the back of the Monitor and extend the antenna Connect an AC adaptor t...

Страница 9: ...ater ripples reflections tree shrub leaves blowing in the wind and the shadows they create can generate motion detection false alarms You can mount the outdoor camera with the stand on the bottom on a wall or table top or on the top on the ceiling The indoor camera can be mounted with the stand on any flat surface When you are positioning the camera you might want to bring the Monitor along it s m...

Страница 10: ... of the camera 6 Connect one end of an AC adaptor to the camera s power pigtail and plug the other end into a 240 volt AC standard indoor power outlet If necessary connect the extension cord to the camera s pig tail and connect the AC adaptor to the extension cord Be sure the power plug and the connector are tightly twisted together to avoid water leaking in 7 Make sure the Power status light turn...

Страница 11: ... into a 240 volt AC standard indoor power outlet 2 Make sure the Power status light turns on If it doesn t try reconnecting the AC adaptor and make sure the power outlet isn t controlled by a wall switch Slide the camera on to the stand swivel mount until it clicks in place AC adaptor power plug LINK ...

Страница 12: ...n on page 25 Schedule Recordings Schedule Record on page 29 System Settings Power Saving Power Saving on page 35 Screen Auto Lock Screen Auto Lock on page 36 Time Time on page 37 Security code Security Code on page 32 Language default language is English Changing the Language on page 40 Recording Settings Motion Detection Motion Detection on page 25 Schedule Recordings Schedule Record on page 29 ...

Страница 13: ...on the screen itself let you monitor power and camera status The G Series system always defaults to the Live screen in Quad mode after being idle for 2 minutes while in any other system screen This default ensures that the system is ready to re cord video even if you forget to return to the Live screen The system can only start a record ing while in Live screen mode The operation of the G24 or G27...

Страница 14: ...level G SERIES SYSTEM SETTINGS Access the G Series Software Operation screens or view re corded events SD CAPACITY Indicates memory capacity remaining BATTERY CAPACITY Displays battery capacity This graphic shows battery at nearly full INTERNET INTRANET STATUS Appears in LIVE view Indicates connection to the internet is in progress Appears in LIVE view and Pop Up Menu Indicates internet connection...

Страница 15: ...the intranet connection is es tablished CAMERA NUMBER Displays the camera number and signal strength through the status lines to the left of the number RECORD STATUS Tap to start or stop recording for that camera Steady on Not recording Flashing Recording MOTION System indicates motion detection recording in progress SCHEDULED System indicates scheduled recording in progress ...

Страница 16: ...16 Icon What it does POP UP MENU TAB Opens and closes the pop up menu display NO SD CARD INDICATOR Displays red when the SD card is not present or is damaged ...

Страница 17: ... camera s video on the entire screen If you are in Quad View tap on the camera quadrant you want to expand to Full View Tap on that image to return to Quad View Using the Pentazoom Feature While in any camera s full screen view selecting the icon on the right side of the screen enables the PentaZoom feature PentaZoom lets you select from 5 sections of the video image Tap on a section and it will d...

Страница 18: ...lder displays with no recordings listed 2 Tap on the recording you want to view It displays on the screen 3 Tap on any area of the screen that does not have control icons to bring up the playback progress bar Tap that area again to close it 4 While playback progress is visible you can fast forward rewind by dragging the playback bar forwards or backwards 5 When playback ends tap to return to the R...

Страница 19: ... 23 tap the camera image you want to pair A processing icon displays for a 60 second countdown 2 During the 60 second countdown quickly press and release the Pairing button on that camera s power cord see Pairing on page 23 3 The system automatically adjusts the Camera On screen accordingly 4 If you have any trouble consult the the table on page 20 deleting Recorded Files You can delete a single r...

Страница 20: ...d and the Monitor s antenna is extended making sure the camera is paired to the correct channel re pairing the camera and Monitor the camera s signal status icon shows one or two bars or the video quality is poor See General Guidelines on page 8 for tips on improving video quality the camera won t pair with the Monitor making sure the camera is plugged in and the red LED is on pressing and releasi...

Страница 21: ...monitor Brightness Brightens or darkens the video of that camera Recorder Setup Motion Detection Records when something moves in front of the camera Continues recording for 2 minutes Mo tion detection is on by default Email Alert Sends email notification to user s PC and or mobile when Motion Detection senses motion in front of the camera Schedule Record Set up a schedule for pre determined record...

Страница 22: ...m Setup Power Saving Temporarily turns off the LCD after the system is idle for 2 minutes to conserve power Screen Auto Lock Locks the screen from further activity until the screen is unlocked Time Clock Alarm Set an alarm Time Setting Set the current time Timer Time countdown Storage Management Formats erases all the data on the microSD card Permits new records to overwrite old records when the m...

Страница 23: ...s to the first camera it detects If two or more cameras are in pairing mode you can t control which camera the Monitor will detect first From the pop up menus tap the following icons as they appear on the screens This screen should display 1 Tap the camera image you want to pair A processing icon displays for a 60 second countdown 2 Press and release the Pairing button on that camera s power cord ...

Страница 24: ...ned on 1 Tap the camera you want to turn on 2 A check mark replaces the x under the camera 3 To turn a camera off tap the camera icon An x replaces the checkmark and indicates the camera is turned off Although the camera is turned off it is still powered The Monitor will not receive video sig nals from that camera From the pop up menu tap the following icons as they appear on the screens This scre...

Страница 25: ...e Recorder Setup screen to select between Motion Detection Email Alert or Schedule Re cord Select Motion Detection See Motion Detection below From the pop up menus tap the following icons as they appear on the screens This screen should display MOTION DETECTION From the pop up menu tap the following icons as they appear on the screens This screen should display ...

Страница 26: ...ter both incoming and outgoing email addresses Uniden recommends you set up and use Gmail as the outgoing mail server The outgoing email server SMTP server is responsible for sending out the email notification to tell users when the G Series system detects motion from any camera Motion Detection must be acti vated The incoming mail server Email To receives the email notification sent from the SMTP...

Страница 27: ...sable to deactivate it 2 Tap on the SMTP Server field A keyboard screen displays Enter your outgoing e mail SMTP server e g for gmail server enter smtp gmail com You can switch the keyboard from alphabetical characters to numbers symbols and back again by tapping the field to the left of the space bar Tap Enter The Email Alert screen displays again ...

Страница 28: ...nter The incoming email account can be the same as or different from the outgoing email ac count If a different email account is used then the outgoing email account serves as a relay for the alert messages Only one incoming email account will be accepted by the G Series system 7 Tap OK to save the settings then tap to return to the previous screen For Gmail SMTP Server smtp gmail com Enter this S...

Страница 29: ... to all 4 cameras to record 2 Set the recording start time Tap the hour and number boxes separately and use the UP and DOWN arrows to scroll through the times 3 Tap the AM PM block to toggle between them These recording sessions must begin and end within a single 24 hour period They cannot cross into the next day From the pop up menus tap This screen should display the following icons as they appe...

Страница 30: ...us one 5 minute recording CLEAR A SCHEDULED RECORDING 1 Access the Schedule Record screen 2 Tap recording you want to clear 1 5 The screen displays the settings for that schedule 3 Tap CLEAR The screen resets to the default values for that recording slot Network Setup Screen The Network Setup screen allows you to select your internet connection type and security code You can also display system de...

Страница 31: ... at the system reboot prompt The Network Setup screen displays DCHP is the most common connection Your router will automatically assign an IP address to your G Series system Static IP is for those that have the ability to specify an IP address for the G Series system Selection Fields Static IP IP Address Subnet Mask Default Gateway DNS Server DHCP None ...

Страница 32: ...will remember You will need the code to access your video from a remote device such as a smart phone or PC 3 Tap on the Change Code field A keyboard screen displays 4 Enter your security code You can switch the keyboard from alphabetical characters to numbers symbols and back by tapping the field to the left of the space bar Tap Return The Security Code screen displays again You must enter a secur...

Страница 33: ... is a unique code specific to your monitor and is required along with the security code to gain remote access to your cameras over the internet The information in the DHCP setting is as signed to your monitor from your home router Alarm Setup Screen From the Alarm Setup screen you can Set the length of time the alarm sounds Select a melody for the alarm ...

Страница 34: ...on you want the siren to last 2 10 or 30 seconds or tap None to turn sirens off 3 Tap to return to the previous screen MELODY This selection allows you to select a melody for the siren 1 Tap Melody The Change Siren Melody screen displays 2 A check mark appears on the melody you tap and the Monitor briefly plays a sample of the selected melody 3 Tap to return to the previous screen ...

Страница 35: ...it is idle for 2 minutes Press the POWER button once to reactivate the monitor Default Disable If a motion detection event or scheduled recording begins the LCD turns back on 1 Tap Power Saving Enable to activate Power Saving mode Default Disable 2 A check mark appears on your selection 3 Tap to return to the previous screen ...

Страница 36: ...as been enabled and your Live screen is locked just tap the POWER button once to unlock the screen and return to normal touch screen operation At any time from the Live screen you can manually lock the system by tapping the POWER button whether or not the auto lock feature has been enabled 1 Tap Screen Auto Lock The Activate Touch Screen Operation screen displays 2 Tap your selection a check mark ...

Страница 37: ...ndent alarm clock It does not affect the operation of live video or recording video 1 Tap to display the Clock Alarm screen 2 Tap on an alarm button total of 5 to select from 3 Tap on the hour block The UP DOWN arrows move to the hour block Set the hour 4 Tap on the minute block The UP DOWN arrows move to the minute block Set the minute 5 Tap on AM PM to toggle between the two 6 Tap SAVE when you ...

Страница 38: ...et the time zone your monitor is in This is especially useful if you are us ing the app in another time zone and you want to remotely access your recorded files You can set a filter for how far back you want to view files the past hour past 6 hours etc see page 49 Your system will know that your request refers to the time zone the monitor is in Default GMT 10 00 Australia This screen contains fiel...

Страница 39: ... screen The Storage Management screen displays 2 You can tap either Format or Overwite from this screen FORMAT Formatting the microSD card erases all data If there are files you need to keep transfer those files from the microSD card to your computer 1 Tap the Format portion of the Storage Management screen A confirmation screen displays asking if you wish to continue 2 Tap OK Reformat your microS...

Страница 40: ...ould display Refer to Upgrading Your System Software System Upgrade on page 56 LANGUAGE CHANGING THE LANGUAGE English is the default language When you change languages all system settings default to the original factory settings You will have to reenter any specialized settings From the pop up menus tap the following icons as they appear on the screens This screen should display 2 A checkmark disp...

Страница 41: ...reboot in about 5 seconds If you do not want to reset the language tap CANCEL and return to the previous screen Changing the language will reboot the system and ask you to recalibrate the touch screen Follow the instructions on the screen Quick Tips The Quick Tips screen provides more detail into 10 common areas Tap on a subject to display the information ...

Страница 42: ...te viewers is determined by the amount of available upload band width on your home network Each remote viewer requires 350kbps of bandwidth on the network Overview The G Series cradle charges your monitor as well as provides an internet connection When you are connected to the internet live video will display on the monitor For this procedure the AC adaptor must be connected to the cradle and not ...

Страница 43: ...m is connected to the internet 6 When you connect remotely to the monitor the Internet Connection Status Indicator shows that remote view in progress When the monitor is placed in the cradle and charge only is selected you can still access your live video from a PC or smart phone or tablet as long as those devices are also connected to the same network as the monitor For example your smart phone o...

Страница 44: ...yed Click on the link Start Viewing On the next screen please enter your DID and security code The DID code can be found on the back of your handheld monitor behind the kickstand It is the 20 characters underneath the barcode You also can find the DID code on the Network Information screen Choose the camera and then press START to view live video ...

Страница 45: ...ile and click on it to install Record Video The Portal lets you record live video and save it to your PC 1 Click Record to start recording 2 Click Stop Record to stop recording Take a Snapshot The Portal lets you take snapshots of video and save to your PC Click Snapshot You specify the Data Storage Location for all video and snapshots Select Data Storage Location and then browse to the location w...

Страница 46: ...m in the System Name field Enter the same DID code from your Uniden Guardian monitor in the DID field Enter the security code Tap the Email Alert box to have the system send you e mails when motion triggers the camera tap SAVE A message displays verifying that you want to save the system you just entered Tap OK 3 A message displays recommending that you change the security code from the default Ta...

Страница 47: ...he image displayed on the main screen is the last camera image captured automatically from your previously established session Tap to add an additional G Series system Tap to enter System Setup page Tap to refresh the system Tap to enter the APP Information page There is also an option to enable disable the PIN lock Main Screen ...

Страница 48: ...r this code when you activate the app About Tap this icon to display the APP version number and the API version number SYSTEM SETUP ICONS TO ENABLE EVENT NOTIFICATION You can set your smartphone or device to notify you when there is a new recorded file 1 Tap Settings on your device 2 Tap Notifications A list of apps displays 3 Tap Uniden Guardian 2 4 The Uniden Guardian 2 setting screen displays T...

Страница 49: ...an set a filter to display all files recorded within the past hour past 6 hours etc Tap SEARCH magnifying glass icon to dis play the filter selections Select a filter and then tap YES The Event List displays again filtered accordingly When you set a filter be sure the Time Zone feature is set accurate ly in the monitor to reflect the current time zone for the system not the time zone where you are...

Страница 50: ...upper right hand corner of the screen The app records for 2 minutes and stores the recorded file on the monitor s microSD card Return icon Tap to return to the Main screen If you have multiple systems scroll down and tap on the system image you want to view To View Video 1 Select a system 2 Select a camera from the drop down menu 3 View video You can turn your device sideways and go to a horizonta...

Страница 51: ...er a name for your system in the System Name field Enter the same DID code from your Uniden Guardian monitor in the DID field If your phone is connected via WiFi to the same network as the Uniden Guardian system tap SEARCH The app will look on your network and find your Uniden Guardian system s DID code Enter the security code Tap SAVE 3 The Uniden Guardian 2 system Main screen displays A globe di...

Страница 52: ...nge settings and enable email alerts and event notifications Delete System Tap this icon to delete the Uniden Guardian system View Recorded Files Tap this icon to display a list of recorded file see page 51 INFORMATION OPTIONS These options display when you tap the icon Set up PIN Lock Activating this function prevents others from activating the app and viewing your camera images Enter a unique 4 ...

Страница 53: ...d files Event List displays You also have the following options available to help you find the files you want Change cameras In the upper right hand corner of the screen is a camera selection field Tap on it and the bottom of the screen displays your camera options Select the camera whose Event List you want to view Set display filter You can set a filter to display all files recorded within the p...

Страница 54: ...een TO DELETE FILES 1 Tap the DELETE ALL or DELETE ONE button on the bottom of the list of files 2 If you tap DELETE ALL a confirmation message display Tap YES or NO 3 If you tap DELETE ONE the Event List displays again with red and white circles Tap the circle on the file you want to delete and then tap DELETE ...

Страница 55: ...of the screen The app records for 2 minutes and stores the recorded file on the monitor s microSD card Return icon Tap to return to the Main screen To View Video 1 Select a system 2 Select a camera from the drop down menu 3 View video You can turn your device sideways and go to a horizontal view 4 Tap Return to stop the video and enter the system page Two icons display on the screen Snapshot and R...

Страница 56: ...Go to www uniden com au 4 Copy the current firmware to the SD card 5 Remove the SD card and reinsert it into the Monitor 6 Upgrade the firmware see System Upgrade on page 40 TAKING CARE OF YOUR HARDWARE Monitor As you use your monitor keep the screen clean by wiping it with a microfibre cloth to remove fingerprints dust etc Cameras When dust and grime builds up on the camera lens and glass it affe...

Страница 57: ...s play with a Quicktime player Down load this free player from www apple com Video will play in players such as Windows Media Player if an H 264 CODEC plug in is installed I schedule a recording save the sched ule and the recording does not happen at the scheduled time Ensure that the system time is set to the current time Make sure that the SD card is inserted into the Monitor and there is still ...

Страница 58: ...ture has been turned on the monitor s LCD screen will power off Tap the power button to turn the LCD back on I have my regular LIVE screen but there are no icons tapping the Power button on top of the Monitor Screen lock may be on and tapping the Power button will unlock the screen The monitor picture has frozen Using a blunt object like an unbent paper clip to press RESET and reset the monitor Th...

Страница 59: ...tion Output Image resolution 480 X 272 HD 320 x 240 QVGA Image processing H 264 Exposure Auto White balance Auto System Specifications Camera Monitor Weight Outdoor 13 oz 370g Indoor 4 1 oz 118g 4 3 Model 7 oz 198g 7 Model 1lb 1 oz 468g Dimension Outdoor 5 94 x 2 9 x 1 9 151 x 74 x 49 mm Indoor 3 5 x 2 9 x 0 8 90 x 49 x 20 mm 5 x 3 x 0 9 132 x 79 x 24 mm 7 2 x 5 x 1 1 184 x 128 x 28 mm Operating t...

Страница 60: ...d an electronics recy cling facility in your area Recycling and Disposal Information CAUTION Rechargeable Batteries Must Be Recycled or Disposed of Properly Lithium Polymer Battery Warning This equipment contains a rechargeable lithium polymer battery A Do not charge the battery in temperatures below 23 F 0 C or higher than 113 F 45 C B Do not open or mutilate the battery C The rechargeable batter...

Страница 61: ...Mount the Camera 8 Outdoor Camera 10 D Date Time 29 37 Display 17 E Email Alert 26 I Icons 14 M Menus 21 Motion Detect 25 N Network 30 P Pairing see camera 23 Playback 18 R Record Schedule 29 Remote Access 42 S Schedule 29 SD Card Display Indication 14 Formatting 39 Recording Live Video 18 Security Code 32 Setup 35 Specifications 59 System Upgrade 40 T Timer 37 ...

Страница 62: ...aser is only valid in the original country of purchase for a Product first purchased either in Australia or New Zealand and will expire one 1 year from the date of the original retail sale If a warranty claim is made this warranty will not apply if the Product is found by Uniden to be A Damaged or not maintained in a reasonable manner or as recommended in the relevant Uniden Owner s Manual B Modif...

Страница 63: ...lure This warranty is in addition to and sits alongside your rights under either the COMPETITION AND CONSUMER ACT 2010 Australia or the CONSUMER GUARANTEES ACT New Zealand as the case may be none of which can be excluded Procedure for Obtaining Warranty Service Depending on the country in which the Product was first purchased if you believe that your Product does not conform with this warranty you...

Страница 64: ...64 2012 Uniden Australia Pty Limited Uniden New Zealand Limited Printed in PRC ...

Отзывы: