background image

Operation

PG-I Series | Version 1.03

19

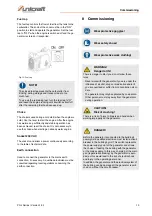
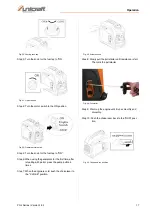
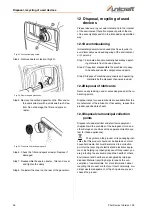
Fig. 32: Venting tank cap 

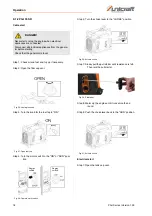
Step 2: Turn the knob for the fuel tap to "ON". 

Fig. 33: Open fuel tap

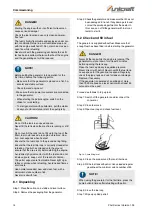
Step 3: Turn the choke lever to the "CHOKE" position

Fig. 34: Actuate choke

Step 4: Turn motor switch to "START" and "RUN" posi-

tion. 

Fig. 35: Operate motor switch

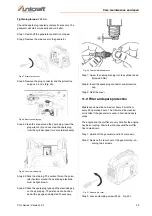
Step 5: Run the engine warm without load until it runs 

smoothly and smoothly.

Step 6: Push the choke lever back to the "RUN" position.

Fig. 36: Actuate choke 

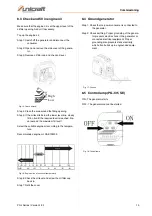
9.2 Switching off the generator

Step 1: Switch off or interrupt all consumers supplied by 

the generator. 

Step 2: Disconnect the mains plug of the electrical 

consumers from the generator. 

Step 3: Run the motor for 2-3 minutes without load, then 

set the energy saving switch and the motor 
switch to "O" or "Off".

Step 4: Turn the fuel tap or tank ventilation to "O" or 

"Off". 

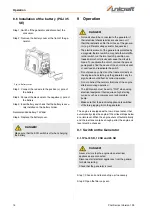
9.3 Workflow

Step 1: Let the engine warm up for a few minutes. 

Step 2: Add up the power (watts or amperes) of the 

electrical consumers. The sum must not ex-
ceed the capacity of the generator or fuse.

Step 3: Plug in the electrical consumer(s). The consu-

mers must be switched off.

Step 4: Switch on the electrical consumer(s). 

Engine
switch

Engine
 switch

DANGER!

Even after the engine has been switched off, it still 
emits heat, so adequate ventilation should be provi-
ded even after the generator has been switched off.

DANGER!

If the connected loads overheat, switch them off and 
disconnect them from the generator.

Содержание PG-I 12 SR

Страница 1: ...Instruction Manual Generator PG I 8 SR PG I 12 SR PG I 20 SR PG I 35 SE PG I 12 SR PG I 35 SE...

Страница 2: ...Technical Data 6 4 1 Type plate 7 5 Transport packaging storage 7 6 Device description 9 6 1 PG I 8 SR 12 SR and 20 SR 9 6 2 Device description PG I 35 SE 10 6 3 Description of the control panels 10 7...

Страница 3: ...using the application which then could be shared and be valuable to develop our products even further 1 3 Limitation of liability All information and notes in these operating instructions were summar...

Страница 4: ...n he must train the personnel at regular intervals and inform them about the dan gers The operator must provide the personnel with the necessary protective equipment and instruct them to wear the requ...

Страница 5: ...ystems Install a CO alarm device If the generator is to be used in rain or snow adequate protection and stability must be provided Never touch the generator with wet hands Do not connect the generator...

Страница 6: ...ty markings are not visible and understandable at first glance the machine must be taken out of opera tion until new safety markings have been applied 3 Intended use The generator is exclusively for u...

Страница 7: ...A Model PG I 20 SR PG I 35 SE Length 525 mm 614 mm Width depth 282 mm 341 mm Height 457 mm 506 mm Net weight 18 5 kg 37 5 kg Nominal voltage 230 V 230 V Max voltage de viation 3 3 Limited output po w...

Страница 8: ...oard packaging components should be sent to the waste paper collection The films are made of polyethylene PE the padded parts of polystyrene PS These materials are to be han ded in at a reusable mater...

Страница 9: ...W40 engine oil into the spark plug hole Step 6 Screw the spark plug back in Step 7 Let the engine turn several times with the pull starter with the ignition switched off Fig 4 Pullstarter Step 8 Clean...

Страница 10: ...escription of PG I 35 SE 1 Fuel tank 2 Fuel filler cap 3 Fuel filter 4 Carrying handle 5 Exhaust pipe 6 Spark plug 7 Choke 8 Rope starter 9 Fuel tap 10 Brake 11 Wheel 12 Oil filter cover 13 Air filter...

Страница 11: ...l panel PG I 35 SE Fig 10 Control panel PG I 35 SE 1 Energy saving switch 2 Indicator lights for oil overload and AC 3 consumer connection 230 V 4 Ground connection 5 Consumer connection 230 V 6 Elect...

Страница 12: ...ine can only be restarted af ter the oil has been topped up and the correct level has been reached ON OFF switch for the motor To start the generator the switch must be set to I If the switch is set t...

Страница 13: ...ap to O and leave the engine running until it switches itself off after the remaining fuel has been used up Wear protective goggles Wear safety shoes Wear protective work clothing WARNING Danger to li...

Страница 14: ...the generator is placed on a flat ho rizontal and stable surface Check fuel and engine oil Make sure that no power consumers are connected to the generator When starting the petrol engine switch on th...

Страница 15: ...vel is reached Ne ver exceed the maximum fill level Select the suitable engine oil according to the tempera ture Recommended engine oil SAE 10W30 Fig 16 Engine oil as a function of temperature Step 6...

Страница 16: ...s should be connected to the generator if their electrical characteristics are unknown or if their characteristics differ from those of the genera tor e g different voltages and or frequencies The ele...

Страница 17: ...sing the generators for the first time after refuelling with petrol press the pump button 6 times Step 7 When the engine is cold push the choke lever to the CHOKE position Fig 23 Actuate choke Step 8...

Страница 18: ...ver to the CHOKE position Fig 29 Actuate choke Step 7 Slowly pull the pull starter until resistance is felt Then jerk the pull starter Fig 30 Pullstarter Step 8 Warm up the engine until it runs smooth...

Страница 19: ...from the generator Step 3 Run the motor for 2 3 minutes without load then set the energy saving switch and the motor switch to O or Off Step 4 Turn the fuel tap or tank ventilation to O or Off 9 3 Wo...

Страница 20: ...charger s pole termi nals to the battery s poles so that they cannot become loose due to vibration or other stres ses Step 4 Charge the battery according to the instructions in the battery user manual...

Страница 21: ...saw 1500 4500 Compressor 1 5HP 1000 3000 Hand drill 1000 2000 Paint sprayer 600 1200 Table saw 2000 6000 ATTENTION Before operating electrical equipment through the generator the voltage and frequenc...

Страница 22: ...tep 2 Switch on the generator and let the engine warm up for a few minutes Step 3 Stop the engine Step 4 Close the fuel tap Fig 37 Close fuel tap CAUTION Maintenance and repair works must only be per...

Страница 23: ...o the oil Step 13 Close oil filler plug Step 14 Refit the cover 11 5Clean oil filter After each oil change check the oil filter and clean or re place if necessary Clean or replace the oil filter after...

Страница 24: ...months or every 100 operating hours Step 1 Switch off the generator and let it cool down Step 2 Remove the fuel filler cap and the filter 1 Fig 45 Cleaning the fuel filter Step 3 Clean the filter with...

Страница 25: ...electrode must be light brown Step 6 Check the spark plug type and the electrode gap on the spark plug The distance can be chec ked with a gauge and adjusted if necessary Fig 50 Check electrode dista...

Страница 26: ...into easy to handle and usable components and parts Step 3 Dispose of machine components and operating materials by the disposal channels provided 12 2Disposal of lubricants Remove any leaking used o...

Страница 27: ...erator PG I 8 SR Item number 6706108 Drawing number 1 Position number 3 NOTE If you cannot solve the problems with your generator yourself please contact your nearest UNICRAFT dealer Please write down...

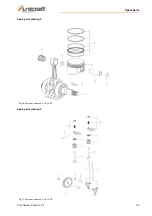
Страница 28: ...service the following drawing shall help to identify the necessary spare parts If necessary send a copy of the parts drawing with the marked components to your authorised dealer 14 2 1Spare parts dra...

Страница 29: ...Spare parts PG I Series Version 1 03 29 Spare parts drawing 2 Fig 56 Spare parts drawing 2 PG I 8 SR Spare parts drawing 3 Fig 57 Spare parts drawing 3 PG I 8 SR...

Страница 30: ...30 PG I Series Version 1 03 Spare parts Spare parts drawing 4 Fig 58 Spare parts drawing 4 PG I 8 SR Spare parts drawing 5 Fig 59 Spare parts drawing 5 PG I 8 SR...

Страница 31: ...Spare parts PG I Series Version 1 03 31 Spare parts drawing 6 Fig 60 Spare parts drawing 6 PG I 8 SR Spare parts drawing 7 Fig 61 Spare parts drawing 7 PG I 8 SR...

Страница 32: ...32 PG I Series Version 1 03 Spare parts Spare parts drawing 8 Fig 62 Spare parts drawing 8 PG I 8 SR Spare parts drawing 9 Fig 63 Spare parts drawing 9 PG I 8 SR...

Страница 33: ...Spare parts PG I Series Version 1 03 33 Spare parts drawing 10 Fig 64 Spare parts drawing 10 PG I 8 SR Spare parts drawing 11 Fig 65 Spare parts drawing 11 PG I 8 SR...

Страница 34: ...34 PG I Series Version 1 03 Spare parts Spare parts drawing 12 Fig 66 Spare parts drawing 12 PG I 8 SR Spare parts drawing 13 Fig 67 Spare parts drawing 13 PG I 8 SR...

Страница 35: ...Spare parts PG I Series Version 1 03 35 Spare parts drawing 14 Fig 68 Spare parts drawin 14 PG I 8 SR...

Страница 36: ...36 PG I Series Version 1 03 Spare parts 14 2 2 Spare parts drawings PG I 12 SR Spare parts drawing 1 Fig 69 Spare parts drawing 1 PG I 12 SR...

Страница 37: ...Spare parts PG I Series Version 1 03 37 Spare parts drawing 2 Fig 70 Spare parts drawing 2 PG I 12 SR Spare parts drawing 3 Fig 71 Spare parts drawing 3 PG I 12 SR...

Страница 38: ...38 PG I Series Version 1 03 Spare parts Spare parts drawing 4 Fig 72 Spare parts drawing 4 PG I 12 SR Spare parts drawing 5 Fig 73 Spare parts drawing 5 PG I 12 SR...

Страница 39: ...Spare parts PG I Series Version 1 03 39 Spare parts drawing 6 Fig 74 Spare parts drawing 6 PG I 12 SR Spare parts drawing 7 Fig 75 Spare parts drawing 7 PG I 12 SR...

Страница 40: ...40 PG I Series Version 1 03 Spare parts Spare parts drawing 8 Fig 76 Spare parts drawing 8 PG I 12 SR Spare parts drawing 9 Fig 77 Spare parts drawing 9 PG I 12 SR...

Страница 41: ...Spare parts PG I Series Version 1 03 41 Spare parts drawing 10 Fig 78 Spare parts drawing 10 PG I 12 SR Spare parts drawing 11 Fig 79 Spare parts drawing 11 PG I 12 SR...

Страница 42: ...42 PG I Series Version 1 03 Spare parts Spare parts drawing 12 Fig 80 Spare parts drawing 12 PG I 12 SR Spare parts drawing 13 Fig 81 Spare parts drawing 13 PG I 12 SR...

Страница 43: ...Spare parts PG I Series Version 1 03 43 Spare parts drawing 14 Fig 82 Spare parts drawing 14 PG I 12 SR...

Страница 44: ...44 PG I Series Version 1 03 Spare parts 14 2 3Spare parts drawings PG I 20 SR Spare parts drawing 1 Fig 83 Spare parts drawing 1 PG I 20 SR...

Страница 45: ...Spare parts PG I Series Version 1 03 45 Spare parts drawing 2 Fig 84 Spare parts drawing 2 PG I 20 SR Spare parts drawing 3 Fig 85 Spare parts drawing 3 PG I 20 SR...

Страница 46: ...46 PG I Series Version 1 03 Spare parts Spare parts drawing 4 Fig 86 Spare parts drawing 4 PG I 20 SR Spare parts drawing 5 Fig 87 Spare parts drawing 5 PG I 20 SR...

Страница 47: ...Spare parts PG I Series Version 1 03 47 Spare parts drawing 6 Fig 88 Spare parts drawing 6 PG I 20 SR Spare parts drawing 7 Fig 89 Spare parts drawing 7 PG I 20 SR...

Страница 48: ...48 PG I Series Version 1 03 Spare parts Spare parts drawing 8 Fig 90 Spare parts drawing 8 PG I 20 SR Spare parts drawing 9 Fig 91 Spare parts drawing 9 PG I 20 SR...

Страница 49: ...Spare parts PG I Series Version 1 03 49 Spare parts drawing 10 Fig 92 Spare parts drawing 10 PG I 20 SR Spare parts drawing 11 Fig 93 Spare parts drawing 11 PG I 20 SR...

Страница 50: ...50 PG I Series Version 1 03 Spare parts Spare parts drawing 12 Fig 94 Spare parts drawing 12 PG I 20 SR Spare parts drawing 13 Fig 95 Spare parts drawing 13 PG I 20 SR...

Страница 51: ...Spare parts PG I Series Version 1 03 51 Spare parts drawing 14 Fig 96 Spare parts drawing 14 PG I 20 SR...

Страница 52: ...52 PG I Series Version 1 03 Spare parts 14 2 4Spare parts drawings PG I 35 SE Spare parts drawing 1 Fig 97 Spare parts drawing 1 PG I 35 SE...

Страница 53: ...Spare parts PG I Series Version 1 03 53 Spare parts drawing 2 Fig 98 Spare parts drawing 2 PG I 35 SE...

Страница 54: ...54 PG I Series Version 1 03 Spare parts Spare parts drawing 3 Fig 99 Spare parts drawing 3 PG I 35 SE Spare parts drawing 4 Fig 100 Spare parts drawing 4 PG I 35 SE...

Страница 55: ...Spare parts PG I Series Version 1 03 55 Spare parts drawing 5 Fig 101 Spare parts drawing 5 PG I 35 SE Spare parts drawing 6 Fig 102 Spare parts drawing 6 PG I 35 SE...

Страница 56: ...56 PG I Series Version 1 03 Spare parts Spare parts drawing 7 Fig 103 Spare parts drawing 7 PG I 35 SE Spare parts drawing 8 Fig 104 Spare parts drawing 8 PG I 35 SE...

Страница 57: ...Spare parts PG I Series Version 1 03 57 Spare parts drawing 9 Fig 105 Spare parts drawing 9 PG I 35 SE Spare parts drawing 10 Fig 106 Spare parts drawing 10 PG I 35 SE...

Страница 58: ...58 PG I Series Version 1 03 Spare parts Spare parts drawing 11 Fig 107 Spare parts drawing 11 PG I 35 SE Spare parts drawing 12 Fig 108 Spare parts drawing 12 PG I 35 SE...

Страница 59: ...Spare parts PG I Series Version 1 03 59 Spare parts drawing 13 Fig 109 Spare parts drawing 13 PG I 35 SE Spare parts drawing 14 Fig 110 Spare parts drawing 14 PG I 35 SE...

Страница 60: ...60 PG I Series Version 1 03 Spare parts Spare parts drawing 15 Fig 111 Spare parts drawing 15 PG I 35 SE Spare parts drawing 16 Fig 112 Spare parts drawing 16 PG I 35 SE...

Страница 61: ...Spare parts PG I Series Version 1 03 61 Spare parts drawing 17 Fig 113 Spare parts drawing 17 PG I 35 SE...

Страница 62: ...62 PG I Series Version 1 03 Electrical circuit diagrams 15 Electrical circuit diagrams 15 1Electrical circuit diagram PG I 8 SR and 12 SR Fig 114 Electrical circuit diagram PG I 8 SR und 12 SR...

Страница 63: ...Electrical circuit diagrams PG I Series Version 1 03 63 15 2Electrical circuit diagram PG I 20 SR Fig 115 Electrical circuit diagram PG I 20 SR...

Страница 64: ...64 PG I Series Version 1 03 Electrical circuit diagrams 15 3Electrical circuit diagram PG I 35 SE Fig 116 Electrical circuit diagram PG I 35 SE...

Страница 65: ...after referred to as the Directives including the amendments thereto in force at the date of this declaration Relevant EU Directives 2014 30 EU EMC Directive 2012 19 EU WEEE Directive 2011 65 EU RoHS...

Страница 66: ...www unicraft de...
Отзывы: