background image

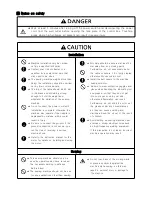
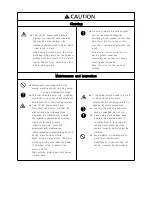
Installation


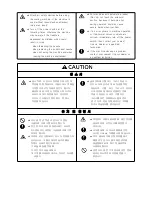
                    ★  Machine  installa tion  only  be  carried

                          out  by  a  qualified  technician  .

                    ★  Conta ct  your  Unicorn  bealer  or  a 

                          qualified  for  any  electrical  work  tha t

                          may  need  to  be  done,

                    ★  The  sewing  machine  weighs  more  than

                          34kg.  The  installa tion  should  be  carried

                          out  by  tow  or  more  peopl e.

                    ★  The  top  of  the  table  should  be  40  mm

                          in  thickness  a nd  should  be  strong

                          enough  to  hold  the  weight  and

                          withstand  the  vibration  of  the  sewing

                          machine.

                    ★  Do  not  connect  the  power  cord  until

                          insta llation  is  complete.  otherwise  the

                          machine  may  opera te  if  the  treadle  is

                          depressed  by  mistake,  which  could 

                          resul t  in  injury.

                    ★  Be  sure  to  connect  the  ground.  lf  the

                          ground  connection  is  not  secure,  you

                          run  the  risk  of  receiving  a  serious 

                          electric  shock.

                    ★  Refer  to  the  instruction  manual  for  the

                          motor  f or  details  on  insta lling  and  using

                          the  motor.                   


  ★  All  cords  should  be  secured  at  least  25

        mm  away  from  any  moving  parts.

                            Furthermore.  do  not  excessively  bend

                            the  cable  or  secure  it  too  firmly  staples,

                            otherwise  shocks  could  occur


  ★  install  the  bel t  covers  to  the  machine


        head  and  motor.


  ★  Be  sure  to  wear  protective  goggles  and


        gloves  when  handling  the  lubricating  oil

                            a nd  grease,  so  that  they  do  not  get

                            into  your  eyes  or  onto  your  skin, 

                            otherwise  inflammation  can  result.

                            Furthermore,  do  not  drink  the  oil  or  eat

                            the  grease  under  any  circumstances,

                            a s  they  can  cause  vomiting  and

                            diarrhoea.  Keep  the  oil   out  of  the  reach


        of   children.


  ★  Avoid  setting  up  sewing  ma chine  near


        sources  o  strong  electrical  noise  such

                            a s  high-frequency  wel ding  equipment.

                            If  this  precaution  is  not  taken,  incorrect 

                            machine  operation  may  result.

Sewing

★  This  sewing  machine  should  only  be

      used  by  operators  who  have  received

                        The  necessary  training  in  saf e  use

        before  hand.

★  The  sewing  machine  should  not  be  use

        f or  a ny  applications  other  than  sewing.


  ★  Do  not  touch  a ny  of  the  moving  parts 


        or  press  any  objects  against  the

                            machine  while  sewing.  as  this  may           

                            result  in  perso nal  injury  or  dam age  to         

                              the  m achine.

                  ★  Wait  at  least  5  minutes  after  turning  off  the  power  switch  and  disconnecting  the  power   

                        cord  from  the  wall  outlet  before  opening  the  face  plate  of  the  control  box.  Touching     

                        areas  where  high  voltages  art  present  can  result  in  severe  injury.

ꍾ 

Notes  on  safety 


Содержание LS2-H530

Страница 1: ...PART BOOK LS2 H530 LS2 H5300 SINGLE NEEDLE SIDE CUTTER LOCK STITCH SEWING MACHINE WITH THREAD TRIMMER 1 OPERATION MANUAL...

Страница 2: ......

Страница 3: ...symbol at left means beware of injury This symbol indicates something that you must not do This symbol indicates something that you must do The picture inside the circle indicates the nature of the t...

Страница 4: ...5 off A S 34 2 40 25 OFF A S A S...

Страница 5: ...all the belt covers to the machine head and motor Be sure to wear protective goggles and gloves when handling the lubricating oil and grease so that they do not get into your eyes or onto your skin ot...

Страница 6: ...placing the bobbin and needle when not using the machine and when leaving the machine unattended For machines with automatic presser lifter do not touch the solenoid section because if becomes hot dur...

Страница 7: ...rician to carry out any maintenance and inspection of the electrical system Turn off the power switch and disconnect the power cord from the wall outlet at the following times otherwise the machine ma...

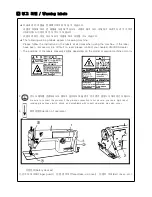
Страница 8: ...act your nearest UNICORN dealer The positions of the labels may vary slightly depending on the model of sewing machine or motor 1 2 Be sure to connect the ground If the ground connection is not secure...

Страница 9: ...ing machine is first turned on verify the rotational direction of the pulley with the power on The pulley should rotate counterclockwise when viewed from the pulley Power must be turned off when the m...

Страница 10: ...6 8 Adjusting the stitch length 6 MECHANICAL DESCRIPTION 7 1 Thread trimmer 7 2 Thread wiper 7 ADJUSTMENT 8 15 1 Adjusting the needle bar height 8 2 Adjusting the rotary hook position 8 3 Adjusting th...

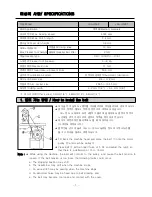
Страница 11: ...4 8mm 3 16 6 4mm 1 4 1 How to install the belt V V 13mm 16mm Tilt back the machine head and place the belt onto the motor pulley and machine pulley Press belt with a finger force of 5 N and adjust th...

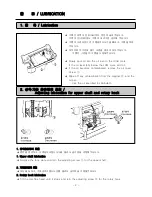
Страница 12: ...he oil cover Screw Wipe off any contamination from the magnet and the oil pan Use the oil specified by Spindle15 2 Adjusting lubrication for upper shaft and rotary hook 1 1 Upper shaft lubrication Rem...

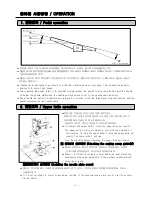
Страница 13: ...needle raised above the needle plate 2 Upper knife operation To operate the upper knife lower the upper knife set lever The upper knife will now operate in sync with the operation of the machine To s...

Страница 14: ...RATION 3 Attaching the needle DB 1 Insert the needle completely making sure that the lengthwise groove of the needle is on the left and secure it using the set screw Use a DBx1 needle 4 Threading the...

Страница 15: ...bin case tension spring 3 Pull the thread from the bobbin case tension spring 6 Winding the bobbin thread 1 2 3 4 1 Fit the bobbin in the bobbin winder shaft 2 Depress the joint as far as it will go 3...

Страница 16: ...tension at this time is 25 30g To adjust the operation range of the thread take up spring loosen the set screw and turn the thread tension bracket assembly To adjust the tension of the thread take up...

Страница 17: ...he thread trimming solenoid activates pressing the thread trimming cam lever stud The roller shaft of the thread trimming cam lever assembly secured by the thread trimming cam lever stud id pushed abo...

Страница 18: ...rejector needle bar bush Then firmly tighten the screw A 0 0 5mm 0 0 05mm Align the bottom reference line of the needle bar with surface A of the needle bar oil rejector needle bar bush by turning the...

Страница 19: ...een the rotary hook and the rotary hook holder is approx 0 7 0 9mm Set the feed regulating dial to maximum and turn the machine pulley Check that the needle enters the center of the feed dog hole at t...

Страница 20: ...epressed fit the indentation of the thread trimming clutch over the roller shaft 3 When the space between the side faces of the thread trimming clutch and the roller shaft is 0 6 0 8mm tighten the scr...

Страница 21: ...the indentation of the thread trimming clutch 3 With the thread trimming solenoid depressed turn the machine pulley Adjust the movable knife and the fixed knife so that they overlap when the rotation...

Страница 22: ...ve the feed bracket up or down 1 2 2 90 1 When the feed dog is fully raised its angle is properly adjusted if the circle on the feed bracket shaft aligns with the index on the feed rock shaft arm 2 To...

Страница 23: ...sition there should be a 9 5 11 5 mm gap between the upper surface of the needle plate and the needle tip with thin or medium materials or a 10 12 mm gap with thick materials If adjustment of needle s...

Страница 24: ...Raise the presser foot using the presser bar lifter 2 Remove the screw and the needle plate 3 Remove the screws and the feed dog 4 Remove the screws and the auxiliary needle plate 5 Turn the machine p...

Страница 25: ...per feed scale to 0 2 The back edge pf the upper knife should be aligned with the needle center The upper knife can be adjusted by loosening the screw and moving the knife within a range of 2 mm forwa...

Страница 26: ...16 4 4 8 8 8 8 4 4 4 6 6 6 2...

Страница 27: ...hook timing 8 Thread wiper too high Thread wiper position Adjust thread wiper position with screw Thread breakage Improper threading Threading Rethread 4 Bent needle Blunt needle tip jammed eye Needl...

Страница 28: ...18 4 4 1 4 4 8 8 8 6 6...

Страница 29: ...resser foot contact Presser bar pressure Tighten presser foot adjustment screw Presser bar height Adjust presser bar height Improper needle to rotary hook timing Needle bar rise Adjust needle to rotar...

Страница 30: ...20 6 6 6 6 puff 8 11 14 4 13 11 14 11...

Страница 31: ...ok stop gap too small Gap Adjust needle to rotary hook timing 8 Improper thread cutting a Needle bobbin threads not cut b Needle thread not cut c Bobbin thread not cut Movable knife fixed knife do not...

Страница 32: ...22 6 1 13 6 11 11 11 11...

Страница 33: ...read cutter signal not transmitted Check circuits refe to motor adjustment manual Thread wiper does not function Needle thread remainder too long Adjust pretension 6 Timing too early wipes thread befo...

Страница 34: ...24...

Отзывы: