


ULTRASTAT 11 EQUIPPED FRYER
1. Ensure the Drain Valve Handle is in the closed
(UP)
position, then add water to the fryer vat until it reaches a point
ONE
(I) inch (25 mm)
BELOW
the middle line of the
“E
”
in the word
LEVEL
of the
HIGH
level mark on the rear wall of
the fryer.
2. Add the amount of
BOIL-OUT COMPOUND
to the fryer vat as prescribed in the Cleaning Manual provided by the
Chemical Supplier.
3. Turn the Toggle ON/OFF switch and the Manual Gas Valve for the fryer to the
ON
position; then depress the ON/OFF
key on the computer.
4. Depress the
“P”
key to enter the program mode and adjust the time of the
LEFT HAND
timer for 30 minutes.
5. Depress the
“P”
key
TWO (2)
times; then adjust the temperature for
190ºF (88ºC).
6. Depress and
HOLD
the
“P”
key for 3 seconds to
EXIT
the program mode.
7. Depress the
EXIT MELT
key on the computer to place the fryer in the
FULL ON
mode and when the
WATER
reaches
190ºF (88ºC), depress the 1
key to start the LEFT HAND timer; then frequently scrub the sides, front and back of the
vat with a long handle scrub brush.
8. When the timer sounds, turn the Toggle ON/OFF switch and Manual Gas Valve for the fryer to the
OFF
position and
CAREFULLY
dispose of the boil-out solution in the fryer in a floor drain.
9. Use a scrubbing pad to remove carbon build-up from the top of the heat exchanger. To remove carbon build-up on the
sides and bottom of the heat exchanger, slide one end of a stropping pad under each heat exchanger, grasp that end with a
pair of tongs and rock the pad up and down along the length of each heat exchanger until all encrusted material has been
removed. Replace the wire rack in the fryer
10. Rinse the fryer with hot water until the water coming out of the drain valve is clear.
11. Mix a solution of
ONE PART
vinegar to
25 PARTS
of water. Place this mixture into a one-gallon garden pressure
sprayer and
THOROUGHLY
spray this solution onto the
SIDES
,
BURNER TUBES
and
BOTTOM
of the
fryer to neutralize the boil-out compound.
NOTE: BOIL-OUT COMPOUND WILL CAUSE SHORTENING TO BREAKDOWN RAPIDLY IF NOT NEUTRALIZED.
12.
THOROUGHLY
wipe the sides, burner tubes and bottom of the ftyer with clean, lint-free, dry towels to remove any
remaining water, turn the
DRAIN VALVE HANDLE
to the closed
“UP”
position; then fill the fryer with
NEW
shortening to the applicable shortening level mark, as prescribed below.
13. Reprogram the Ultrastat 11 Cooking Computer for the correct cook time and temperature.
D. SHORTENING INSTALLATION
1.
LIQUID SHORTENING:
When using liquid shortening (cooking oil) fill the fryer with shortening even with the
middle line of the
“E ”
in the word
LEVEL
of the applicable shortening level mark on the rear wall of the fryer.
2.
SOLID SHORTENING:
a. Cut a block of solid shortening into small pieces.
b. Place small pieces of solid shortening
EVENLY
on top of the
HEAT EXCHANGER TUBES
or
THOROUGHLY
PACK
these pieces of solid shortening between, below and above the
HEAT EXCHANGER TUBES.
While
packing solid shortening is messy and time consuming, it is the safest and fastest way to melt solid shortening.
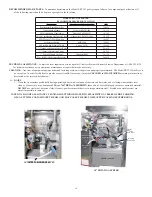
c. DTMR equipped Fryer
1) Turn the fryer Toggle
ON/OFF
switch
ON
; then place the Default-to-Manual-Restart (DTMR) Control in the
SHORTENING MELT MODE
by depressing then releasing the momentary
START
button on the DTMR.
The
RED START
lamp and
AMBER MELT MODE
lamp will light to indicate the fryer is in the melt mode.
2) When the
HEAT EXCHANGER TUBES
are
COMPLETELY
covered with
LIQUID
shortening and the
shortening temperature is
ABOVE 100°F (38ºC)
, replace the grill in the fryer vat; then push the
EXIT MELT
button on the DTMR and proceed to paragraph “e” below.
d. Ultrastat 11 equipped Fryer
1) Turn the fryer Toggle ON/OFF switch
ON
; then place the computer in the
SHORTENING MELT MODE
by
depressing the ON/OFF key.
C
Y
P
will appear in the display indicating the computer is in the
PURGE
MELT MODE
, and the
RED
burner indicator lamp on the fryer will cycle
ON
and
OFF
indicating the burner
is being turned
ON
and
OFF
to gently heat the shortening.
2) When the heat exchanger tubes are
COMPLETELY
covered with
LIQUID
shortening and the shortening is
ABOVE 100ºF (38ºC)
, replace the grill in the fryer vat; then push the
EXIT MELT
key on the computer.
e. Continue adding solid shortening as follows:
1) Place small pieces of solid shortening into a fry basket.
2)
CAREFULLY
lower the basket into the fryer vat.
3)
GENTLY
turn the basket to allow these ieces of solid shortening to float away.
4) Repeat the above steps until liquid shortenng is even with the middle line of the
“ E
ß
”
in the word
LEVEL
of the applicable shortening level mark on the rear wall of the fryer vat
.
25


