background image

TOC

INTRODUCTION

Terminology 

Please note the following terms and abbreviations, as they are used throughout this user guide! 

LE

 means 

left encoder

 and


RE

 means 

right encoder


For instance, ’

RE1-4

’ means any or all encoders on the right, while ‘

LE3

’ means encoder 3 on the left. 

Parameter 

A particular function or choice of options. 

Page 

A set of CVilization parameters controlled by the 8 encoders, a 

view

 switchable via press / long-press… 

Press 

Instruction to push the top of an encoder and quickly release. Doing this usually opens a Program Page

Long-Press 

Instruction to push the top of an encoder for 

2+ seconds

. Doing this usually opens a Config Page

Channel 

One of the four processors controlled by each pair of encoders. Called ‘

track

’ in Mode III. 

Breathe 

An LED smoothly fading in and out (‘breathing’) identifies which Program Page is currently open. Pressing 
the ‘breathing’ encoder takes you back to the Performance Page. Note that Mode II plays a short sequence 
of different colours (‘rainbow’) instead, as all 8 encoders need to display values. 

Blink 

Similarly, a ‘blinking’ LED identifies which Config page is currently open. Blinking is also used for clock or 
trigger activity, for instance that a sequence is running.  

Flash 

While adjusting values, the LED(s) will flash once when either minimum or maximum is reached. LEDs will 
also flash when zero is reached, which is especially useful for centre-zero parameters. 

Tick 

While turning encoders you can feel them snapping to discrete values. We call each of these a ‘tick’. 

Colour Coding 

Solid 

ORANGE

GREEN

BLUE

 or 

MAGENTA

 usually means the numbers 

1

2

3

 or 

4

 – for instance, the 

indices of the inputs and outputs. The MODE indicator LEDs also follow this general rule. An example 
applying to modes I, II or IV: If RE3 is green instead of blue, it often means that input 

2

 is routed to output 

3

YELLOW

 and 

PURPLE

 stand for CV-A and CV-B, respectively. 

TEAL

 (blue-green) is used for random or otherwise unspecified values. 

Solid 

RED

 means ‘mute’, ‘pause’, ‘skip’ or ‘recording’, while 

DARK RED

 means ‘unavailable’. 

RUBY

 signifies negative values or inverted signals, and four PASTEL colours are used for Static Offsets.

MIX  SEQ  MUC  PAN  EXP

7

Содержание CVilization

Страница 1: ......

Страница 2: ... Config Page 1 11 LE1 Quantization 11 LE2 Clock Trigger Source 11 LE3 Clock Division 12 Config Page 2 12 LE1 Glide Time 12 LE2 CV B Function 12 LE3 Tracking Time 13 Static Offsets 13 Mode II Sequential Switch 14 Performance Page 15 Stop Pause 15 Live Input Switching 15 Program Pages 15 Step Gain 15 Step Type 16 Config Page 1 16 LE1 Quantization 16 LE2 Clock Trigger Source 17 LE3 Clock Division 17 C...

Страница 3: ... 28 System Bus 29 Global Functions 29 LED Brightness 29 Jack Tester 29 Input Calibration 30 Clear Autosave Memory 30 Reset Quantization 30 Colour Palette Test 30 MicroSD 31 Firmware Updates 31 Options in CVZ ini 32 CVilization is a fragment of UFO control panel right there in your Eurorack Originally designed to plop in and out of chronospace faster than you can say plop our team of specialists at...

Страница 4: ...le by pressing encoders replaces the usual encoder plus mini display combination After some practice CVilization can be operated very quickly and effectively WATCH our TUTORIAL VIDEOS on YOUTUBE MIX SEQ MUC PAN EXP 4 I II III IV MODE button Press repeatedly to step through the four modes Also To load a preset hold MODE then press an encoder To save a preset hold MODE then long press an encoder LE ...

Страница 5: ...t to be free of defects in materials and construction for a period of one year from the date of purchase proof of purchase required Malfunction resulting from wrong power supply voltages wrongly connected bus cables mechanical abuse or other causes determined to be the fault of the user are not covered by this warranty and normal service rates will apply During the warranty period defective units ...

Страница 6: ...nned across the four outputs automatically as well as via CV There are similarities with input scanning mixers which dynamically blend multiple inputs into a single output but the principle is reversed here Extra processors Wherever it makes sense for the mode quantizers with user definable scales sample hold and glide can be individually applied to each output CVilization is predestined for tonal...

Страница 7: ...ours rainbow instead as all 8 encoders need to display values Blink Similarly a blinking LED identifies which Config page is currently open Blinking is also used for clock or trigger activity for instance that a sequence is running Flash While adjusting values the LED s will flash once when either minimum or maximum is reached LEDs will also flash when zero is reached which is especially useful fo...

Страница 8: ...Offsets per output These are opened by long pressing on RE1 4 Presets Each Mode has 7 user presets LE1 4 RE1 3 and 1 initialization preset init RE4 How to save a preset Hold down the MODE button wait a second then long press the encoder where you want to save your preset Note that RE4 is reserved for the init preset which cannot be overwritten Preset data include mixer gains sequences glide quanti...

Страница 9: ...ed press the currently breathing encoder to go back to the Performance page While in the Performance Page To mute an input or output turn the encoder one tick to the right the LED appears red To open the Configuration pages long press a left hand encoder LE1 4 To open the Static Offsets pages long press a right hand encoder RE1 4 Press the currently breathing or blinking encoder to go back to the ...

Страница 10: ... right will turn orange or red or off depending on their values RE1 4 now adjust the amount of the input 1 signal mixed into each output As your hand tends to obscure the encoder you are adjusting all 8 encoders temporarily adopt the same colour and intensity When either zero minimum or maximum is reached they flash once Mix 4 Inputs to 1 Output Press one of the right hand encoders Its LED starts ...

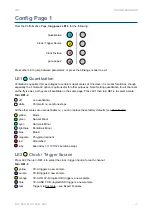
Страница 11: ...tonic Minor blue Blues magenta Phrygian dominant red Diminished ruby Alien Alloy 111211122 semitone steps LE2 Clock Trigger Source This page specifies the source which will be used for triggering the Sample Hold S H processor Turn RE1 4 off no sample hold for this output yellow CV A triggers a new sample purple CV B triggers a new sample orange CV A OR CV B logical OR triggers a new sample blue CV...

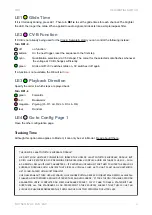
Страница 12: ... a slew limiter a k a glide processor which smoothes out any sharp transitions in the signal Turn RE1 4 to set the glide times for each output The brighter the LED the longer the glide Note Applied to an audio signal Glide acts like a simple lowpass filter LE2 CV B Function If CV B is not already being used as Clock Trigger Source you can use it for one of the following Turn RE1 4 off no function ...

Страница 13: ...ew milliseconds after a trigger has occurred With the right setting pitches e g from a sequencer are only frozen i e sampled and held after the target value is reached This ensures optimal timing without any serious side effects Note If there is visual feedback during tracking e g recording in Mode III the brightness of the LED can indicate a state somewhere before the end of the tracking time Thi...

Страница 14: ... in the selected sequence Pressing LE1 4 selects a sequence 1 4 and lets you adjust the step gain for the 8 steps Pressing RE1 4 selects a sequence 1 4 and lets you choose a step type for the 8 steps Press the flashing rainbow encoder to go back to the Performance Page MIX SEQ MUC PAN EXP 14 I II III IV MODE II Sequential Switch LE1 4 Turn down one tick to stop Turn up one tick to pause or Press t...

Страница 15: ...ing the right hand encoders Note that the special step types constant random and skip see Step Type below are not available here as that would be too confusing Turn RE1 4 orange Input 1 green Input 2 blue Input 3 magenta Input 4 Turning RE1 4 changes the input routing for the respective sequence for the current step which may or may not be a moving target You can use Live Input Switching to step p...

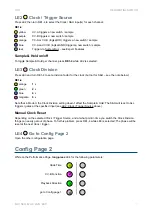
Страница 16: ...mance Page long press LE1 3 for the following Press other LE to jump between parameters or press the blinking encoder to exit LE1 Quantization CVilization s quantizer forces voltages to certain musical scales at 1V octave It is meant for pitches though especially the chromatic option is quite useful for other purposes Note Setting quantization for all channels on the fly is easy as they are all av...

Страница 17: ...t for S H see the note below RE1 4 orange 1 x green 2 x blue 4 x magenta 8 x Note that in Mode II the Clock Division setting doesn t affect the Sample Hold The S H will react to ALL triggers gates at the specified input see LE2 Clock Trigger Source above Manual Clock Reset Depending on the selected Clock Trigger Source and at what point in time you switch the Clock Division things can easily get o...

Страница 18: ... Config Page 1 Open the other configuration page Tracking Time Although this option also applies to Mode II it can only be set in Mode I Read about it there MIX SEQ MUC PAN EXP 18 The world s least intuitive Eurorack module We don t know whether CVilization is indeed the world s least intuitive Eurorack module But given u he s reputation for designing mind bogglingly complex audio software plug in...

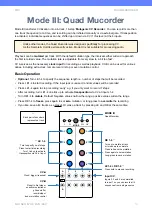
Страница 19: ... turn LE1 4 one tick up to activate transposition via CV at inputs 1 4 Turn RE1 4 to mutate Default Negative values narrow the range positive values widen the range Press RE1 4 to freeze press again to set zero mutation or long press to overwrite the recording If you like save all 4 tracks as a preset Or erase a track by pressing LE and RE at the same time MIX SEQ MUC PAN EXP 19 Unlike other modes...

Страница 20: ...y connecting a regular clock to CV A instead of the gate from the keyboard but keep the pitch CV attached then turn LE1 one tick up to activate Transposition Experiment Performance Page Sequence Length optional By turning LE1 4 you can specify the maximum number of steps that will be recorded Here s the default colour scheme for those numbers see Sequence Length Colour Scheme for alternatives Turn...

Страница 21: ... will jump to zero Undo Mutation By pressing the RE again or at any time when the mutation is at zero the original recording is restored Save Mutation A long press on the RE replaces the original recording with the current state Transposition During playback the main inputs can be used to transpose sequences pre quantization Turn RE1 4 up one tick If the input is unused and not normalled to anothe...

Страница 22: ...ation white Chromatic i e semitone steps All the other scales are user definable i e you can replace these factory defaults see User Scales yellow Major green Natural Minor cyan Harmonic Minor light blue Pentatonic Minor blue Blues magenta Phrygian dominant red Diminished ruby Alien Alloy 111211122 semitone steps LE2 Clock Trigger Source Press LE2 then turn RE1 4 to select the clock trigger input ...

Страница 23: ... LE2 or LE3 is selected The phase will be reset at the next clock trigger Tip You can use this feature to shift clocks to the off beat LE4 Go to Config Page 2 Open the other configuration page Config Page 2 From the Performance Page long press LE4 for the following functions LE1 Glide Time If it isn t already blinking press LE1 Then turn RE1 4 to set the glide times for each channel The brighter t...

Страница 24: ...oose the kind of mutation applied in the Performance page orange Narrower wider intervals default green Randomly i e at irregular intervals copy the CV signal from the corresponding input blue Randomly copy from the track above Specifically Track 4 copies from track 3 track 3 copies from track 2 track 2 copies from track 1 and track 1 copies from track 4 magenta Harmonize create harmonic structure...

Страница 25: ... as a volume for each input you can also set a nominal pan position which can then be shifted either automatically or via CV A and CV B Finally Auto Hop jumps to a random pan position on each transient blip in the audio which makes this option especially interesting for percussive material Basic operation Turn LE1 4 to adjust input volumes indicated by the brightness of the encoders as you turn Tu...

Страница 26: ...Pages Auto Pan CV Pressing a LE enters the Program Page for that particular channel s pan automation RE1 4 introduce panning as follows note that they can all be used at the same time RE1 Auto Pan speed red backwards RE2 One tick up switches Auto Hop see below on brighter slower smoother hops RE3 Amount of pan modulation from CV A negative values are ruby RE4 Amount of pan modulation from CV B neg...

Страница 27: ... playing via keyboards or other quantized 1 Volt per octave CV sources Each Volt is divided into 12 steps and any steps that don t conform to the desired scale are shifted accordingly Recording basic scales using a keyboard For this you will need pitch CV and gate signals either directly from a CV capable keyboard or from a MIDI keyboard via MIDI to CV converter Then Select any CVilization Mode an...

Страница 28: ... of the usual 12 Playing the C an octave above that will give you an A and so on How to record a Volt Map The procedure is similar to Basic Scale recording except that you long press the encoder one more time The outer two mode LEDs I and IV will light up indicating that CVilization is ready to record a Volt Map Remember that the last recorded note is not part of the scale but sets the repetition ...

Страница 29: ...ad regular presets via Select Bus the two types are entirely separate MIDI Start Stop By default whenever CVilization receives a MIDI Stop message it resets all clock divisions and sequences MIDI Start can also be used for the reset see the two MIDI Reset options in CVZ ini below Global Functions A few settings common to all 4 modes are directly available without you having to edit CVZ ini see bel...

Страница 30: ...e Global Settings Page Clear Autosave Memory LE4 All parameter values in the current mode are saved after 60 seconds of inactivity and these are recalled the next time the module is powered up Although we have yet to encounter any problems the Autosave data could theoretically become corrupted To cater for this unlikely scenario we included a function which clears the autosave memory it is perfect...

Страница 31: ... cvlizUpd ebi onto the card overwriting the previous version With the microSD back in its slot secure CVilization in the rack Switch your Eurorack on while holding down LE1 for 2 to 3 seconds While CVilization is checking the validity of the firmware file LE1 3 and RE1 3 should light up GREEN If the update file was successfully loaded LE4 will then cycle through several colours while the firmware ...

Страница 32: ...Voltage 3 1 10 Volt Also sets the maximum random voltage Encoder Ticks per Volt 12 12 24 12 semitones only 24 quarter tones possible Mode 3 Set Sequence Length yes on off yes no 1 0 no allow transposition before recording Longest Resets All no on off yes no 1 0 yes whenever the longest sequence restarts it also resets the other three Step Feedback Length CV CV and Position Position Length CV and L...

Страница 33: ...obability of the respective behaviour being applied when a step is mutated MUTAGEN positive mutation Entropy 1 10 Classic random values one sequence step is simply randomized standard behaviour Dissociation 0 10 Random increase of the interval between the mutated step and its surroundings Dissociation is somewhat more blatant and targeted than Entropy Inversion 0 10 The step is inverted pivoting a...

Страница 34: ...team Heckmann Audio GmbH Wilmersdorfer Str 98 99 10629 Berlin Germany MIX SEQ MUC PAN EXP 34 The Lava Lamp Mode Accidentally designed by one of the engineers the Lava Lamp Mode got its name from the beautifully changing colours of the front panel LEDs It did not process any signals at all it just looked nice Rumours say that CVilization s lead designer originally insisted on keeping this mode beca...

Отзывы: