


5 -
MAINTENANCE
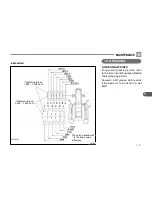
J10O527A
CAlIbrATION fOr rEplACE-
MENT Of pOsITION sENsOr/
Ehr-b (bOsCh ECu)
Step 1: Start the engine.
Step 2: Set the dial to the control
mode on the Bosch control
panel as shown in the fig-
ure.
Step 3: Set the dial to the set point 1
as shown in the figure.
Step 4: Press the external hitch lift-
ing button to lift the 3-point
hitch.
►
Step 5: Press and hold the external
hitch lifting button even after
the 3-point hitch is fully lift-
ed.
Step 6: Hold the external hitch lifting
button until the status LED
on the Bosch control panel
blinks and then stops.
Step 7: When the LED on the Bosch
control panel stops blinking,
release the external hitch
lifting button.
Step 8: Set the dial to the set point 2.
Step 9: Press the external hitch low-
ering button to lower the
3-point hitch.
Step 10: Press and hold the exter-
nal hitch lowering button
even after the 3-point hitch
is fully lowered.
Step 11: Hold the external hitch low-
ering button until the sta-
tus LED on the Bosch con-
trol panel blinks and then
stops.
Step 12: W h e n t h e L E D o n t h e
Bosch control panel stops
blinking, release the exter-
nal hitch lowering button.
Step 13: Stop the engine, wait for 5
seconds and turn the igni-
tion switch to the "ON" po-
sition for 5 seconds.
External hitch
lifting button
External hitch
lowering button
Control mode Set point
2
Status LED
Set point
1
15. INspECTINg ElECTrOhydrAulIC sysTEM (sp MOdEl)
Содержание T1054
Страница 30: ...MEMO...
Страница 34: ...MEMO...
Страница 41: ...1 1 GENERALINFORMATION J10O213A EPAREGULATION USE ULTRALOW SULFUR FUELONLY GDQJHU GDQJHU...
Страница 42: ...1 GENERALINFORMATION J10O205A GDQJHU 7LOW DQGOH WARNING Do not adjust the tilt handle when traveling...
Страница 46: ...MEMO...
Страница 115: ...4 Work Procedure 1 Precautions for handling implement 4 2 2 General implement 4 2 3 Types of Work by speed table 4 8...
Страница 160: ...MEMO...
Страница 161: ...STORAGE AND DISPOSAL 1 Tractor storage 6 2 2 Usage and disposal 6 3 6...
Страница 164: ...MEMO...
Страница 191: ...INDEX 1 INDEX 10 2 10...
Страница 196: ...MEMO...
Страница 197: ...WARRANTY 1 WARRANTY 11 2 11...


