12 TURBOLOCK TL114
Section 4
Installation (New)
This section details installation steps needed if you are installing the TL114 on a door
without a cutout. If you are using the TL114 to replace an old lock or if your door otherwise
already has a cutout, please go back to Section 3.
• For easier installation, have another person help to hold the lock.
• For your convenience, installation instructions are broken into segments. Read and follow the
instructions for both Pre-Installation and Main Installation.
4.1 Pre-Installation
Part 1 Making the Opening
Step 1.
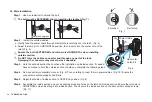
Using the provided template, mark the locations for the centers of the backset and the
latch hole (Fig. 14).
Step 2.
Bore a 54mm (about 2” or 2 1/8”) hole on door face, then drill a 25mm (about 1”) hole into
the edge of the door so that it intersects with the larger hole (Fig. 15).
• When drilling the 54mm (about 2” or 2 1/8”) hole, it’s recommended to drill from both sides of
door to stop the wood from splintering.
• It may be easier to drill the 54mm hole with a hole saw bit (not included).
• It may be easier to drill the 25mm hole with a hole saw bit (not included) or a 7/8” spade bit (not included). If using a spade bit,
do not drill at high speeds as this may tear out too much wood and/or damage the door.
Mark Hole
Latch Hole
Backset
Side Hole
2” diameter hole
1” diameter hole
Fig. 14
Fig. 15


