background image

Copyright © 2000 Tunstall Group Ltd.

Lifeline 4000 Advanced User Guide (B)

7

How do I enter my timed service?

A timed service is just like a non-timed service, except that you must enter your PIN 

before 

you

deliver the service, and enter your service code again to let the Lifeline 4000 know when you have

finished the service. The 

main 

difference is that you press the 

 key for some entries instead of

always pressing the  #  key, as you would for a non-timed service. You need to follow the five

steps explained here.

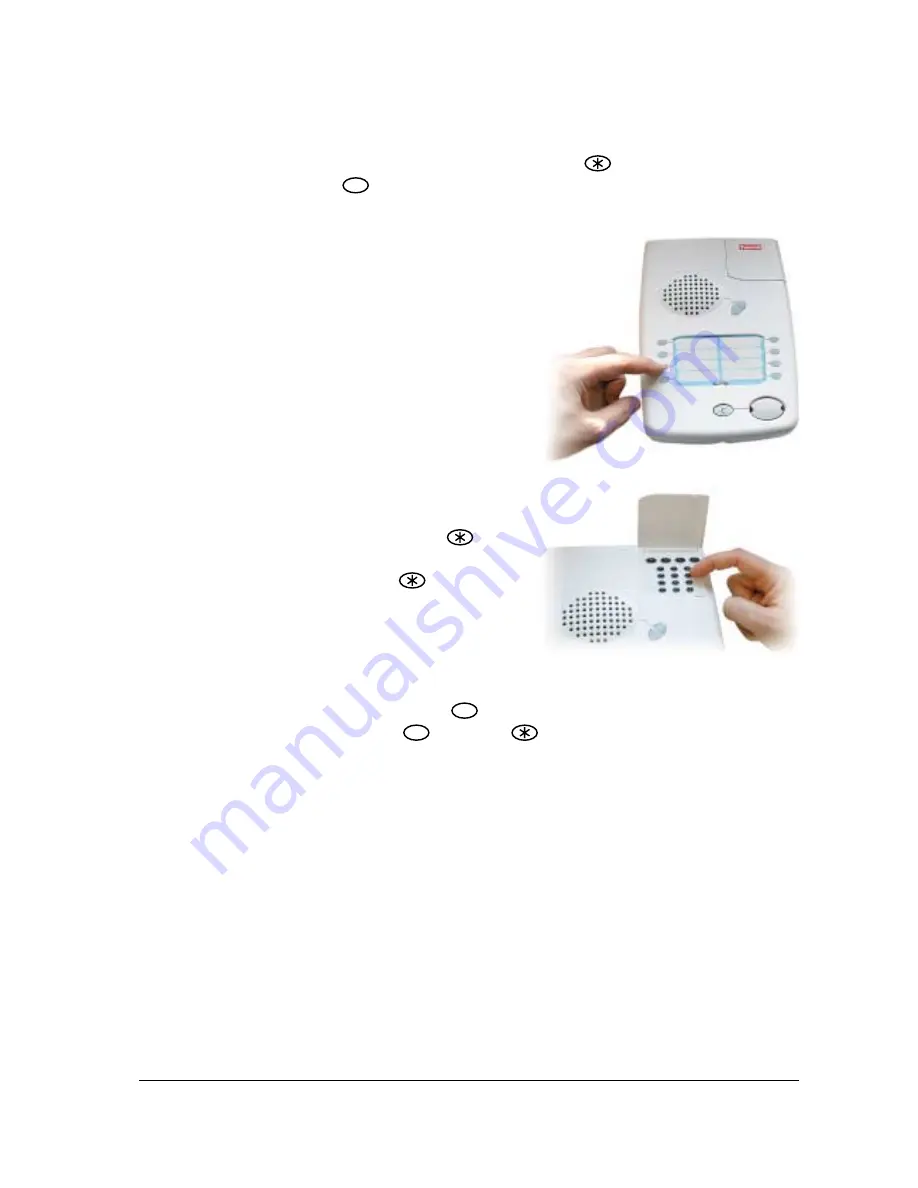
1.

Press the 

Homecare 

user key on the top of

the Lifeline 4000. If the Lifeline 4000 has a

display you will see the words 

Enter PIN

displayed.

2.

Enter your personal identification number

(your PIN). After you have entered your PIN

the words on the display (if the Lifeline

4000 has one) will change to 

PIN Entered

Service Code ??

3.

Enter the two digit service code. If the

Lifeline 4000 has a display it will then

display the words 

Resident ?

4.

If the service is for a resident then enter

the number for the resident who is receiving

the service and then press the 

 key. If

the service is not for any particular resident

then just press the 

 key without

entering a resident number. If the Lifeline

4000 has a display it will show the words

Service Started.

5.

When you have delivered the service press

the 

Homecare 

user key on the top of Lifeline

4000. Enter your PIN and press  # , and then enter the service code as before. This time,

however, you press the  #  key, not the 

 key. This ends the service, and the Lifeline

4000 will pass the information back to the computers at the control centre.

What if I arrive when someone else is also delivering a timed service, do I have to wait?

 Lifeline 4000

can time up to five different services at once. Consequently, you would only have to wait if five

service providers were already each present providing a timed service.

What if I forget to enter the end of my timed service?

 Lifeline 4000 will do nothing with your

service information until you enter the end of the timed service. If after 24 hours you have still not

entered the end of your timed service then Lifeline 4000 will assume that you have forgotten

about the service and will remove it from its memory without making a call to the control centre.

Will my service information always reach the control centre?

 Unlike alarm calls, Lifeline 4000 will

only make one call to a control centre with service information. This is to ensure that the Lifeline

4000 is available for alarm calls. In the unlikely event that the call does not get through to the

control centre the information on the service will be lost.

Speaker

Away

Homecare

Jenny

Dr Hill
Jackie

Pat

Intruder

Содержание Lifeline 4000

Страница 1: ...ne 4000 Advanced User Guide All the reassurance you need Tunstall Telecom Ltd Whitley Lodge Whitley Bridge Yorkshire DN14 0HR Tel 01977 661234 Fax 01977 661993 http www tunstall co uk Part Number D360...

Страница 2: ...15 Replacing the battery 18 2 Common Installations 19 Installing movement detectors 19 Inactivity Monitoring 20 Intruder Detection 21 Smoke and Fire Alarms 22 Temperature Monitoring 22 Opening doors...

Страница 3: ...4000 s input and output ports Control centres and Lifeline 4000 Full use The Tunstall PNC3 Vision control centre version 5 4 and above takes advantage of the wide variety of new features offered by Li...

Страница 4: ...4 Lifeline 4000 Advanced User Guide B Copyright 2000 Tunstall Group Ltd...

Страница 5: ...Homecare Management When someone arrives at a resident s home to perform a service such as check a central heating system or perform a personal service such as providing physiotherapy they can registe...

Страница 6: ...re so that they know you have delivered your service You will also be given a two digit service code for the service you provide If you provide more than one service you will be given a different two...

Страница 7: ...the words Service Started 5 When you have delivered the service press the Homecare user key on the top of Lifeline 4000 Enter your PIN and press and then enter the service code as before This time ho...

Страница 8: ...ached using these buttons These higher volumes are used during augmented ringing Augmented ringing is where the volume of the ringing gets louder the longer a telephone call goes unanswered In short v...

Страница 9: ...e altered Displays and card inserts Anything that can be programmed locally on a Lifeline 4000 with an LCD display can also be programmed on a Lifeline 4000 with the card insert However it is difficul...

Страница 10: ...en hear another beep and the word Param will be shown if the Lifeline 4000 has a display 7 Enter the number of the parameter you wish to change and then press the key The display will either show the...

Страница 11: ...ramming and then press the Cancel button again to answer the call Setting the unit identification number The unit identification number is the unique number you can program into each Lifeline 4000 Thi...

Страница 12: ...new value 0 9 3 5 and then press 5 End local programming by pressing the Cancel key Setting the time to 1pm 1 Enter local programming mode by holding down the key and then holding down the key until t...

Страница 13: ...he number in parameter 0 is the number of a control centre Lifeline also assumes that the number in parameter 1 is the number of a control centre If it calls either of these telephone numbers it will...

Страница 14: ...l programming mode by holding down the key and then holding down the key until the unit beeps Release the key first and then the key 2 Enter the parameter press 1 3 Delete the old value using the C ke...

Страница 15: ...number automatically entered into it when it is made at the factory When a radio trigger is set off it transmits this identification number Lifeline listens for any radio transmissions on a particula...

Страница 16: ...rm button on the radio trigger Lifeline will beep and the words Trigger registered will be announced and the words Programmed will be displayed if the unit has a display 4 End local programming by pre...

Страница 17: ...ling to register When you register a radio trigger you will normally hear a high pitched beep from the Lifeline 4000 If you hear a low tone then the registration has failed The most common reason for...

Страница 18: ...one line 5 Disconnect the Lifeline 4000 connected from its mains electricity adaptor and turn the unit upside down resting it on the soft surface 6 Push and slide the battery cover off 7 Carefully rem...

Страница 19: ...y More importantly you should test that the Lifeline 4000 can receive radio signals from the PIR when the PIR is in position but before you have drilled any holes If a thick concrete beam or metal cab...

Страница 20: ...52 For historical reasons inactivity monitoring is enabled using the User Options parameter see page 30 5 If you have previously configured older equipment for inactivity monitoring you should be awar...

Страница 21: ...sure that the movement detector trigger types are set for intruder detection see the Trigger Uses digit in the Trigger Types and Actions section on page 44 3 If security is a major concern then make...

Страница 22: ...can detect when a set temperature has been exceeded and emit a radio trigger signal Normally these sensors should trigger just once when the set level is passed If the sensor continually transmits its...

Страница 23: ...ents you might want to silence these announcements at the Lifeline 4000 see personal recipient configuration page 62 4 If you are considering a hardwired input then you might wish to select one where...

Страница 24: ...24 Lifeline 4000 Advanced User Guide B Copyright 2000 Tunstall Group Ltd...

Страница 25: ...k and entering the telephone numbers to call when an alarm is raised Configuring Keys Each User Key on the Lifeline 4000 can be configured to perform a number of different tasks In addition the four A...

Страница 26: ...entered for external output is 2 This means that pressing the key will turn the output on Information on making hardwired connections to either the input or output for Lifeline 4000 can be found in c...

Страница 27: ...are explained in the main Lifeline 4000 User Guide However to summarize the Away key is used for switching the Away feature on and off The Speech Record is used to record voice tags messages for the F...

Страница 28: ...e using the C key display version only 4 Enter 0 0 0 0 0 5 and then press 5 End local programming by pressing the Cancel key Setting the C key to be the Speech Record key 1 Enter local programming mod...

Страница 29: ...umber of alarm calls that cannot be cancelled Normally these digits are set to 00 meaning that any alarm call can be cancelled The second two digits in parameter 172 can be set to 00 or 01 If set to 0...

Страница 30: ...ents are regular intervals The default setting is on Inactivity Monitoring This determines whether Lifeline monitors inactivity For more information see the section on Inactivity Monitoring in Chapter...

Страница 31: ...ning enabled not disabled and Inactivity Monitoring off 1 Enter local programming mode by holding down the key and then holding down the key until the unit beeps Release the key first and then the key...

Страница 32: ...ond digit and just press the key to enter the new value for the parameter this sets the language to be the first programmed language The settings for speech synthesis will affect the mains fail and li...

Страница 33: ...press 1 3 0 3 Delete the old value using the C key display version only 4 Enter 0 1 0 0 and then press 5 End local programming by pressing the Cancel key To set the time between announcements to 12 ho...

Страница 34: ...trigger is set off it transmits this identification number Lifeline listens for any radio transmissions on a particular frequency If it detects a signal it checks the number that has been sent Next L...

Страница 35: ...ng and finally whether it triggers the external output See page 44 for more information 3 Configure check the call sequence used for the trigger type Which of the ten emergency numbers are used and in...

Страница 36: ...is method will be explained in more detail a later in this section Examples Registering a trigger in Smoke Detector 1 1 Enter local programming mode by holding down the key and then holding down the k...

Страница 37: ...When you register a radio trigger you will normally hear a high pitched beep from the Lifeline 4000 If you hear a low tone then the registration has failed The most common reason for such a failure i...

Страница 38: ...r in this section n o i s n e t x E o i d a R r e g g i r T r e t e m a r a P r e g g i r T r o f r e t e m a r a P r e g g i r T r o f e p y T 1 0 6 1 6 2 2 6 3 6 3 4 6 5 6 4 6 6 7 6 5 8 6 9 6 6 0 7...

Страница 39: ...trigger will only be used as intruder detectors For example if you have a device to detect when a window has been broken and it is linked to a radio trigger then you should set the type for this to in...

Страница 40: ...emperature sensors in the home although there is no reason why it cannot be used for industrial monitoring as well For example you may wish to monitor the temperature in a greenhouse that contains a v...

Страница 41: ...cular properties see chapter 5 of volume A and chapter 2 of volume C in the PNC3 Vision User Manual Which location information should I enter If you enter the BS location information but the Lifeline...

Страница 42: ...0 6 and then press 5 End local programming by pressing the Cancel key In the example the 02 is the code for a pull cord The 33 is the TT92 location code for a downstairs toilet The 13 is the BS locat...

Страница 43: ...rcuit is broken This is useful if security is an issue For example if an panic button has been wired into a kitchen and an intruder rips the button away from its connection this will still trigger the...

Страница 44: ...ommunication tones sent by the control centre computers can be heard through the Lifeline 4000 s loudspeaker Call progress tones The tones that the Lifeline 4000 normally makes while connecting to a c...

Страница 45: ...r t n I 9 4 1 t i x e y r t n E t n e m e v o M 4 5 1 t i x e y r t n E n o N t n e m e v o M 5 5 1 t n e m e g a n a M e r a C e m o H 6 3 1 r e m i r P t n e m e g a n a M e r a C e m o H 6 5 1 n o...

Страница 46: ...I t e s e R m r a l A r e d u r t n I e s i a R f f O n O f f O 2 s l l a C g n i m o c n I r e w s n A r e m i T y t i v i t c a n I t e s e R m r a l A r e d u r t n I e s i a R f f O f f O n O 1 s...

Страница 47: ...the external output It can switch the output on and will have no effect if the output is already on it can switch it off and again will have no effect if the output is already off or it can toggle th...

Страница 48: ...rature drops below this level we want a call to be raised However we also want a light to be flashed so that any carer in the home is made aware of the problem so they can check the central heating Th...

Страница 49: ...ce Following this it might be useful if we call a personal recipient just once Next we will try the main control centre once more before trying another personal recipient just once 1 2 4 2 4 1 1 1 6 1...

Страница 50: ...ue using the C key 4 Enter 1 1 2 1 8 1 1 2 2 2 and then press 5 Enter the next parameter press 1 0 3 6 Delete the old value using the C key 7 Enter 3 1 1 4 2 4 1 9 2 9 and then press 8 End local progr...

Страница 51: ...the next parameter press 1 0 5 6 Delete the old value using the C key 7 Enter 1 3 2 3 0 0 0 and then press 8 End local programming by pressing the Cancel key For some residents their first port of cal...

Страница 52: ...the resident is inactive for a period longer than the Inactivity Time programmed into their Lifeline 4000 then Lifeline 4000 will make an inactivity alarm call Usually the Inactivity Time is set for 1...

Страница 53: ...h 2 The clock start time 3 The clock end time 4 The inactivity time for the stopwatch The first two digits determine the method used either stopwatch clock or both see adjacent table In the example ab...

Страница 54: ...0 0 0 0 0 0 0 0 0 1 2 0 0 and then press 5 End local programming by pressing the Cancel key Setting inactivity monitoring to use the clock method between 9am and 10pm 1 Enter local programming mode b...

Страница 55: ...nd distribute them in the rooms of a large house If any of these sensors detected a temperature out of range it would send a radio trigger to Lifeline and the Lifeline 4000 would raise an alarm Settin...

Страница 56: ...Delete the old value using the C key display version only 4 Enter 0 0 1 0 and then press 5 End local programming by pressing the Cancel key Set Temperature A to be on when the resident is Away and Tem...

Страница 57: ...they have triggered the intruder alarm and they need to enter their personal identification number PIN soon before the Lifeline 4000 raises an alarm call Entry tones help to prevent false alarms Howev...

Страница 58: ...tones and to disable test mode 1 Enter local programming mode by holding down the key and then holding down the key until the unit beeps Release the key first and then the key 2 Enter the parameter pr...

Страница 59: ...ng down the key and then holding down the key until the unit beeps Release the key first and then the key 2 Enter the parameter press 4 9 3 Delete the old value using the C key display version only 4...

Страница 60: ...later After this it will call in exactly twenty eight days time Consequently if you program it at 3 30 in the afternoon then the unit will make every periodic call at 3 30pm Many control centres prefe...

Страница 61: ...y version only 4 Enter 1 0 0 3 0 0 and then press 5 End local programming by pressing the Cancel key Adding a random time element to a periodic call If many Lifeline 4000s are programmed to call into...

Страница 62: ...control centre receive the call It is made after a personal recipient has accepted an alarm call by pressing a key on their telephone It allows the control centre computers to make a note of the alar...

Страница 63: ...call can be set in hours and minutes If parameter 170 is set to 0000 then there will be no call timeout Examples To turn the incoming call timeout off 1 Enter local programming mode by holding down th...

Страница 64: ...re If this digit is set to 4 then Lifeline will make the call between 1 and 5 hours after the mains failure The maximum is 9 hours Mains restored call time range The second digit is the time range in...

Страница 65: ...old value using the C key display version only 4 Enter 3 2 0 1 0 0 0 0 0 0 0 0 0 0 0 0 and then press 5 End local programming by pressing the Cancel key Tone dialling pulse dialling Old telephones us...

Страница 66: ...3 Delete the old value using the C key display version only 4 Enter 0 1 and then press 5 End local programming by pressing the Cancel key Augmented ringing interval Lifeline 4000 can be made to incre...

Страница 67: ...hecked by a member of staff This date could then be checked from the control centre using manual programming methods y a D h t n o M r a e Y 0 7 0 5 0 1 The date is entered in the format day month yea...

Страница 68: ...down the key until the unit beeps Release the key first and then the key 2 Enter the parameter press 3 1 3 Delete the old value using the C key display version only 4 Enter 3 5 and then press 5 End l...

Страница 69: ...output The terminals for these hardwired connections can be found underneath a Lifeline Home Unit next to the power socket To make a connection use a terminal screwdriver as shown here Use the screwd...

Страница 70: ...open i e broken or not made it must have a resistance greater than 30K ohms 4 Lifeline Home Unit provides a small wetting current of 300uA for the input Some switches will not work with such a small c...

Страница 71: ...30V 4 If the circuit connected to the output is AC alternating current then the maximum current is 300mA and the maximum voltage is 125V 5 The output circuit needs a minimum current of 10uA and a mini...

Страница 72: ...72 Lifeline 4000 Advanced User Guide B Copyright 2000 Tunstall Group Ltd...

Страница 73: ...e 13 Parameter 47 page 65 Parameter 48 pages 19 57 Parameter 49 page 59 Parameter 50 page 59 Parameter 58 page 43 70 Parameters 60 to 89 page 38 Parameter 93 page 64 65 Parameter 94 page 66 Parameters...

Страница 74: ...74 Lifeline 4000 Advanced User Guide B Copyright 2000 Tunstall Group Ltd...

Страница 75: ...se of in inactivity 20 B battery replacing 18 battery low call 64 C call configurations 60 66 call confirmation and personal recipients 62 call progress tones 44 call sequence trigger actions 44 call...

Страница 76: ...le service delivery 7 registering non timed services 6 registering services using a radio trigger 6 registering timed services 7 service calls and control centres 7 I identification number 11 inactivi...

Страница 77: ...rigger radio rechargeable battery replacing 18 Relay key 27 replacing the battery 18 ringing configuring 66 ringing augmented 8 S services forgetting a timed service 7 Home Care Primer trigger type 40...

Страница 78: ...ing a trigger with more than one home unit 17 type 39 40 easy method 36 entry exit and non entry exit 39 flexible method 36 Home Care Primer 40 intruder 39 movement 39 temperature 40 types 34 44 48 ca...

Страница 79: ...Copyright 2000 Tunstall Group Ltd Lifeline 4000 Advanced User Guide B 79...

Страница 80: ...nted without the written permission of Tunstall Group Ltd Lifeline Home Unit settings Unit ID Owner Resident Main User r e t e m a r a P d e r e t n E e u l a V r e t e m a r a P d e r e t n E e u l a...

Отзывы: