background image

INTRODUCTION

1-1  Using Your Tsurumi Operation, Repair and Service Manual

We thank you for purchasing a Tsurumi centrifugal pump. We are sure that the centrifugal pump you
have selected will meet your portable pumping needs.

This manual applies to the Tsurumi centrifugal pumps listed below. Specifications for the centrifugal
pumps are provided in the 

SPECIFICATIONS

section. Key features of the centrifugal pump are shown

in the 

DESCRIPTION

section.

TE

3

-50HA

TE

3

-80HA

TE

3

-100HA

This manual provides instructions for operation, service, and repair of your centrifugal pump. We
strongly recommend that those who operate the centrifugal pump become familiar with the centrifugal
pump’s features and controls, and read the operating instructions before using the centrifugal pump.

The Operation, Repair, and Service Manual provides instructions to service, checkout, and repair the
centrifugal pump. This manual also provides replacement parts information.

Repair and service information for the Honda engine is provided in the Owner’s Manual for Models
GX160, GX240, and GX340. A copy of the Owner’s Manual has been provided in the centrifugal pump’s
literature package. Parts information for the Honda Engine is available in Honda’s Parts Catalogs.

When there are differences between centrifugal pump models, separate instructions are provided. The
separate instructions are provided to make sure the correct procedures are used on the affected cen-
trifugal pumps.

All information in the Tsurumi manuals is based upon the latest production configuration of the cen-
trifugal pump at the time of printing.

If you have a problem with your centrifugal pump that cannot be resolved using the Operation, Repair,
and Service Manual, or if you have questions about the operation, service, repair, or maintenance of
your centrifugal pump, contact your local Tsurumi centrifugal pump dealer.

1-2 Precautions

Pay special attention to precautionary notes preceded by the words

WARNING, CAUTION,

and 

NOTE

.

WARNINGS

indicate that there is a strong possibility of personal injury or loss of  life if the procedure

is not followed, or if cleaning, lubricating, adhesives, and other materials are not used properly.

CAUTIONS

indicate that there is a possibility of  equipment damage if instructions are not followed.

NOTES

are used in procedures to provide additional or supplemental information to make the proce-

dure easier or more efficient.

WARNING:

• The centrifugal pump is designed to give safe and dependable service when operated accord-

ing to the instructions in the technical manual provided with the centrifugal pump.

Introduction

Page 1

Tsurumi’s Operation, Service, and Repair Manual

Содержание TE3 Series

Страница 1: ...OPERATION SERVICE AND REPAIR MANUAL FOR TSURUMI TE3 SERIES CENTRIFUGAL PUMPS MODELS TE3 50HA TE3 80HA TE3 100HA ...

Страница 2: ...nor does it apply to any product that has been subjected to misuse neglect alteration misapplication accident or act of God TSURUMI assumes no responsibility for compliance with any regulations codes standards or ordi nances applicable to the installation location operation or maintenance of its products No other warranty expressed or implied is authorized by or applicable to the seller No person ...

Страница 3: ...10 3 Troubleshooting 11 3 1 Troubleshooting Charts 11 4 Maintenance 12 4 1 Maintenance Schedule 12 4 2 Changing Engine Oil 13 4 3 Air Cleaner Service 14 4 4 Sediment Cup Cleaning 14 4 5 Cleaning and Adjusting Spark Plug 14 4 6 Disassembly of Centrifugal Pump 15 4 7 Replacement of Mechanical Seal 17 4 8 Removal and Installation of Engine 20 4 9 Replacement of Cushions 20 4 10 Assembly of Centrifuga...

Страница 4: ...rts Catalogs When there are differences between centrifugal pump models separate instructions are provided The separate instructions are provided to make sure the correct procedures are used on the affected cen trifugal pumps All information in the Tsurumi manuals is based upon the latest production configuration of the cen trifugal pump at the time of printing If you have a problem with your cent...

Страница 5: ...oisonous carbon monoxide gas contained in the exhaust gases will endanger human lives Keep the centrifugal pump at least 1 meter 3 feet away from any structure or building dur ing use When a centrifugal pump is located close to a building or nearby equipment heat and exhaust from the engine will cause the surrounding temperature to rise This will degrade the engine s cooling efficiency causing ove...

Страница 6: ...r the pumping capacity of TE3 series centrifugal pumps Introduction Page 3 Tsurumi s Operation Service and Repair Manual MODELS TE3 50HA TE3 80HA TE3 100HA Pump Output Gal Min to Total Head See Performance Curve See Performance Curve See Performance Curve Suction Size Inches 2 NPT Male 3 NPT Male 4 NPT Male PUMP Discharge Size Inches 2 3 4 Engine Models Honda GX120K1 WKT2 GX160K1 WKT2 GX240K1 WKT2...

Страница 7: ...INDIVIDUAL PERFORMANCE MODEL TE2 50HA INDIVIDUAL PERFORMANCE MODEL TE3 80HA INDIVIDUAL PERFORMANCE MODEL TE3 100HA Page 4 Introduction Tsurumi s Operation Service and Repair Manual ...

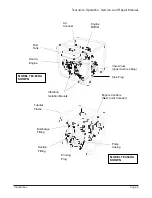
Страница 8: ...bration Isolation Mounts Suction Fitting Pump Casing Tubular Frame Engine Controls Next to Air Cleaner Honda Engine MODEL TE3 80HA SHOWN Fuel Tank Priming Plug Check Valve Under Suction Fitting Discharge Fitting MODEL TE3 50HA SHOWN Engine Muffler Air Cleaner Drain Plug ...

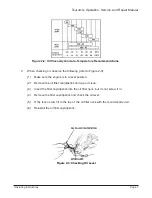
Страница 9: ...QUATE LUBRICATING CHARACTERISTICS CHECK THE OIL LEVEL WITH THE ENGINE ON A LEVEL SURFACE AND THE ENGINE STOPPED A Use Honda 4 stroke oil or use an equivalent high detergent premium quality motor oil cer tified to meet or exceed U S automobile manufacturer s requirements for Service Classification SG SF Motor oils classified SG SF will show this designation on the con tainer SAE 10W 30 is recommend...

Страница 10: ... not screw it in 4 Remove the filler cap dipstick and check the oil level 5 If the level is low fill to the top of the oil filler neck with the recommended oil 6 Reinstall the oil filler cap dipstick Operating Instructions Page 7 Tsurumi s Operation Service and Repair Manual Figure 2 2 Oil Viscosity Grade to Temperature Recommendations Figure 2 3 Checking Oil Level Figure 2 2 Oil Viscosity Grade t...

Страница 11: ...T USE SMOKING MATERIALS WHEN FILLING THE FUEL TANK DO NOT REFUEL WHILE SMOKING OR NEAR OPEN FLAME OR OTHER SUCH POTEN TIAL FIRE HAZARDS OTHERWISE FIRE ACCIDENT MAY OCCUR AVOID REPEATED OR PROLONGED CONTACT WITH SKIN OR BREATHING OF VAPOR KEEP OUT OF REACH OF CHILDREN 2 4 Check Fuel Level A Remove cap from fuel tank If fuel level is low refill with unleaded automotive gasoline B Fuel tank capacitie...

Страница 12: ...east three 3 feet one 1 meter away from buildings or other structures b Only operate centrifugal pump in a dry well ventilated area c Keep exhaust pipe clear of foreign objects d Keep centrifugal pump away from open flame a Keep centrifugal pump on a stable and level surface b Do not block centrifugal pump air vents with paper or other material 2 6 Starting and Operating the Engine A Refer to the ...

Страница 13: ... suction and discharge hoses Make sure suction hose is fitted with a strainer B Remove priming plug from top of pump and fill chamber with water C Operate the engine at idle speed for 3 to 5 minutes D After engine warm up move the throttle lever to the operating speed 2 8 Stopping the Centrifugal Pump A Move the throttle lever fully to the right B Set the ON OFF switch to OFF C Turn the fuel valve...

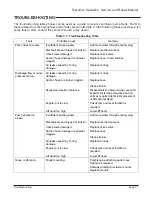
Страница 14: ...or pump pressure too low Air leaks caused by O ring damage Replace O rings Suction hose or strainer clogged Replace hose Clean strainer Excessive impeller clearance Disassemble to obtain casing cover and impeller Determine clearance and re shim as required refer to Replacement of Mechanical Seal Engine rpm too low Check rpm and reset throttle as required Lift head too high Lower lift head Pump pri...

Страница 15: ... CONTAINS POISONOUS CARBON MONOXIDE GAS CAUTION REFER TO THE HONDA ENGINE OWNER S MANUAL FOR OTHER MAINTENANCE REQUIREMENTS Table 4 1 Maintenance Schedule Frequency Maintenance Action Daily Check oil level Check all components according to the PRE OPERATIONAL CHECKS section 50 Hours Wash cleaner element Check spark plug and clean if necessary 100 Hours Change engine oil 200 Hours Adjust spark plug...

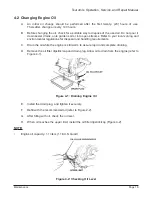
Страница 16: ...ironmental regulations for disposal and handling requirements C Drain the oil while the engine is still warm to assure rapid and complete draining D Remove the oil filler dipstick cap and drain plug Allow oil to drain from the engine refer to Figure 4 1 E Install the drain plug and tighten it securely F Refill with the recommended oil refer to Figure 2 2 G After filling with oil check the oil leve...

Страница 17: ...LY FLAMMABLE AND IS EXPLOSIVE UNDER CERTAIN CONDI TIONS DO NOT SMOKE OR ALLOW OPEN FLAMES OR SPARKS IN THE AREA A Turn the fuel valve to OFF refer to Figure 2 1 B Remove the sediment cup and O ring Wash both parts in nonflammable or high flash point solvent C Wipe the sediment cup and O ring dry then reinstall WARNING AFTER INSTALLING THE SEDIMENT CUP CHECK FOR LEAKS AND MAKE SURE THE AREA IS FREE...

Страница 18: ...OM 55 TO 109 POUNDS TO AVOID PERSONAL INJURY USE AN OVERHEAD LIFTING DEVICE OR GAIN THE ASSISTANCE OF ANOTHER PERSON TO LIFT THE PUMP ON AND OFF THE BENCH IT IS RECOMMENDED THAT THE PUMP BE ASSEMBLED AND DISASSEMBLED ON A BENCH OR SIMILAR SURFACE WITH THE ENGINE SHROUD FACING DOWN IN ADDI TION WOODEN BLOCKS IN A VARIETY OF LENGTHS AND THICKNESSES SHOULD BE AVAILABLE FOR SUPPORT OF THE ENGINE AFTER...

Страница 19: ... a hard plastic hammer sharply rap on the end of the hex on impeller 3 If impeller 3 did not come loose put a wooden block against one of the impeller vanes Then strike the wooden block counterclockwise with a hammer to loosen the impeller 6 Rotate impeller 3 until it can be removed from the threaded end of the engine crank shaft 2 17 14 15 16 9 7 31 3 A PUT TAB ON 4 IN POCKET OF 2 A MEASURE AND C...

Страница 20: ...scription of the Mechanical Seal 1 The mechanical seal 7 is a two part seal The seal consists of a fixed element and a rotating element 2 The fixed element is installed in the center bore of the cover casing The fixed ele ment is sealed between the seal and the center bore that is provided by a strip of sealant on the outside diameter of the seal 3 The rotating element is installed in the center b...

Страница 21: ...contacts the metal cup of the seal Figure 4 5 Mechanical Seal Installation Removal Tool 3 Clean bore in casing cover to remove all traces of sealant residue 4 Take the measurements needed for calculating the thickness of shim 31 The shim is sized to provide clearance between the casing cover 2 and impeller 3 a Refer to Figures 4 6 Measure and record dimension A b Refer to Figures 4 7 Measure and r...

Страница 22: ...A 0 3 mm 0 012 Inch 0 6 mm 0 024 Inch 20 x 18 mm 0 787 x 0 709 inch 801 037 801 038 TE3 80HA 0 3 mm 0 012 Inch 0 6 mm 0 024 Inch 1 0 mm 0 039 Inch 24 2 x 20 0 mm 0 952 x 0 787 inch 1001 043 1001 044 1001 045 TE3 100HA 0 3 mm 0 012 Inch 0 6 mm 0 024 Inch 1 6 mm 0 063 Inch 0 3 mm 0 091 Inch 22 2 mm 0 874 inch 1001 040 1001 041 1001 042 1001 043 Noted shim is a disk and does not have an inside diamet...

Страница 23: ...ctions in 4 11 Assembly of Centrifugal Pump 4 9 Replacement of Cushions NOTE Use wooden blocks to support the centrifugal pump frame during disassembly and assembly Refer to Figure 4 4 for location of parts used on Models TE3 50HA and TE3 80A A Replacement of Pump Cushions 24 on Models TE3 50HA and TE3 80A 1 Remove screws 30 from casing 2 and brackets 25 2 Remove nuts 27 and brackets 25 from threa...

Страница 24: ...t engine end of frame Secure with nuts 26 CAUTION MAKE SURE YOU CHECK TIGHTNESS OF THE FOUR NUTS 26 ON THE UNDERSIDE OF THE FRAME TIGHTENING THE NUTS ON THE TOP SIDE OF THE FRAME MAY LOOSEN THE NUTS ON THE UNDERSIDE OF THE FRAME 8 Install base 22 over the long threaded ends of cushions 23 Tighten nuts 23 9 Install engine 33 on base 22 Align boltholes in flange of engine 33 with holes in base 22 Ma...

Страница 25: ...1 the pump and the engine 33 during disassembly and assembly These procedures assume that the engine is installed Installation instructions for mechanical seal 7 are contained in 4 7 Replacement of Mechanical Seal A Position frame 21 with the engine 33 in normal operating position with fuel tank up B Make sure the fixed element of mechanical seal 7 is installed in casing cover 2 C Make sure the ro...

Страница 26: ... threaded end of cushion 24 Install two screws 30 through bracket and into casing 1 do not tighten N Install nuts 26 on threaded end of cushions 24 O Tighten screws 30 and nuts 26 4 11 Replacement of Check Valve A Remove three bolts 20 check valve 11 and suction case 6 B Discard damaged check valve 11 C Place the flat side of the replacement check valve 11 against the flat side of the suction case...

Страница 27: ...ures should be followed before storing your pump for periods of 6 months or longer 1 Carefully drain fuel from the fuel tank gasoline left in the fuel tank will eventually dete riorate making engine starting difficult 2 Remove the carburetor float chamber and also drain the carburetor 3 Change engine oil 4 Check for loose bolts and screws tighten if necessary 5 Clean pump thoroughly with oiled clo...

Страница 28: ...tings that provide part number description and quantity The item numbers shown on the illustrations cor respond with the item numbers in the facing parts listing 6 2 Ordering Parts Order replacement parts from Tsurumi America Inc 1625 Fullerton Ct Glendale Heights IL 60139 Tel 1 630 793 0127 Fax 1 630 793 0146 E mail info tsurumiamerica com Replacement Parts Page 25 Tsurumi s Operation Service and...

Страница 29: ...A Centrifugal Pump 1 2 3 4 5 13 12 11 10 9 8 7 6 14 15 16 17 21 26 13 12 21 20 19 18 25 22 23 24 ENGINE FLANGE PUMP SIDE ENGINE SIDE 25 25 25 PUMP LUG 29 25 Page 26 Replacement Parts Tsurumi s Operation Service and Repair Manual ...

Страница 30: ...Seal Packing 7 8 x 13 5 x 3 3t 4 18 501 030HV Frame Cage 1 19 501 038 Bracket 2 20 501 003 Bolt Hex M10 x 30 SW Bracket to Pump 2 21 501 014 Bolt Hex M8 x 25L SW Discharge Bend Suction Flange 7 22 1001 032 Cushion Rubber Pump Side 2 23 501 037 Cushion Rubber Engine Side 2 24 501 024 Nut Spring M8 F Engine to Cushion 2 25 1001 024 Nut Spring M8 F Cushions to Frame Pump to Cushion 6 26 501 042 Shim ...

Страница 31: ...surumi s Operation Service and Repair Manual Exploded View Model TE3 80HA Centrifugal Pump 1 2 3 4 5 13 12 11 10 9 8 7 6 14 15 16 17 21 27 13 12 22 20 19 18 26 23 24 25 ENGINE FLANGE PUMP SIDE ENGINE SIDE 26 26 26 PUMP LUG 30 26 ...

Страница 32: ... x 13 5 x 3 3t 4 18 801 030HV Frame Cage 1 19 501 038 Bracket 2 20 501 003 Bolt Hex M10 x 30L SW Bracket to Pump 2 21 501 014 Bolt Hex M8 x 25L SW Discharge Bend 4 22 801 014 Bolt Hex M8 x 30L SW Suction Flange 3 23 1001 032 Cushion Rubber Pump Side 2 24 501 037 Cushion Rubber Engine Side 2 25 501 024 Nut Spring M8 F Engine to Cushion 2 26 1001 024 Nut Spring M8 F Cushion to Frame Bracket to Cushi...

Страница 33: ...i s Operation Service and Repair Manual Exploded View Model TE3 100HA Centrifugal Pump PUMP SIDE ENGINE SIDE ENGINE MOUNTING FLANGE 1 2 3 4 5 13 12 11 10 8 7 6 14 15 16 17 22 29 13 12 20 19 23 18 25 26 28 28 33 25 25 25 25 21 30 9 24 ...

Страница 34: ...er Plain M8 4 17 501 006 Seal Packing 7 8 x 13 5 x 3 3t 4 18 501 003 Bolt Hex M10 x 30 SW 4 19 501 003 Bolt Hex M10 x 30 SW 4 20 501 003 Bolt Hex M10 x 30 SW 4 21 1001 030H Frame Cage 1 22 1001 031H Base 1 23 1001 032 Cushion Rubber 4 24 1001 034 Bracket 2 25 1001 024 Nut Spring M8 F 8 26 1001 023 Bolt Hex M10 x 45 SW 4 27 1001 033 Nut Flange M10 F 4 28 1001 014 Bolt Hex M10 x 20 SW 4 29 1001 033 ...

Отзывы: